
Removing
1. Apply the parking brake, jack up the front of the vehicle and place it on jackstands.
2. Unscrew the wheel bolts and remove the wheel whose brake caliper is to be removed.
3. Remove the protective caps of the caliper mounting bolts.
4. Unscrew both bolts of fastening of a support and remove a support.
Attention! If the caliper will be removed only in order to dismantle the brake disc, then do not disconnect the brake hose of the wheel brake cylinder from the caliper, because after installation the brake system will have to be pumped.
Attention! Be careful not to damage the ABS sensor wire when removing the caliper.
5. Fix a support on a body by means of a wire. The brake hose must not be kinked or stretched.
6. Remove both brake pads.
7. Pinch the brake hose near the caliper with a special clip if the hose is disconnected. It is also recommended to unscrew the cap of the brake fluid reservoir, cover the opening with plastic wrap and screw on the cap. This technique helps to minimize the loss of brake fluid when the hose is disconnected from the caliper.
8. Clean the area around the brake hose coupling, then unscrew the coupling bolt and separate the hose from the caliper. Be prepared for some brake fluid to come out. Plug the hose and caliper openings to prevent dirt from entering the hydraulic actuator. Sealing gaskets when installing the hose should be replaced with new ones.
9. Unscrew both guide pins and disconnect the brake pad guide from the steering knuckle (see illustrations).


Bulkhead
10. Place the caliper on the workbench and clean it with a special cleaner.
Attention! Use a respirator because the surface of the caliper may contain dust from the brake pads.
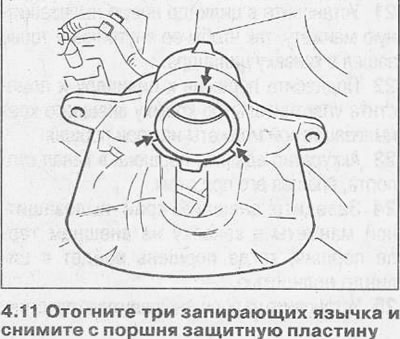
11. Bend back the three locking tabs and remove the protective plate from the piston (see illustration).
12. Remove the piston from the caliper and remove the dust cuff. The piston can be removed manually or pushed out with air by feeding it into the bore of the brake pipe coupling, for example, using a pump. Place a piece of wood between the piston and caliper to prevent the piston from falling out.
Attention! When performing this operation, use goggles to avoid getting brake fluid into your eyes. Do not try to catch the piston with your hand.
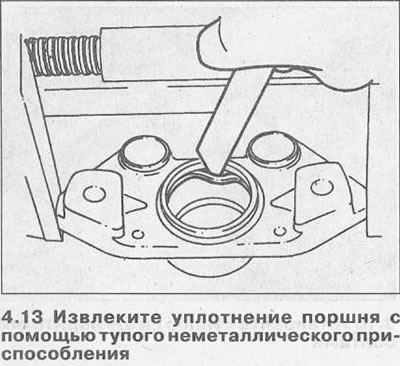
13. Remove the piston seal using a blunt, non-metallic tool, being careful not to damage the cylinder wall (see illustration).
14. Press out the rubber guide bushings using a suitable drift.
15. Thoroughly clean all parts with clean brake fluid. Never use mineral solvents for this (gasoline, kerosene), as they are aggressive towards rubber components. Dry the parts with compressed air or a clean, dense (lint-free) cloth, and then blow air through the holes.
16. Inspect all components and replace worn or damaged parts. Pay special attention to the cylinder walls and piston. Parts must be replaced if they are scratched, worn or corroded.
Attention! Do not attempt to remove corrosion or minor damage from a piston or cylinder with emery cloth or any other tool. These parts are beyond repair and must be replaced with new ones.
17. Check up a condition of directing fingers and their plugs. The bolts must not be damaged and must not fit tightly into the bushings. If there is any doubt about the condition of any component, replace it.
18. Replace new piston seals and dust seal if the caliper assembly is fit for further use, as well as a tube of special paste for brake cylinders.
19. Apply a small amount of paste to the walls of the caliper channel, the piston and its seal.
20. Install the piston seal into the groove in the caliper cylinder without using any tools as they may damage the seal.
21. Install a new dust seal into the cylinder so that its inner end fits into the groove of the cylinder.
22. Bring the piston to the cylinder and place the sealing lip of the outer edge of the dust seal on the edge of the piston.
23. Gently press the piston into the caliper channel while rotating it.
24. Insert the outer edge of the dust seal into the groove on the outer end of the piston when the piston is fully seated in the cylinder.
25. Install the protective plate on the piston and bend the three locking tabs, placing them in their respective recesses.
26. Moisten the rubber caliper guide bushings with a little soapy water, then install them in their mounting location.
27. Clean the brake shoe guide from dust and corrosion using a wire brush. Pay special attention to the surfaces that are in contact with the brake pads.
Installation
28. Install the brake shoe guide on the steering knuckle, screw in and tighten the mounting bolts with a force of 230 Nm.
29. Apply a small amount of high temperature grease to the mating surfaces of the metal bearings and the brake shoe guide.
Attention! When applying lubricant, do not allow it to get on the surface of the brake linings and brake disc.
30. Install the inner and outer brake pads into the caliper and pad guide. Make sure the pads move easily in the guides.
31. Set the caliper to the working position so that the piston rests against the base of the inner pad, and the outer edge of the caliper against the base of the outer pad. Make sure the springs at the edge of the pads are resting on the inside of the caliper and are not caught in the caliper's inspection port.
32. Thoroughly clean the threads of the caliper mounting bolts, screw in and tighten with a force of 30 Nm.
33. Close the bolt heads with protective caps.
34. Place new seals on each side of the brake hose coupler and screw it into the caliper. Make sure the brake hose coupling is correctly positioned in relation to the lug on the caliper and tighten the coupling bolt to 40 Nm.
35. Remove the clip from the brake hose, with which it was pinched to prevent leakage of brake fluid.
36. Attach the brake pad wear sensor.
37. Remove air from the brake system, see the relevant chapter.
38. Install the wheels in accordance with the marks made during removal and secure with bolts.
Lower the vehicle and tighten the wheel bolts in a criss-cross pattern to 110 Nm.
Attention! Depress the brake pedal with force several times until a strong resistance is felt. When this action is performed, the brake pads are centered and they self-adjust to the working position.
39. Check the brake fluid level in the expansion tank. If necessary, top up to the maximum mark.
40. Check the operation of the brake system.
Visitor comments