


J60, J61
1. Raise and secure the vehicle.
2. Remove the front wheel from the vehicle.
Caution: Do not press the brake pedal when the caliper is removed from the brake disc to prevent damage to the brake system components.
3. Unscrew the hollow bolt (1) securing the brake hose.
Note: Tightening torque: 40 Nm.
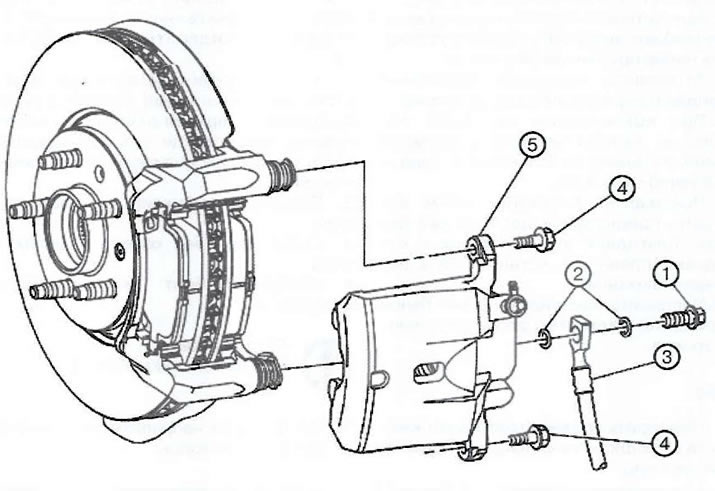
4. Remove the two brake hose gaskets (2).
Note: Always use new gaskets (2) each time you install the brake hose.
5. Disconnect the front brake hose (3). Plug the holes to prevent brake fluid from leaking out and contaminants from entering the brake system.
6. Loosen the two bolts (4) of the brake caliper guide pins. Check the brake caliper guide pins for smooth movement and the condition of the dust boots. By moving the guide pins in the holes of the caliper bracket inward and outward, without disconnecting them from the dust boots, check the following:
- Limiting the movement of guide pins.
- Looseness in the caliper bracket.
- Jamming or seizing of guide pins.
- Cracked or damaged anthers.
If any of the above defects are found, replace the guide pins and/or boots.
Note: Tightening torque: 27 Nm.
7. Remove the front brake caliper (5).
8. Installation is carried out in the reverse order of removal.
Caution: When bleeding the brake system when replacing a brake caliper, the pressure in the system may be higher than during normal bleeding. Make sure that the bleed hose is securely fastened to the bleed nipple before opening the nipple. If it is not fastened properly, the hose may come off when opening the nipple, which may cause brake fluid to spray out.
Bleeding the brake system to remove air from it must be done after each depressurization of the brake system for repair. Failure to comply with this rule may lead to failure of the brake system and, as a result, to a traffic accident with a risk to life.
J62
1. Check the brake fluid level in the expansion tank of the master brake cylinder:
- If the brake fluid level is halfway between the lower and upper marks, no additional operations with the brake fluid are required.
- If the brake fluid level is above the midpoint between the lower and upper marks, it is necessary to remove some of the brake fluid using a syringe before starting work.
[Information taken from the website opelbook.ru]
2. Raise and secure the vehicle.
3. Remove the front wheel from the vehicle.
4. Unscrew the hollow bolt (1) securing the brake hose to the caliper and remove the brake hose.
Note: Tightening torque: 40 Nm.
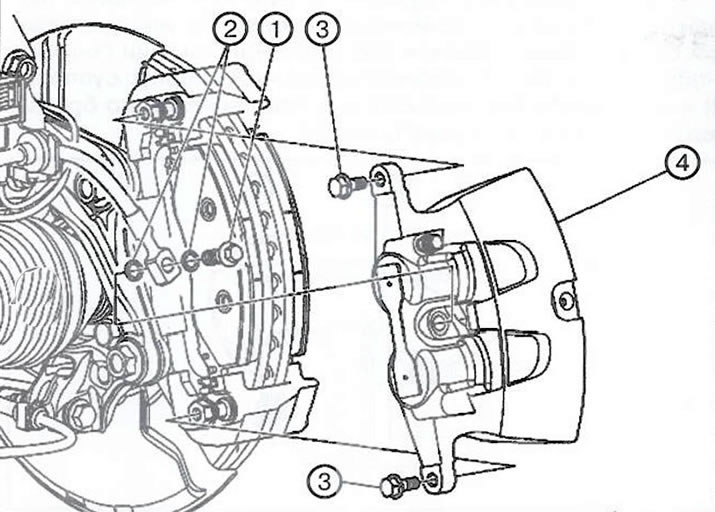
5. Remove the two copper washers (2) from the brake hose. Plug the holes in the brake hose and caliper to prevent brake fluid from leaking out and contaminants from entering the system.
Note: Use only new brake hose gaskets (2) during installation.
6. Loosen the two bolts (3) of the brake caliper guide pins and remove the brake caliper from the mounting bracket. Check the brake caliper guide pins for smooth movement and the condition of the dust boots. By moving the guide pins in the holes of the caliper bracket inward and outward, without disconnecting them from the dust boots, check the following:
- Limiting the movement of guide pins.
- Looseness in the caliper bracket.
- Jamming or seizing of guide pins.
- Cracked or damaged anthers.
If any of the above defects are found, replace the guide pins and/or boots.
Note: Tightening torque: 32 Nm.
7. Remove the front brake caliper (5).
8. Installation is carried out in the reverse order of removal.
Attention.
- When bleeding the brake system when replacing a brake caliper, the pressure in the system may be higher than during normal bleeding. Make sure that the bleed hose is securely fastened to the bleed nipple before opening the nipple. If it is not fastened properly, the hose may come off when opening the nipple, which may cause brake fluid to spray out.
- Bleeding the brake system to remove air from it must be done after each depressurization of the brake system for repair. Failure to comply with this rule may lead to failure of the brake system and, as a result, to a traffic accident with a risk to life.
J64
1. Raise and secure the vehicle.
2. Remove the front wheel from the vehicle.
3. Remove the brake pads.
4. Loosen the hollow bolt (1) securing the brake hose to the caliper. Plug the holes in the brake hose and caliper to prevent brake fluid from leaking out and contaminants from entering the system.
Caution: Do not press the brake pedal when the caliper is removed from the brake disc to prevent damage to the brake system components.
Note: Tightening torque of hollow bolt (1): 40 Nm.
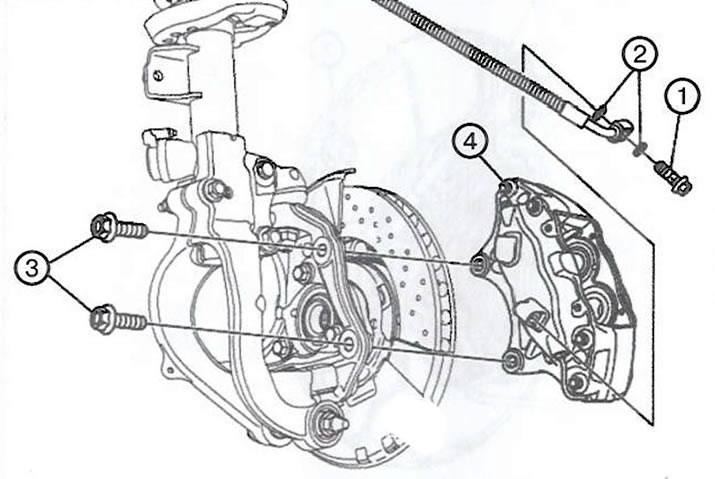
Caution: Do not press the brake pedal when the caliper is removed from the brake disc to prevent damage to the brake system components.
Note: Tightening torque of hollow bolt (1): 40 Nm.
Visitor comments