
OpelBook.ru
Cars AvtoVAZ Cars Mitsubishi Cars BMW Cars Mercedes Cars Nissan Cars Toyota Cars Chevrolet
English Русский
Български
Беларускі
Український
Српски
Hrvatski
Română
Polski
Slovenský
Magyar
 |  Sitemap  |  Contacts  |    


Main Astra Corsa Insignia Kadett Omega Vectra Zafira Others Articles
Omega A (1986-1993) Omega B (1993-1999) Omega B2 (1999-2003)
  • Main
  • Omega
  • Omega A
  • Chassis
  • Brake system
  • Front Brake Caliper — Removal, Repair and Installation

Front Brake Caliper — Removal, Repair and Installation (Opel Omega A)

            0

1. Apply the handbrake, jack up the front of the car and secure it on axle stands. Remove the wheel.

2. Install the clamp on the high pressure brake line pipe to the brake caliper.

3. Remove the brake pads as described in Chapter 3.

4. Unscrew the hollow bolt securing the high-pressure brake line pipe to the caliper and remove the two copper gaskets (photo).
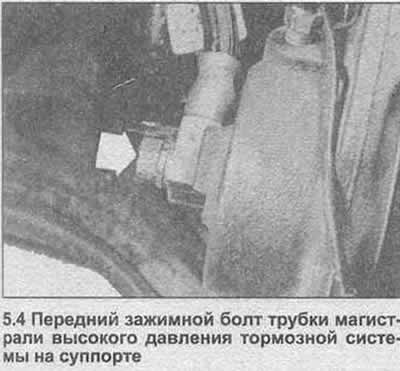
4. Unscrew the hollow bolt securing the high-pressure brake line pipe to the caliper and remove the…


5. Use a screwdriver to lift the caps of the caliper mounting bolts (photo).
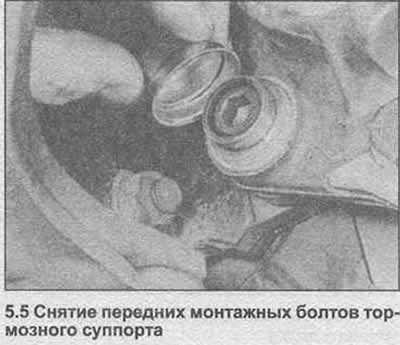
5. Use a screwdriver to lift the caps of the caliper mounting bolts (photo).


6. Using a socket wrench, loosen the mounting bolts and remove the caliper from the steering knuckle.

7. Clean the outer surfaces of the caliper.

8. Remove the outer plastic caps of the sliding sleeves using a lever.

9. Using a lever, remove the dust cap from the caliper and piston.


10. Press the sliding sleeves slightly inward and remove the caps from their grooves.

11. Remove the sliding sleeves, but remember their locations.

12. Place a block inside the caliper in place of the brake disc pads, then using air pressure from an air line or foot pump through the fluid inlet, carefully pry the piston out of the cylinder. Remove the piston.

13. Unscrew the shield.

14. Use a lever to remove the piston seal from the cylinder, being careful not to scratch the surface.
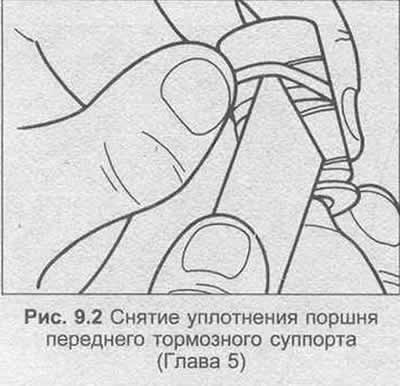
14. Use a lever to remove the piston seal from the cylinder, being careful not to scratch the…


15. Clean the piston and cylinder with methylated spirits and allow to dry. Inspect the piston and cylinder bore surfaces for wear, damage and corrosion. If defects are evident, replace the entire caliper, but if the surfaces are in good condition, use a repair kit that includes a piston seal and dust cap. Also buy a tube of brake cylinder paste.

16. Apply a small amount of paste to the contact area of the brake cylinder to the piston, cylinder bore and piston seal.

17. Position the piston seal in the cylinder groove, then gently insert the piston until it enters the insulation. It may be necessary to rotate the piston to prevent this from pinching the insulation.
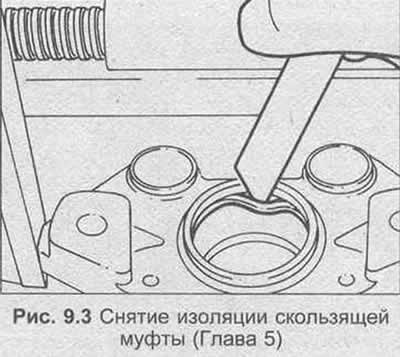


17. Position the piston seal in the cylinder groove, then gently insert the piston until it enters…


The article was published on the website: OpelBook.ru

18. Loosen the dust cap in the piston groove, then press it into the caliper using a suitable length of metal tube.

19. Install the shield and tighten the bolts with the specified tightening force Specification.

20. Check the sliding couplings for wear and condition of the insulation.

21. Insert the sliding sleeves into the caliper.

22. Install the inner heads onto the sliding sleeves and press them onto the caliper using metal tubes of suitable length.

23. Install the outer heads on the sliding couplings in the same way.

24. To install the caliper, place it on the steering knuckle, insert the mounting bolts and tighten them to the specified tightening torque Specification.

25. Install the plastic caps onto the mounting bolts.

26. Using new copper washers, insert the bolt through the hole in the brake high pressure line connection and tighten to the specified torque Specification.

27. Check that the caliper moves freely in the sliding sleeves.

28. Install the brake pads in accordance with Chapter 3.

29. Remove the clamp on the brake high-pressure line tube or the protective polyethylene covering and bleed the hydraulic system as described in Chapter 13. If there was no loss of brake fluid, it is enough to bleed the caliper that was removed, however, if brake fluid was leaked, bleed the entire system.

30. Install the wheel and lower the car to the ground.


This article is available at russian, bulgarian, belarusian, ukrainian, serbian, croatian, romanian, polish, slovak, hungarian
Checking the article: Zinoviev Kirill

Share information:

Previous articles
Opel Omega A: Brake system
Next articles

Rear Brake Pads — Inspection and Replacement
Front Brake Pads — Inspection and Replacement
Technical support
General description
Brake system specifications
Rear Brake Caliper — Removal, Repair and Installation
Brake disc — inspection, removal and installation
Handbrake shoes — inspection and replacement
Handbrake cable — removal and installation
Handbrake lever — removal and installation
Master Cylinder — Removal, Adjustment and Installation


See similar ones from other Opel car manuals:
▶ Front Brake Caliper — Removal, Repair and Installation Opel Astra F (1991-1998, petrol)
▶ Front Brake Caliper — Removal, Repair and Installation Opel Zafira A (1999-2005, petrol)
▶ Front Brake Caliper Repair Opel Frontera B (1998-2004)
▶ Removal, repair and installation of front wheel disc brake… Opel Corsa B (1993-2000)
▶ Replacing the front brake caliper Opel Insignia A (2008-2017)
Link to this page in different formats

Visitor comments


No comments yet


How much will 20 + 25 =


Omega B2 (1999-2003) 
  • General information
  • User manual
  • Maintenance
  • Troubleshooting
  • Power unit
  • Petrol 4-cylinder
  • Petrol 6-cylinder
  • Engine overhaul
  • Diesel engines 2.0 l
  • Diesel engines 2.5 l
  • Cooling and heating
  • Injection system (gasoline)
  • Fuel system (diesel)
  • Fuel system
  • Exhaust system
  • Ignition system
  • Transmission
  • Clutch
  • Mechanical gearbox
  • Automatic gearbox
  • Main gear and shafts
  • Chassis
  • Brake system
  • Car suspension
  • Steering
  • Body
  • Body elements
  • Electrical equipment
  • Equipment and devices
  • Electrical circuits
Omega B (1993-1999) 
  • General information
  • User manual
  • Tips for the car owner
  • Maintenance (gasoline)
  • Maintenance (diesel)
  • Power unit
  • Petrol engine SOHC 2.0 l
  • Petrol engine DOHC 2.0 l
  • Petrol engines 2.5 and 3.0 l
  • Repair of gasoline engines
  • Diesel engine 2.0 l
  • Diesel engine repair 2.0 l
  • Diesel engine 2.5 l
  • Cooling and heating
  • Power system (petrol)
  • Emission reduction
  • Fuel system (diesel 2.0 l)
  • Fuel system (diesel 2.5 l)
  • Launch system
  • Ignition system
  • Transmission
  • Clutch
  • Mechanical gearbox
  • Automatic gearbox
  • Drive shafts
  • Chassis
  • Brake system
  • Wheel suspension
  • Steering
  • Body
  • Exterior
  • Interior
  • Doors and windows
  • Electrical equipment
  • Equipment and devices
  • Wiring diagrams (early)
  • Wiring diagrams (late)
Omega A (1986-1993) 
  • General information
  • User manual
  • Maintenance
  • Changes and additions
  • Troubleshooting
  • Power unit
  • Gasoline engines
  • Diesel engines
  • Cooling system
  • Fuel system (gasoline)
  • Fuel system (diesel)
  • Ignition system
  • Transmission
  • Clutch
  • Mechanical gearbox
  • Automatic gearbox
  • Cardan shaft
  • Drive shafts
  • Chassis
  • Brake system
  • Car suspension
  • Steering
  • Body
  • Exterior
  • Interior
  • Electrical equipment
  • Power devices
  • Lighting and appliances
  • Electrical circuits
OpelBook.ru © 2017–2026 · Mobile version · · Sitemap: EN BG BY UA RS HR RO PL SK HU · Feedback · Site search
Astra F, petrol · Astra G, petrol · Astra G · Astra H · Astra J, petrol · Corsa B · Corsa C, petrol · Corsa C · Insignia A · Kadett D · Kadett E · Omega A · Omega B · Omega B2 · Vectra A, petrol · Vectra A · Vectra B, petrol · Vectra B · Vectra C · Zafira A, petrol · Frontera A, petrol · Frontera B · Ascona C · Vivaro A ·
We want your visit to be comfortable 🤝! We use cookies 🍪 to make that happen.