
OpelBook.ru
Cars AvtoVAZ Cars Mitsubishi Cars BMW Cars Mercedes Cars Nissan Cars Toyota Cars Chevrolet
English Русский
Български
Беларускі
Український
Српски
Hrvatski
Română
Polski
Slovenský
Magyar
 |  Sitemap  |  Contacts  |    


Main Astra Corsa Insignia Kadett Omega Vectra Zafira Others Articles
Insignia A (2008-2017)
  • Main
  • Insignia
  • Insignia A
  • Chassis
  • Brake system
  • Checking the hardware for mounting the front brake pads

Checking the hardware for mounting the front brake pads (Opel Insignia A)

            0

Checking the hardware for mounting the front brake pads


1. Check the brake fluid level in the expansion tank of the master brake cylinder.
  • If the brake fluid level is halfway between the lower and upper marks, no additional operations with the brake fluid are required.
  • If the brake fluid level is above the midpoint between the lower and upper marks, it is necessary to remove some of the brake fluid using a syringe before starting work.

2. Raise and secure the vehicle.

3. Remove the front wheel from the vehicle.

4. Compress the brake caliper body and try to move it up and down and back and forth relative to the caliper bracket. If excessive play is detected, the brake caliper bracket bushings and/or brake caliper bolts must be replaced.

5. Compress the front brake caliper pistons:
  • Install a large C-clamp through the top of the caliper body against the back of the outer pad.
  • Slowly tighten the C-clamp to fully compress the pistons into the caliper bores.
  • Remove the C-clamp from the caliper.

6. With the pistons pressed into the caliper bores, compress the brake caliper body and move it back and forth on the brake caliper mounting bolts. Check for smooth movement. If a lot of force is required to move the caliper body or the caliper body does not move smoothly, check the brake caliper mounting bolts and/or caliper bracket bushings for wear or damage. If defects are found, replace the brake caliper mounting bolts and/or caliper bracket bushing.


7. Remove the brake caliper mounting bolts from the caliper bracket and secure the caliper with strong wire. Do not disconnect the brake hoses from the caliper.

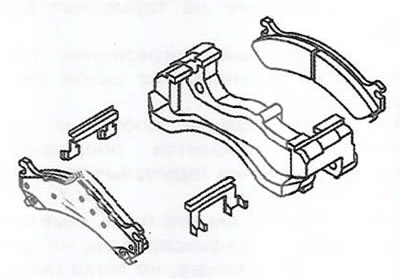
8. Remove the brake pads from the brake caliper bracket.

9. Check the brake shoe mounting hardware for the following:
  • Loss of fastening elements.
  • Excessive corrosion.
  • Deformation of mounting keys.
  • Looseness in the brake caliper bracket.
  • Weakness in the brake pads.
  • Excessive contamination of the mounting surfaces on the caliper bracket and threads.

10. If any of the listed defects are detected, the brake pad mounting equipment must be replaced.

11. Make sure the brake pads are securely locked into place on the caliper bracket but move easily over the mounting elements without binding.
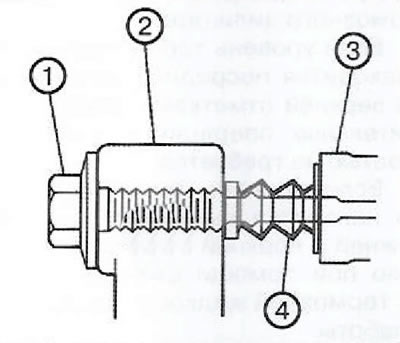
11. Make sure the brake pads are securely locked into place on the caliper bracket but move easily…


12. Check the caliper bolts (1) for the following:
  • Jamming.
  • Grasping.
  • Looseness in the caliper bracket (3).
  • Deformation or damage to the brake caliper mounting bolts.
  • Cracking or lifting of anthers (4).
  • Absence of anthers.
  • Deformation or damage to the caliper bracket (3).

13. If any of the listed defects are detected, the brake pad fastening elements must be replaced.


14. Install the brake pads onto the caliper bracket.

15. Install the brake caliper onto the mounting bracket.


This article is available at russian, bulgarian, belarusian, ukrainian, serbian, croatian, romanian, polish, slovak, hungarian
Checking the article: Zinoviev Kirill

Share information:

Previous articles
Opel Insignia A: Brake system
Next articles

Replacing the front brake pads
Checking brake pads
Replacing the modulator valve lines
Replacing brake hoses
Replacing the front brake line
Replacing the brake system expansion tank
Replacing the front brake caliper
Replacing the brake caliper bracket
Checking the technical condition of the brake caliper
Replacing the front brake disc
Checking the technical condition of brake discs
Regrinding of brake discs


See similar ones from other Opel car manuals:
▶ Front Brake Pads — Checking, Removing and Installing Opel Omega B2 (1999-2003)
▶ Front Brake Pads — Removal Opel Astra F (1991-1998, petrol)
▶ Replacing the front disc brake pads Opel Corsa C (2000-2006)
▶ Checking brake pads Opel Vectra A (1988-1995, petrol)
▶ Front brake pads — replacement Opel Zafira A (1999-2005, petrol)
Link to this page in different formats

Visitor comments


No comments yet


How much will 42 + 30 =


Insignia A (2008-2017) 
  • General information
  • Repair on the road
  • Daily checks
  • Operation and maintenance
  • Safety and tool
  • Power unit
  • Petrol engines 1.6 l
  • Petrol engines 2.0 l
  • Diesel engines 2.0 l
  • Diesel engines 2.8 l
  • Cooling system
  • Lubrication system
  • Supply system
  • Engine management
  • Intake and exhaust system
  • Engine electrical equipment
  • Transmission
  • Clutch
  • Mechanical gearbox
  • Automatic gearbox
  • Transfer case
  • Drive shafts
  • Chassis
  • Wheel suspension
  • Brake system
  • Steering
  • Body
  • Exterior
  • Interior
  • Passive safety
  • Heater and air conditioner
  • Electrical equipment
  • Electrical circuits
OpelBook.ru © 2017–2026 · Mobile version · · Sitemap: EN BG BY UA RS HR RO PL SK HU · Feedback · Site search
Astra F, petrol · Astra G, petrol · Astra G · Astra H · Astra J, petrol · Corsa B · Corsa C, petrol · Corsa C · Insignia A · Kadett D · Kadett E · Omega A · Omega B · Omega B2 · Vectra A, petrol · Vectra A · Vectra B, petrol · Vectra B · Vectra C · Zafira A, petrol · Frontera A, petrol · Frontera B · Ascona C · Vivaro A ·
We want your visit to be comfortable 🤝! We use cookies 🍪 to make that happen.