


J60, J61
1. Check the brake fluid level in the brake system expansion tank:
- If the brake fluid level is halfway between the lower and upper marks, no additional operations with the brake fluid are required.
- If the brake fluid level is above the midpoint between the lower and upper marks, it is necessary to remove some of the brake fluid using a syringe before starting work.
2. Raise and secure the vehicle.
3. Remove the front wheel from the vehicle.
4. Loosen the guide pin bolt (1).
Note: Tightening torque: 28 Nm.
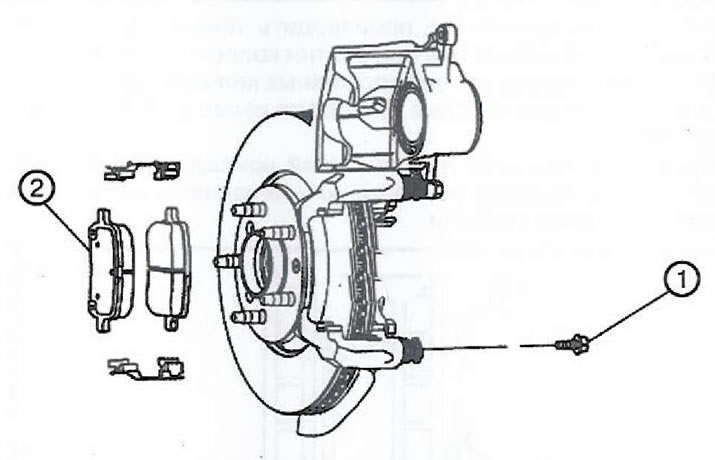
5. Without disconnecting the brake hose, turn the caliper upward and secure it with strong wire or something similar.
Caution: Support the brake caliper with a strong wire or something similar to prevent the weight of the caliper from placing pressure on the brake hose, which may damage the brake hose and cause brake fluid leaks.
(Article published on the website: «OPELBOOK.ru»)
6. Remove the brake pads (2) from the caliper bracket.
7. Remove the two spring brake shoe holders.
8. Clean the contact surfaces of the caliper bracket with the brake pad mounting hardware from any dirt or corrosion. Check the freedom of movement of the brake caliper guide pins and the condition of the guide pin boots. By moving the guide pin in and out of the caliper bracket bore without disconnecting it from the boots, check the following:
- Limiting the movement of the guide pin.
- Looseness in the caliper bracket.
- Guide pins jammed.
- Twisting or damage to anthers.
9. If any of the above defects are detected, replace the guide pins and/or dust boots with new ones.
10. If new brake pads are installed, discard the old ones and install new spring retainers.
11. Install the front brake pads in the reverse order of removal.
12. With the engine off, gradually press the brake pedal approximately ⅔ of the total travel and slowly release it.
13. Wait 15 seconds, then repeat the previous step two or three more times. This will ensure that the pistons and pads are correctly positioned in the working position.
14. Fill the expansion tank with brake fluid to the required level.
J62
1. Check the brake fluid level in the brake system expansion tank:
- If the brake fluid level is halfway between the lower and upper marks, no additional operations with the brake fluid are required.
- If the brake fluid level is above the midpoint between the lower and upper marks, it is necessary to remove some of the brake fluid using a syringe before starting work.
2. Raise and secure the vehicle.
3. Remove the front wheel from the vehicle.
4. Loosen the guide pin bolt (1).
Note: Tightening torque: 32 Nm.
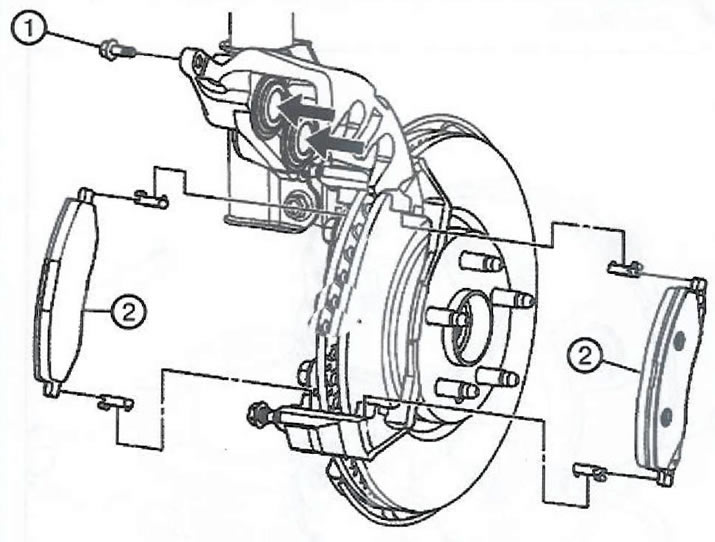
5. Without disconnecting the brake hose, turn the caliper upward and secure it with strong wire or something similar.
Caution: Support the brake caliper with a strong wire or something similar to prevent the weight of the caliper from placing pressure on the brake hose, which may damage the brake hose and cause brake fluid leaks.
6. Remove the brake pads (2) from the caliper bracket.
7. Remove the four brake shoe spring retainers.
8. Clean the contact surfaces of the caliper bracket with the brake pad mounting hardware from any dirt or corrosion. Check the freedom of movement of the brake caliper guide pins and the condition of the guide pin boots. By moving the guide pin in and out of the caliper bracket bore without disconnecting it from the boots, check the following:
- Limiting the movement of the guide pin.
- Looseness in the caliper bracket.
- Guide pins jammed.
- Twisting or damage to anthers.
9. If any of the above defects are detected, replace the guide pins and/or dust boots with new ones.
10. If new brake pads are installed, discard the old ones and install new spring retainers.
11. Install the front brake pads in the reverse order of removal.
12. With the engine off, gradually press the brake pedal approximately ⅔ of the total travel and slowly release it.
13. Wait 15 seconds, then repeat the previous step two or three more times. This will ensure that the pistons and pads are correctly positioned in the working position.
14. Fill the expansion tank with brake fluid to the required level.
J64
1. Check the brake fluid level in the brake system expansion tank:
- If the brake fluid level is halfway between the lower and upper marks, no additional operations with the brake fluid are required.
- If the brake fluid level is above the midpoint between the lower and upper marks, it is necessary to remove some of the brake fluid using a syringe before starting work.
2. Raise and secure the vehicle.
3. Remove the front wheel from the vehicle.
4. Loosen the guide pin bolt (1).
Note: Tightening torque: 32 Nm.
5. Remove the two brake shoe guide pins (1).
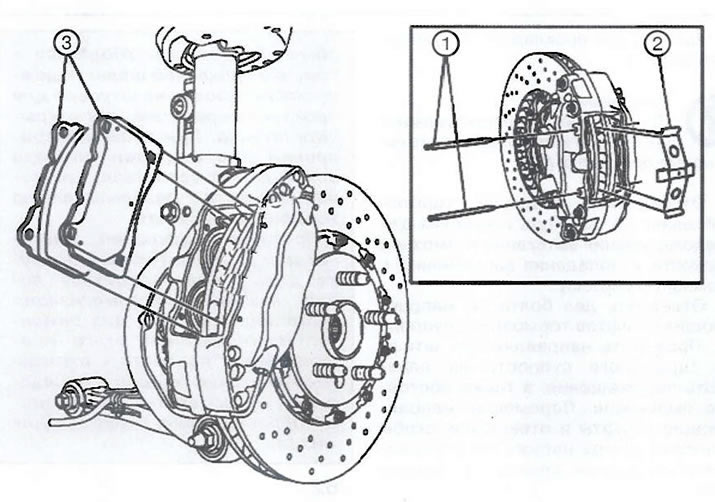
6. Check the guide pins. If they are damaged or corroded, replace them with new ones. Do not attempt to remove corrosion from the guide pins.
Note: When reinstalling, ensure that the guide pins are fully seated in the caliper bracket.
7. Remove the brake shoe spring retainers.
Note: If new brake pads are installed, discard the old ones and install new spring retainers.
8. Using a spreader, carefully press the pistons into the caliper holes until they stop.
9. Check the caliper piston dust boots for damage and/or wear due to material aging; replace with new ones if any defects are found.
10. Clean the contact surfaces of the caliper bracket with the brake pad mounting hardware from any dirt or corrosion.
11. Install the brake pads in the reverse order of removal.
12. With the engine off, gradually press the brake pedal approximately ⅔ of the total travel and slowly release it.
13. Wait 15 seconds, then repeat the previous step two or three more times. This will ensure that the pistons and pads are correctly positioned in the working position.
14. Fill the expansion tank with brake fluid to the required level.
Visitor comments