
Raise the front of the car and secure it.
Remove the wheel.
Turn the wheel.
On vehicles with a monitoring system, use a small screwdriver to carefully pry the brake pad wear indicator wire connector out of the inner lining recess.
Pry out the clip on the outside of the brake caliper with a screwdriver.
On the inside of the caliper, remove the protective caps from the guide pins.
Now install the Allen key (7 mm) into the exposed hexagon of the guide pins and loosen the bolts.
Press out the brake caliper housing.
Remove the brake caliper housing.
The inner brake lining is fixed to the brake piston with a clamp - remove the lining.
In order for the body of the brake caliper not to pull the brake hose, it is tied with a cord or wire. If necessary, release the clip and remove the brake hose from the bracket on the shock strut.
Clean the brake pad guides in the brake caliper with alcohol and a rag.
Install new brake pads.
Clamp back the piston in the brake caliper.

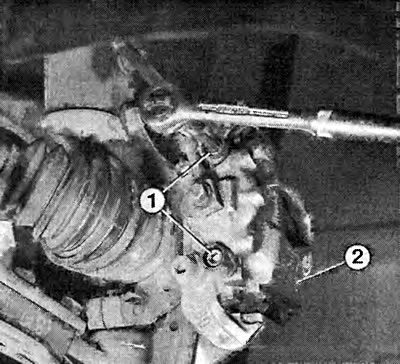
Left:the wire (1) control system sensor is clipped to the inner brake lining (2).
On right:the coupling collar is pressed from the brake caliper with a screwdriver.
After loosening the guide bolts (1) You can remove the brake caliper housing.
Install the brake caliper housing.
Tighten the guide bolts to 30 Nm and reinstall the protective caps.
Install a clamp on the outside of the brake caliper. If necessary, install the tie-down strap on the suspension strut.
Push the brake pad wear indicator wire into the recess in the inner pad.
After assembling, depress the brake pedal several times so that the pads lie against the brake disc. Otherwise, there will be no braking effect!
With new brake pads, brake carefully for the first 200 km - if possible.
Tip: If the lapped brake pads are used again, they must be installed in the same place. Changing from outside to inside or vice versa, or from one wheel to another, can result in an uneven braking effect.
Removing the front brake caliper
Remove the brake pads.
With the monitoring system, use a screwdriver to press the connector of the wire of the brake lining wear indicator out of the recess of the inner lining.
Where there is, wring out the protective caps of the brake caliper mounting bolts with a screwdriver or chisel.
Remove the brake caliper mounting bolts.
Suspend the brake caliper or brake caliper housing with the brake hose screwed on so that the hose is not under tension. If necessary, release the clamp and remove the brake hose from the bracket on the suspension strut.
Depress and hold the brake pedal to prevent leakage of brake fluid (see «work advice» in this chapter).
Lubricate both fixing bolts with protective compound during assembly and tighten them to 95 Nm. Then tighten the bolts by 30-45°.
Screw on the brake hose with a new O-ring (40 Nm). If necessary, mount the tie-down strap on the suspension strut.
Press the brake pad wear indicator wire connector into the recess in the inner lining.
If the brake hose is unscrewed, bleed the brake system.
Depress the brake pedal several times before driving for the first time to adjust the pedal clearance to normal.
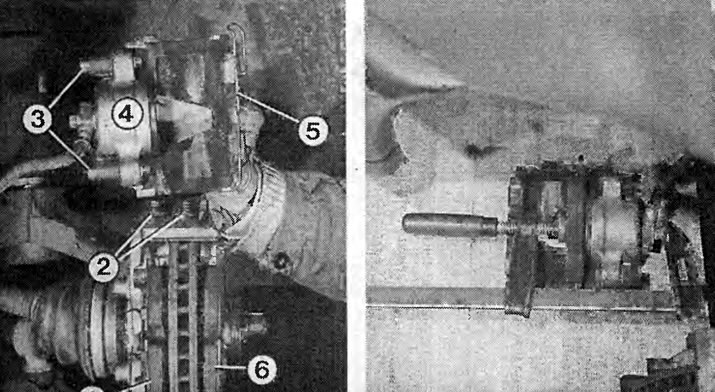
Left:removed brake caliper housing. The numbers indicate:
1 - internal brake lining;
2 - protective caps;
3 - guide bolts;
4 - brake caliper body;
5 - coupling collar;
6 - external brake lining.
On right:here the piston in the brake caliper is pressed back with a clamp so that new brake linings can be installed. For protection, an internal brake pad is laid.
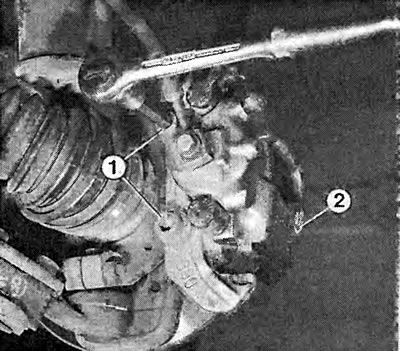
The brake caliper can be removed together with the brake pads. To do this, press the brake caliper housing outward with a screwdriver as described in section «Measuring front disc brake pads». Then unscrew the fixing screws (1) and remove the brake caliper from the steering knuckle.
Replacing the cuff of the front brake piston
If the brake piston collar in the brake caliper has been damaged, then you must take care of replacing it as soon as possible, otherwise the brake piston will soon seize due to corrosion and dirt. Unfortunately, cuffs are sold only together with a brake piston - an o-ring (which remains after the repair).
Unscrew the brake caliper housing.
Press the brake piston collar away from the body with a flathead screwdriver or chisel.
When installing a new cuff, the brake piston should protrude a little more from the brake caliper housing. Do not change the position of the piston (the raised pressure surfaces of the piston must be in a horizontal position).
If necessary, have your assistant depress the brake pedal a little harder so that the piston protrudes by about 10 mm.
Insert a new cuff into the groove on the brake piston and pull it onto the roller on the brake caliper. If necessary, press in the dust seal with a plastic wedge.
Check: The seal must be evenly located in the brake caliper around the entire perimeter. It must fit flawlessly in the groove of the brake piston.
Restoring the free play of the brake caliper and piston
Due to corrosion of the sliding surfaces of the brake caliper, its movement can be difficult. A defective piston collar causes the piston in the brake caliper to seize due to dirt and corrosion. Both cause an uneven braking effect.
Remove the brake pads.
Check if the pads move easily in their guides.
Otherwise, sand the guides. Take care not to damage the piston collar.
Also check and clean the movable bushings.
To check the ease of movement of the pistons, install a clamp with a block of wood inserted as a stop for the piston so that they cannot slide out too far.
Have an assistant gently depress the brake pedal. Is the piston moving?
If the piston does not extend, pump the brake pedal until the piston begins to move.
Press the piston back as described in section «Replacing Disc Brake Linings».
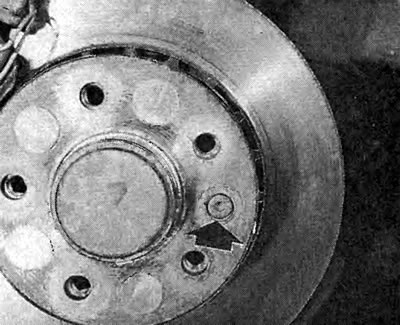
The photo shows the front brake disc mounting bolt. After loosening the bolt, you can remove the brake disc from the wheel hub.
Repeat these steps until the piston moves easily. In this case, do not change the position of the piston. The protruding pressure surfaces of the piston must be in a horizontal position.
Lubricate the side surfaces of the piston with ATE brake paste.
Removing the front brake disc
Brake discs must always be replaced in pairs. One-sided replacement can lead to uneven braking effect.
Remove the brake caliper.
Secure the brake caliper housing with wire to the body; the hydraulic hoses remain connected.
Unscrew the brake caliper from the steering knuckle.
Unscrew the fixing bolt (between wheel bolt holes) wrench with hexagon socket.
Pretreat the bolt with a rust remover or use an impact driver.
The brake disc can now be removed manually from the wheel hub. If it is rusted, help yourself with vigorous hammer blows - but only if the disk will change.
Before installing a new brake disc, clean the mating surface of the wheel hub
Tighten the brake disc mounting bolt to 4 Nm.
Remove the anti-corrosion wax from the new disc with a solvent.
Visitor comments