
OpelBook.ru
Cars AvtoVAZ Cars Mitsubishi Cars BMW Cars Mercedes Cars Nissan Cars Toyota Cars Chevrolet
English Русский
Български
Беларускі
Український
Српски
Hrvatski
Română
Polski
Slovenský
Magyar
 |  Sitemap  |  Contacts  |    


Main Astra Corsa Insignia Kadett Omega Vectra Zafira Others Articles
Vectra A (1988-1995, petrol) Vectra A (1988-1995) Vectra B (1995-2002, petrol) Vectra B (1995-2002) Vectra C (2002-2008)
  • Main
  • Vectra
  • Vectra B
  • Chassis
  • Brake system
  • Checking the handbrake

Checking the handbrake (Opel Vectra B)

            0

Contents: Maintenance work ⬇ "Breathing in" the handbrake ⬇ Adjusting the handbrake ⬇

Maintenance work


If the parking brake is pulled vigorously every time you park, the brake cables will lengthen over time. But on the other hand, someone who rarely uses the handbrake may one day be surprised to find that it only pulls on one side - a defect often found during a TUV inspection. Therefore:

Perform a functional test as described below.

The action of the handbrake should begin from the second tooth of the lever.

When entering the groove of the seventh tooth, the rear wheels must be locked.

If the lever travel is longer, this indicates worn rear brake drum linings or stretched handbrake cables

If the handbrake extends more than 6 teeth, it needs to be adjusted.

"Breathing in" the handbrake


In cars with disc brakes at the rear, the handbrake pads hardly wear out, because it is usually tensioned when the car is stationary. That is, the usual friction between the pads and the drums almost never occurs. As a result, the friction coefficient of the handbrake pads may change. The parking brake loses its effectiveness. Help: drive the car with the handbrake slightly tensioned for about 300 m.
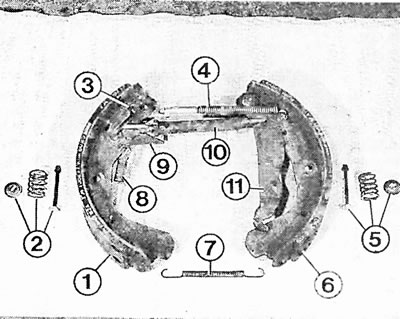
Dismantled drum brake shoes. Visible:

Dismantled drum brake shoes. Visible:
1 - running shoe (primary shoe);
2 and 5 - spring plates, pressure spring, mounting pin;
3 - adjusting and fastening spring;
4 - upper return spring;
6 - push-off block (secondary shoe);
7 - lower return spring;
8 - spring of the adjusting lever;
9 - adjusting lever;
10 - push rod with adjusting gear and heat clamp;
11 - handbrake control lever.


"Been-in" should also occur if new handbrake shoes have been installed, if the handbrake needs to be repaired, or if you notice a decrease in the effectiveness of the handbrake.


From time to time, you should brake your car on the last meters of movement to a complete stop with the handbrake. This way, the friction surfaces of the drum and brake shoes of the handbrake will remain in working condition and will not rust. Make sure that there is no other car driving behind you, because when you pull the handbrake, the brake lights do not light up.

Adjusting the handbrake


Conditions: Before adjusting the handbrake, you need to make sure that the brake cables have a smooth movement, otherwise the adjustment will be of no use. You should also pre-adjust the brake pads of the handbrake - only then can you adjust the tension of the cables (if this is even necessary anymore).

Adjusting the handbrake shoes (in cars with disc brakes at the rear): Place the handbrake lever on the second notch.

Raise the rear of the vehicle.

Remove the rear wheels.

There is a hole between the holes for the wheel bolts. Turn the brake disc so that the hole is located at the bottom.

The handbrake shoe adjustment gear is located exactly in this place. To check, shine a flashlight into the bolt hole.

Insert a screwdriver into the hole and use a pushing motion to turn the adjusting gear so that the brake pads are pressed and the brake disc cannot rotate. When adjusting, push the screwdriver downwards.

Turn the adjusting gear back until the wheel can turn freely

Adjusting brake cables (for all models):

Raise the rear of the car so that both wheels are free to hang.

In the car, pull the handbrake lever to the seventh tooth.


In this position, both rear wheels should be locked.

If not, release the handbrake. Lightly squeeze the leatherette roller on the handbrake lever and remove it from the center console clips.

Adjust the nut on the handbrake lever accordingly.

[Text copied from an internet website: opelbook.ru]

Grind the handbrake.

Check the handbrake again.


This article is available at russian, bulgarian, belarusian, ukrainian, serbian, croatian, romanian, polish, slovak, hungarian
Checking the article: Shapovalov Yaroslav

Share information:

Previous articles
Opel Vectra B: Brake system
Next articles

Handbrake
Measuring drum brake shoes
Drum brakes
Measuring rear disc brake pads
Rear disc brakes
Replacing the front brake pads
Checking the handbrake pads on vehicles with rear disc brakes
Hydraulics and controls
Work on the hydraulic brake system
Master brake cylinder
Brake booster
Checking the brake booster


See similar ones from other Opel car manuals:
▶ Crankshaft — Installation and Checking the Main Bearing… Opel Astra F (1991-1998, petrol)
▶ Checking the vehicle's readiness for operation Opel Corsa B (1993-2000)
▶ Checking the compression in the cylinders Opel Insignia A (2008-2017)
▶ Checking the cylinder head Opel Kadett E (1984-1995)
▶ Checking engine oil level — every 400 km Opel Omega A (1986-1993)
Link to this page in different formats

Visitor comments


No comments yet


How much will 25 + 23 =


Vectra C (2002-2008) 
  • General information
  • User manual
  • Vehicle device
  • Maintenance
  • Troubleshooting
  • Power unit
  • Engine repair
  • Cooling system
  • Power and control system
  • Engine electrics
  • Transmission
  • Clutch
  • Car gearbox
  • Drive shafts
  • Chassis
  • Car suspension
  • Steering
  • Brake system
  • Body
  • Exterior
  • Interior
  • Doors, locks and windows
  • Heating and ventilation
  • Electrical equipment
  • Equipment and devices
  • Headlights and lighting
  • Electrical circuits
Vectra B (1995-2002) 
  • General information
  • User manual
  • Weekly checks
  • Maintenance (gasoline)
  • Maintenance (diesel)
  • Troubleshooting
  • Power unit
  • SOHC gasoline engine
  • DOHC petrol engine
  • Diesel engine 1.7 liter
  • Diesel engine 2.0 liters
  • Engine repair
  • Cooling system
  • Fuel system (gasoline)
  • Fuel system (diesel)
  • Charging system
  • Launch system
  • Ignition and preheat
  • Transmission
  • Clutch
  • Mechanical gearbox
  • Automatic gearbox
  • Drive shafts
  • Chassis
  • Brake system
  • Wheel suspension
  • Steering
  • Body
  • Exterior
  • Interior
  • Doors and windows
  • Heating and ventilation
  • Electrical equipment
  • Equipment and devices
  • Electrical circuits
Vectra B (1995-2002, petrol) 
  • General information
  • Maintenance
  • Help with malfunctions
  • Power unit
  • Engine repair
  • Exhaust system
  • Cooling system
  • Fuel system
  • Multec injection system
  • Four point injection
  • Transmission
  • Clutch
  • Gearbox and drive
  • Chassis
  • Wheel suspension
  • Steering
  • Brake system
  • Wheels and tires
  • Body
  • Exterior
  • Interior
  • Electrical equipment
  • Fuses and electronics
  • Power devices
  • Ignition system
  • Lighting and signaling
  • Equipment and devices
  • Heating and ventilation
  • Electrical circuits
Vectra A (1988-1995) 
  • Power unit
  • Engine repair
  • Ignition system
  • Lubrication system
  • Cooling system
  • Injection system
  • Fuel system (carburetor)
  • Fuel system (diesel)
  • Exhaust system
  • Transmission
  • Clutch
  • Car gearbox
  • Chassis
  • Front suspension
  • Rear suspension
  • Steering
  • Brake system
  • Wheels and tires
  • Body
  • Exterior
  • Interior
  • Electrical equipment
  • Electrical circuits
Vectra A (1988-1995, petrol) 
  • General information
  • User manual
  • Maintenance
  • Power unit
  • SOHC engine
  • DOHC engine
  • Cooling and ventilation
  • Fuel system (carburetor)
  • Fuel system (injector)
  • Exhaust converter
  • Transmission
  • Clutch
  • Mechanical gearbox
  • Automatic gearbox
  • Drive shafts
  • Chassis
  • Brake system
  • Car suspension
  • Steering
  • Body
  • Body elements
  • Electrical equipment
  • Power devices
  • Equipment and devices
  • Electrical circuits
OpelBook.ru © 2017–2026 · Mobile version · · Sitemap: EN BG BY UA RS HR RO PL SK HU · Feedback · Site search
Astra F, petrol · Astra G, petrol · Astra G · Astra H · Astra J, petrol · Corsa B · Corsa C, petrol · Corsa C · Insignia A · Kadett D · Kadett E · Omega A · Omega B · Omega B2 · Vectra A, petrol · Vectra A · Vectra B, petrol · Vectra B · Vectra C · Zafira A, petrol · Frontera A, petrol · Frontera B · Ascona C · Vivaro A ·
We want your visit to be comfortable 🤝! We use cookies 🍪 to make that happen.