
OpelBook.ru
Cars AvtoVAZ Cars Mitsubishi Cars BMW Cars Mercedes Cars Nissan Cars Toyota Cars Chevrolet
English Русский
Български
Беларускі
Український
Српски
Hrvatski
Română
Polski
Slovenský
Magyar
 |  Sitemap  |  Contacts  |    


Main Astra Corsa Insignia Kadett Omega Vectra Zafira Others Articles
Vectra A (1988-1995, petrol) Vectra A (1988-1995) Vectra B (1995-2002, petrol) Vectra B (1995-2002) Vectra C (2002-2008)
  • Main
  • Vectra
  • Vectra B
  • Chassis
  • Brake system
  • Measuring rear disc brake pads

Measuring rear disc brake pads (Opel Vectra B)

            0

Contents: Maintenance work ⬇ Replacing rear disc brake pads ⬇ Removal the rear brake caliper ⬇ Replacing the rear brake piston seal ⬇ Removal the rear brake disc ⬇

Maintenance work


The wear of the rear disc brake pads is checked in the same way as for the front brakes. Here, too, the minimum size is 6 mm - the measurement is made together with the bearing plate of the pad.

The condition of the brake discs is checked simultaneously with the linings. The wear rate and the sequence of work operations are described later in the text of this chapter.

Replacing rear disc brake pads


Always replace both pads and spacer clips on the right and left at the same time. Use pads with ABE only.

Using a suitable punch, knock out the brake pad mounting pins from the outside in.

Remove the released spacer clamp.

Place a gas wrench between the brake pad carrier plate and the brake caliper and press the pad out.

Insert a screwdriver between the pad and the brake disc and push the pad completely towards the outer edge of the brake caliper well.

Check the brake fluid level in the expansion tank. It rises when the pistons are pressed. If necessary, suck out the brake fluid with an injection syringe.

Press out the other pad in the same way.
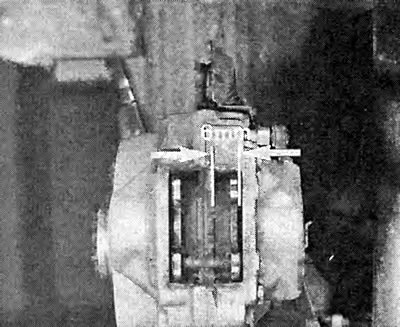
To measure the thickness of the rear disc brake pad, remove the mounting pin and the released…

To measure the thickness of the rear disc brake pad, remove the mounting pin and the released spacer spring. If the thickness is less than 6 mm, including the carrier plate, the pads must be replaced.
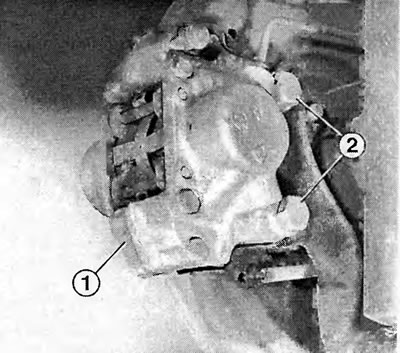

The photograph shows the mounting bolts (2) that secure the rear brake caliper (1) to the trailing…

The photograph shows the mounting bolts (2) that secure the rear brake caliper (1) to the trailing arm.


In this case, leave the opposite lining installed for now. Otherwise, when one piston is pressed out of its guide, the other one may move out.


Remove both pads.

With a cloth soaked in alcohol (under no circumstances with gasoline), clean out the dust from the wear of the pads in their sockets.

Scrape off the caked-on crust from the linings and rust with a flat-head screwdriver. Be careful not to damage the piston seals.

To avoid brake squeal, lubricate the linings where the brake pistons meet with brake paste "Plastilube" (in the spare parts store).

Install new pads with metal gaskets.

Place the expansion spring and insert the mounting pins from the inside out.

Press the brake pedal several times until the pads are pressed against the brake discs.

If the brake fluid was sucked out, check its level.

Removal the rear brake caliper


Raise the car and remove the rear wheel.

Remove the brake pipe if the brake caliper is to be removed. To do this, open the bleed valve, press the brake pedal once and lock it in this position.

Remove the brake caliper mounting bolts.

Press the brake caliper back and forth to move the brake pistons slightly.

Remove the brake caliper.

When installing, tighten the mounting bolts to 80 Nm. Screw on the brake pipe to 16 Nm.

Bleed the brake system if the brake pipe has been unscrewed.

Before the first meters of movement, press the brake pedal several times to establish normal pedal clearance.

Replacing the rear brake piston seal


Remove the brake pads.

Remove the brake caliper, the brake pipe remains connected.

When replacing the seal, the brake piston should protrude slightly above the brake caliper housing. If this is not the case, have your assistant press the brake pedal slightly so that the piston protrudes by about 10 mm. Do not change the installation position of the brake piston. The piston must fully press the protruding side of the pressure surface onto the brake lining mounting plate. If necessary, turn the piston slightly.


Use a narrow screwdriver to press the spring ring on the brake piston cuff.

Remove the old cuff.
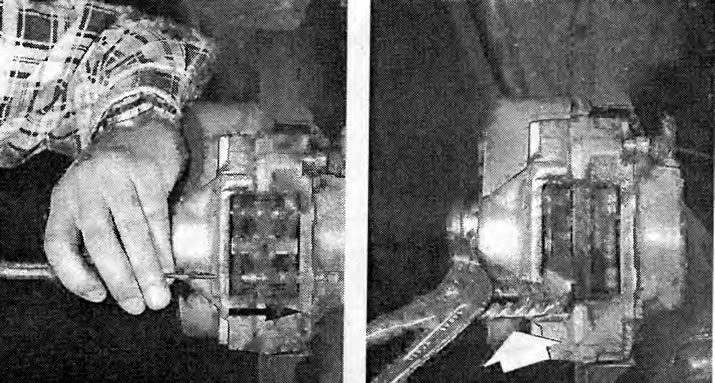
Left: knock out the rear brake pad mounting pins from the outside in.

Left: knock out the rear brake pad mounting pins from the outside in.

Right:press the inner and outer brake pistons back with a gas wrench. This will make it easier to pull the linings out of the shafts.


Check the position of the piston: the piston must fully press the protruding side of the pressure surface onto the brake lining mounting plate; if necessary, turn the piston slightly.

Insert the new seal into the groove of the brake piston, pull it onto the roller on the brake caliper and secure it with a spring ring.

Check: The cuff should be evenly positioned in the brake caliper along the entire perimeter. It should fit perfectly in the groove of the brake piston.

Removal the rear brake disc


Remove the rear brake caliper. The brake pipe remains connected. Tie the brake caliper to the body with wire.

Unscrew the mounting bolt at the front of the brake disc.

Now remove the brake disc. If this does not work, turn the handbrake shoe adjusting wheel back slightly (see Fig. "Adjusting the handbrake").

Clean the mating surface of the brake disc on the wheel hub and install a new brake disc. Tighten the mounting bolt to 4 Nm.

Adjust the handbrake shoes.


This article is available at russian, bulgarian, belarusian, ukrainian, serbian, croatian, romanian, polish, slovak, hungarian
Checking the article: Shapovalov Yaroslav

Share information:

Previous articles
Opel Vectra B: Brake system
Next articles

Rear disc brakes
Replacing the front brake pads
Checking the condition of the brake discs
Measuring Front Disc Brake Pads
Checking the brake pedal travel
Disc brakes
Drum brakes
Measuring drum brake shoes
Handbrake
Checking the handbrake
Checking the handbrake pads on vehicles with rear disc brakes
Hydraulics and controls


See similar ones from other Opel car manuals:
▶ Rear Disc Brake Pads — Removal and Installation Opel Astra G (1998-2004, petrol)
▶ Replacing the rear wheel disc brake pads Opel Corsa C (2000-2006)
▶ Replacing the brake pads of the rear disc brake mechanisms Opel Kadett E (1984-1995)
▶ Rear brake pads of the rear disc brake mechanism —… Opel Zafira A (1999-2005, petrol)
▶ Checking the rear brake pads Opel Insignia A (2008-2017)
Link to this page in different formats

Visitor comments


No comments yet


How much will 47 + 43 =


Vectra C (2002-2008) 
  • General information
  • User manual
  • Vehicle device
  • Maintenance
  • Troubleshooting
  • Power unit
  • Engine repair
  • Cooling system
  • Power and control system
  • Engine electrics
  • Transmission
  • Clutch
  • Car gearbox
  • Drive shafts
  • Chassis
  • Car suspension
  • Steering
  • Brake system
  • Body
  • Exterior
  • Interior
  • Doors, locks and windows
  • Heating and ventilation
  • Electrical equipment
  • Equipment and devices
  • Headlights and lighting
  • Electrical circuits
Vectra B (1995-2002) 
  • General information
  • User manual
  • Weekly checks
  • Maintenance (gasoline)
  • Maintenance (diesel)
  • Troubleshooting
  • Power unit
  • SOHC gasoline engine
  • DOHC petrol engine
  • Diesel engine 1.7 liter
  • Diesel engine 2.0 liters
  • Engine repair
  • Cooling system
  • Fuel system (gasoline)
  • Fuel system (diesel)
  • Charging system
  • Launch system
  • Ignition and preheat
  • Transmission
  • Clutch
  • Mechanical gearbox
  • Automatic gearbox
  • Drive shafts
  • Chassis
  • Brake system
  • Wheel suspension
  • Steering
  • Body
  • Exterior
  • Interior
  • Doors and windows
  • Heating and ventilation
  • Electrical equipment
  • Equipment and devices
  • Electrical circuits
Vectra B (1995-2002, petrol) 
  • General information
  • Maintenance
  • Help with malfunctions
  • Power unit
  • Engine repair
  • Exhaust system
  • Cooling system
  • Fuel system
  • Multec injection system
  • Four point injection
  • Transmission
  • Clutch
  • Gearbox and drive
  • Chassis
  • Wheel suspension
  • Steering
  • Brake system
  • Wheels and tires
  • Body
  • Exterior
  • Interior
  • Electrical equipment
  • Fuses and electronics
  • Power devices
  • Ignition system
  • Lighting and signaling
  • Equipment and devices
  • Heating and ventilation
  • Electrical circuits
Vectra A (1988-1995) 
  • Power unit
  • Engine repair
  • Ignition system
  • Lubrication system
  • Cooling system
  • Injection system
  • Fuel system (carburetor)
  • Fuel system (diesel)
  • Exhaust system
  • Transmission
  • Clutch
  • Car gearbox
  • Chassis
  • Front suspension
  • Rear suspension
  • Steering
  • Brake system
  • Wheels and tires
  • Body
  • Exterior
  • Interior
  • Electrical equipment
  • Electrical circuits
Vectra A (1988-1995, petrol) 
  • General information
  • User manual
  • Maintenance
  • Power unit
  • SOHC engine
  • DOHC engine
  • Cooling and ventilation
  • Fuel system (carburetor)
  • Fuel system (injector)
  • Exhaust converter
  • Transmission
  • Clutch
  • Mechanical gearbox
  • Automatic gearbox
  • Drive shafts
  • Chassis
  • Brake system
  • Car suspension
  • Steering
  • Body
  • Body elements
  • Electrical equipment
  • Power devices
  • Equipment and devices
  • Electrical circuits
OpelBook.ru © 2017–2026 · Mobile version · · Sitemap: EN BG BY UA RS HR RO PL SK HU · Feedback · Site search
Astra F, petrol · Astra G, petrol · Astra G · Astra H · Astra J, petrol · Corsa B · Corsa C, petrol · Corsa C · Insignia A · Kadett D · Kadett E · Omega A · Omega B · Omega B2 · Vectra A, petrol · Vectra A · Vectra B, petrol · Vectra B · Vectra C · Zafira A, petrol · Frontera A, petrol · Frontera B · Ascona C · Vivaro A ·
We want your visit to be comfortable 🤝! We use cookies 🍪 to make that happen.