
OpelBook.ru
Cars AvtoVAZ Cars Mitsubishi Cars BMW Cars Mercedes Cars Nissan Cars Toyota Cars Chevrolet
English Русский
Български
Беларускі
Український
Српски
Hrvatski
Română
Polski
Slovenský
Magyar
 |  Sitemap  |  Contacts  |    


Main Astra Corsa Insignia Kadett Omega Vectra Zafira Others Articles
Vectra A (1988-1995, petrol) Vectra A (1988-1995) Vectra B (1995-2002, petrol) Vectra B (1995-2002) Vectra C (2002-2008)
  • Main
  • Vectra
  • Vectra B
  • Chassis
  • Brake system
  • Measuring drum brake shoes

Measuring drum brake shoes (Opel Vectra B)

            0

Contents: Removal the brake drum ⬇ Dismantling the wheel brake cylinder…⬇ Removal brake pads ⬇
Since the advancing shoe wears out faster than the rear pressing shoe, the thickness measurement is performed only on the front shoe.

Raise the rear of the vehicle.

Remove the plastic cap from the inside of each rear wheel.

Shine a flashlight into the inspection hole and determine the thickness of the block.

The maximum permissible thickness of the linings riveted to the pads is 3 mm. Accordingly, the protruding part above the rivet head is 0.5 mm. In this case, replace the pads.

The thickness of the new pads is 5 mm.

Removal the brake drum


Raise the rear of the car and remove the wheel.

Remove the brake drum retaining bolt.

If the drum cannot be removed manually, then put the adjusting eccentric back.

Remove the plug from the back of the brake mechanism shield and use a screwdriver to press the handbrake lever through the hole, which will pull back the return spring.

If necessary, loosen the adjusting nut on the handbrake lever.

The source is on the online website (OpelBook.ru)
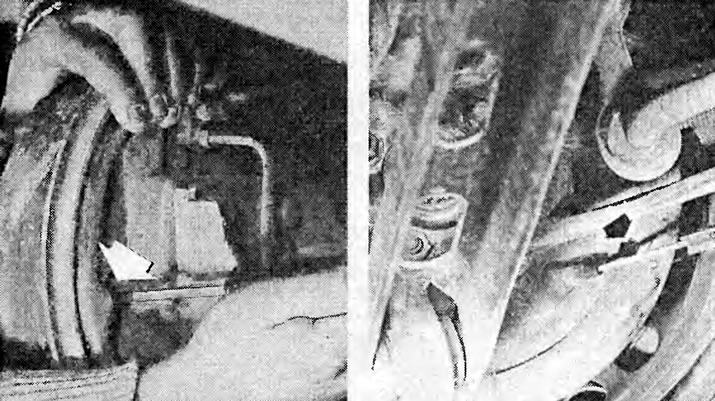
Left: to facilitate the removal of the brake drum, use a screwdriver to press through the hole on…

Left: to facilitate the removal of the brake drum, use a screwdriver to press through the hole on the handbrake lever on the rear of the brake mechanism shield, which will pull back the return spring.

Right: checking the thickness of the lining on the rear drum brakes: Each brake shield has an inspection hole through which you can take a look at the brake linings.
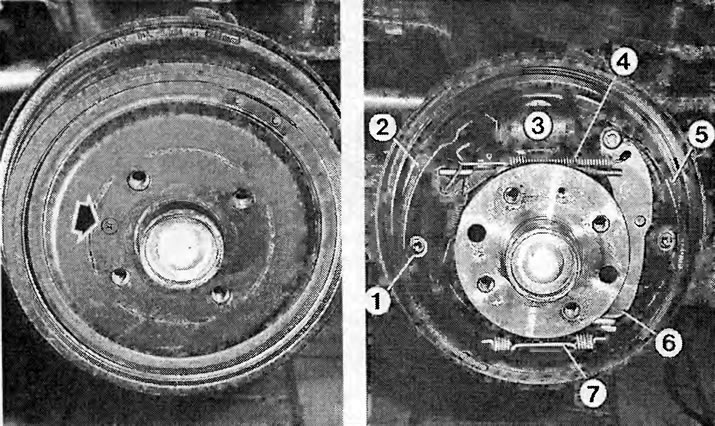

Left: the arrow shows the fixing bolt that secures the brake drum to the wheel hub.

Left: the arrow shows the fixing bolt that secures the brake drum to the wheel hub.

Right: when the brake drum is removed, we see the following components on the rear wheel brake:
1 - pressure springs;
2 - running shoe (primary shoe);
3 - wheel brake cylinder;
4 - adjusting fastening spring;
5 - push-off block (secondary shoe);
6 - handbrake control lever;
7 - lower return spring;
8 - upper return spring.


Loosen the tightly seated drum on the wheel hub centering belt using a plastic hammer.


Before installing the drum, lubricate the rear wheel hub belt with a thin layer of plastic grease for rolling bearings.

Adjust the handbrake if necessary.

Checking the condition of the brake drums

The friction surface of the brake drum should be as smooth as possible.

If there are grooves or deep hangnails (due to the pads being worn down to the rivets), then the drum can be bored.

The new brake drums have an internal diameter of 231 mm.

After boring, its internal diameter should be no more than 231.0 mm. Otherwise, both brake drums must be replaced.

With bored drums, larger size pads are used: 5.6 mm.

Dismantling the wheel brake cylinder of the drum brake


Remove the brake drum.

Unhook the upper brake shoe return spring and push the shoes outward.

Unscrew the brake pipe. If a new brake cylinder is not installed immediately after this, you must press the brake pedal and lock it (see "Work tip" in this chapter) in order to avoid unnecessary loss of brake fluid.

Unscrew the brake cylinder from the brake shield.

Before installation, turn back the adjusting eccentric. After assembling the brake shoe, adjust, see the next section.

Tightening torques: brake cylinder on the brake mechanism shield - 9 Nm, brake pipe on the brake cylinder - 16 Nm.

Bleed the brake system.

Removal brake pads


Remove the brake drum.

Using both hands, push the brake shoes toward the front of the vehicle to prevent the adjusting retaining spring from damaging the wheel brake cylinder boot when removed.

Use pliers to unhook the adjusting mounting spring at the top and remove it together with the upper return spring.


Also remove the spring and the adjusting lever.

Remove the retaining pressure springs. To do this, press the spring plate with pliers and turn it 90°. At the same time, press the retaining pins at the back of the brake shield by hand so that they do not rotate either.

Remove the brake shoes from the wheel brake cylinder.

Unhook the handbrake cable.

Before installation, clean the brake anchor plate with a soft metal brush and lubricate the mating surfaces with anti-squeak paste.

When installing, please note: the adjustment devices have right- and left-hand threads. Do not confuse the mounting side.

Check the free play of the gear and adjusting lever; clean if necessary.

Turn the gear back until it stops.

Lightly lubricate the push rod threads.

Install the brake shoes. When installing, first hang the lower side of the adjusting mounting spring. Use pliers to hang the upper return spring on the adjusting mounting spring. Now hang the adjusting mounting spring as described above.

Install the brake drum.

After installation, press the brake pedal until the audible jumping of the adjusting lever on the gear stops on both rear wheels (for this you need an assistant).

Adjust the handbrake if necessary.
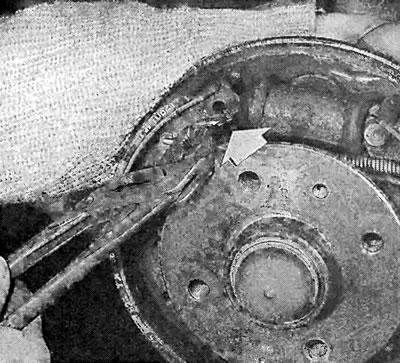
When removing the brake pads, you need to remove the adjusting mounting spring. To do this, rest…

When removing the brake pads, you need to remove the adjusting mounting spring. To do this, rest the gas wrench against the wheel hub. When removing the spring, make sure that (to avoid damage to the wheel brake cylinder cuff).


This article is available at russian, bulgarian, belarusian, ukrainian, serbian, croatian, romanian, polish, slovak, hungarian
Checking the article: Shapovalov Yaroslav

Share information:

Previous articles
Opel Vectra B: Brake system
Next articles

Drum brakes
Measuring rear disc brake pads
Rear disc brakes
Replacing the front brake pads
Checking the condition of the brake discs
Measuring Front Disc Brake Pads
Handbrake
Checking the handbrake
Checking the handbrake pads on vehicles with rear disc brakes
Hydraulics and controls
Work on the hydraulic brake system
Master brake cylinder


See similar ones from other Opel car manuals:
▶ Replacing the shoes of the rear wheel drum brake mechanisms Opel Astra G (1998-2004)
▶ Brake drum, replacement of shoes of drum brake mechanisms Opel Corsa C (2000-2006)
▶ Replacing the brake shoes of the rear wheel drum brakes Opel Kadett E (1984-1995)
▶ Rear brake shoes of the rear drum brake mechanism —… Opel Zafira A (1999-2005, petrol)
▶ Parking brake shoes — inspection, removal and installation Opel Omega B2 (1999-2003)
Link to this page in different formats

Visitor comments


No comments yet


How much will 27 + 25 =


Vectra C (2002-2008) 
  • General information
  • User manual
  • Vehicle device
  • Maintenance
  • Troubleshooting
  • Power unit
  • Engine repair
  • Cooling system
  • Power and control system
  • Engine electrics
  • Transmission
  • Clutch
  • Car gearbox
  • Drive shafts
  • Chassis
  • Car suspension
  • Steering
  • Brake system
  • Body
  • Exterior
  • Interior
  • Doors, locks and windows
  • Heating and ventilation
  • Electrical equipment
  • Equipment and devices
  • Headlights and lighting
  • Electrical circuits
Vectra B (1995-2002) 
  • General information
  • User manual
  • Weekly checks
  • Maintenance (gasoline)
  • Maintenance (diesel)
  • Troubleshooting
  • Power unit
  • SOHC gasoline engine
  • DOHC petrol engine
  • Diesel engine 1.7 liter
  • Diesel engine 2.0 liters
  • Engine repair
  • Cooling system
  • Fuel system (gasoline)
  • Fuel system (diesel)
  • Charging system
  • Launch system
  • Ignition and preheat
  • Transmission
  • Clutch
  • Mechanical gearbox
  • Automatic gearbox
  • Drive shafts
  • Chassis
  • Brake system
  • Wheel suspension
  • Steering
  • Body
  • Exterior
  • Interior
  • Doors and windows
  • Heating and ventilation
  • Electrical equipment
  • Equipment and devices
  • Electrical circuits
Vectra B (1995-2002, petrol) 
  • General information
  • Maintenance
  • Help with malfunctions
  • Power unit
  • Engine repair
  • Exhaust system
  • Cooling system
  • Fuel system
  • Multec injection system
  • Four point injection
  • Transmission
  • Clutch
  • Gearbox and drive
  • Chassis
  • Wheel suspension
  • Steering
  • Brake system
  • Wheels and tires
  • Body
  • Exterior
  • Interior
  • Electrical equipment
  • Fuses and electronics
  • Power devices
  • Ignition system
  • Lighting and signaling
  • Equipment and devices
  • Heating and ventilation
  • Electrical circuits
Vectra A (1988-1995) 
  • Power unit
  • Engine repair
  • Ignition system
  • Lubrication system
  • Cooling system
  • Injection system
  • Fuel system (carburetor)
  • Fuel system (diesel)
  • Exhaust system
  • Transmission
  • Clutch
  • Car gearbox
  • Chassis
  • Front suspension
  • Rear suspension
  • Steering
  • Brake system
  • Wheels and tires
  • Body
  • Exterior
  • Interior
  • Electrical equipment
  • Electrical circuits
Vectra A (1988-1995, petrol) 
  • General information
  • User manual
  • Maintenance
  • Power unit
  • SOHC engine
  • DOHC engine
  • Cooling and ventilation
  • Fuel system (carburetor)
  • Fuel system (injector)
  • Exhaust converter
  • Transmission
  • Clutch
  • Mechanical gearbox
  • Automatic gearbox
  • Drive shafts
  • Chassis
  • Brake system
  • Car suspension
  • Steering
  • Body
  • Body elements
  • Electrical equipment
  • Power devices
  • Equipment and devices
  • Electrical circuits
OpelBook.ru © 2017–2026 · Mobile version · · Sitemap: EN BG BY UA RS HR RO PL SK HU · Feedback · Site search
Astra F, petrol · Astra G, petrol · Astra G · Astra H · Astra J, petrol · Corsa B · Corsa C, petrol · Corsa C · Insignia A · Kadett D · Kadett E · Omega A · Omega B · Omega B2 · Vectra A, petrol · Vectra A · Vectra B, petrol · Vectra B · Vectra C · Zafira A, petrol · Frontera A, petrol · Frontera B · Ascona C · Vivaro A ·
We want your visit to be comfortable 🤝! We use cookies 🍪 to make that happen.