
OpelBook.ru
Cars AvtoVAZ Cars Mitsubishi Cars BMW Cars Mercedes Cars Nissan Cars Toyota Cars Chevrolet
English Русский
Български
Беларускі
Український
Српски
Hrvatski
Română
Polski
Slovenský
Magyar
 |  Sitemap  |  Contacts  |    


Main Astra Corsa Insignia Kadett Omega Vectra Zafira Others Articles
Vectra A (1988-1995, petrol) Vectra A (1988-1995) Vectra B (1995-2002, petrol) Vectra B (1995-2002) Vectra C (2002-2008)
  • Main
  • Vectra
  • Vectra B
  • Chassis
  • Brake system
  • Drum brakes

Drum brakes (Opel Vectra B)

            0

Contents: Automatic adjustment ⬇ Automatic adjustment and temperature ⬇
The Vectra with an eight-valve 1.6-liter engine has drum brakes on the rear axle. In this brake design, two brake shoes are pressed by pistons of the wheel brake cylinder (it is located between the upper ends of the brake pads) to the brake surface of the drum. Due to the arrangement of the brake shoes, one of the two brake shoes in the drum brake used in the Vectra (simplex brake = one brake cylinder with two pistons) acts with a self-amplifying effect. This means that the shoe is independently pulled towards the brake drum by the rotation of the wheel within certain limits, which reduces the pedal force. In the Vectra, the front brake shoe acts with self-amplifying (on condition of moving forward). In professional jargon, it is called the primary or running shoe. Accordingly, the rear one is called the secondary or pushing shoe.

Automatic adjustment


The Vectra with the 1.6-litre eight-valve engine has an automatic adjustment device on the rear drum brakes. This eliminates the need for manual adjustment. The adjustment module consists of an adjustment lever, an adjustment spring and a two-piece pressure rod, the length of which can be changed using an adjustment gear.

When braking, the pistons of the wheel brake cylinder move the shoes in the direction of the brake drum. The adjusting lever of the front brake shoe is under pre-tension due to the adjusting spring and, due to this, is constantly adjacent to the pressure rod, at the same time it engages with the saw-tooth profile of the adjusting gear.


As a result, the increasing distance between the brake shoes causes a rotational movement of the adjusting lever. As the shoes wear progressively, the rotational movement becomes large enough for the lever to engage the next tooth in the adjusting gear. The adjusting gear continues to rotate, the pressure rod lengthens. Now the brake shoes are approaching the drum again - the brake is adjusted.
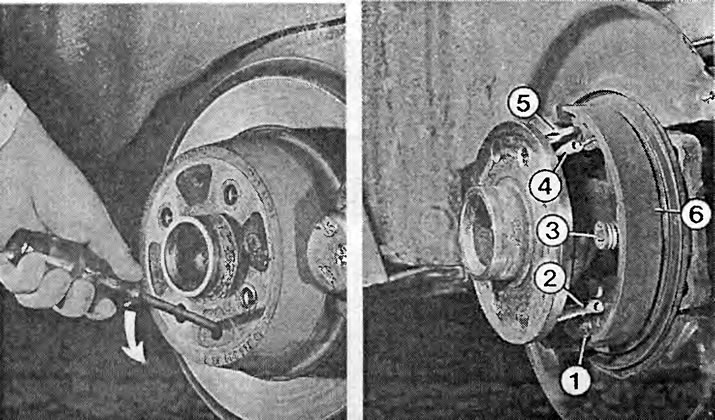
Left: to adjust the brake pads, insert a screwdriver through the hole and use a pushing motion to…

Left: to adjust the brake pads, insert a screwdriver through the hole and use a pushing motion to turn the adjusting gear in the direction of the arrow until the brake pads are seated and the brake disc no longer rotates. Then turn the adjusting gear back until the brake disc rotates freely.

Right:when the brake disc is removed, the following parts are visible:
1 - adjusting device;
2 - lower return spring;
3 - pressure spring;
4 - upper return spring;
5 - expansion lock (when the handbrake is on, it presses the shoes against the drum);
6 - rear handbrake shoe.
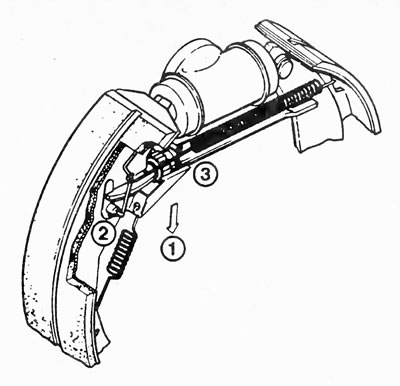

This is how the automatic adjustment works: when the brake pedal is pressed, the brake shoes are…

This is how the automatic adjustment works: when the brake pedal is pressed, the brake shoes are pressed outward toward the drum. The resulting reciprocating motion of the advancing and receding bridge of the brake shoes is pulled by the adjustment lever in direction "1", rotates around the support point "2" and turns the gear on the pressure rod with the end of the blade. But this process is only carried out if there is appropriate wear on the lining. To prevent adjustment due to thermal expansion (for example, when driving downhill) brake drum, between the pressure sleeve and the pressure rod there is a heat-shrink clamp (B), which causes automatic adaptation to the gap caused by heating.


Automatic adjustment and temperature


When the brake is released, there should be a small distance between the shoes and the brake drum to allow the wheels to rotate freely. This distance should always remain with automatic adjustment. Long-term braking, for example when going down a slope, with a fully loaded vehicle can increase the temperature of the drum brakes to 350°C. Under the influence of this temperature, the increase in the diameter of the brake drum can reach 1 mm. The automatic adjustment device can perceive this as shoe wear and make adjustments with a heated, enlarged drum brake. Consequence: after the brakes have cooled, the wheels lock.

With increased thermal expansion, the adjustment must be suppressed. This is done by a so-called thermal clamp inserted into the pressure rod. The bimetallic part expands greatly under the influence of temperature and thus compensates for the change in diameter of the brake drum. The effect: the distance between the shoe and the drum remains constant and false adjustment does not occur.


This article is available at russian, bulgarian, belarusian, ukrainian, serbian, croatian, romanian, polish, slovak, hungarian
Checking the article: Shapovalov Yaroslav

Share information:

Previous articles
Opel Vectra B: Brake system
Next articles

Measuring rear disc brake pads
Rear disc brakes
Replacing the front brake pads
Checking the condition of the brake discs
Measuring Front Disc Brake Pads
Checking the brake pedal travel
Measuring drum brake shoes
Handbrake
Checking the handbrake
Checking the handbrake pads on vehicles with rear disc brakes
Hydraulics and controls
Work on the hydraulic brake system


See similar ones from other Opel car manuals:
▶ Replacing brake linings of drum brakes Opel Corsa B (1993-2000)
▶ Technical characteristics of rear wheel drum brakes Opel Kadett E (1984-1995)
▶ Rear drum brakes — check Opel Zafira A (1999-2005, petrol)
▶ Rear Brake Drum — Removal, Checking and Installation Opel Astra F (1991-1998, petrol)
▶ Disc brakes Opel Insignia A (2008-2017)
Link to this page in different formats

Visitor comments


No comments yet


How much will 28 + 38 =


Vectra C (2002-2008) 
  • General information
  • User manual
  • Vehicle device
  • Maintenance
  • Troubleshooting
  • Power unit
  • Engine repair
  • Cooling system
  • Power and control system
  • Engine electrics
  • Transmission
  • Clutch
  • Car gearbox
  • Drive shafts
  • Chassis
  • Car suspension
  • Steering
  • Brake system
  • Body
  • Exterior
  • Interior
  • Doors, locks and windows
  • Heating and ventilation
  • Electrical equipment
  • Equipment and devices
  • Headlights and lighting
  • Electrical circuits
Vectra B (1995-2002) 
  • General information
  • User manual
  • Weekly checks
  • Maintenance (gasoline)
  • Maintenance (diesel)
  • Troubleshooting
  • Power unit
  • SOHC gasoline engine
  • DOHC petrol engine
  • Diesel engine 1.7 liter
  • Diesel engine 2.0 liters
  • Engine repair
  • Cooling system
  • Fuel system (gasoline)
  • Fuel system (diesel)
  • Charging system
  • Launch system
  • Ignition and preheat
  • Transmission
  • Clutch
  • Mechanical gearbox
  • Automatic gearbox
  • Drive shafts
  • Chassis
  • Brake system
  • Wheel suspension
  • Steering
  • Body
  • Exterior
  • Interior
  • Doors and windows
  • Heating and ventilation
  • Electrical equipment
  • Equipment and devices
  • Electrical circuits
Vectra B (1995-2002, petrol) 
  • General information
  • Maintenance
  • Help with malfunctions
  • Power unit
  • Engine repair
  • Exhaust system
  • Cooling system
  • Fuel system
  • Multec injection system
  • Four point injection
  • Transmission
  • Clutch
  • Gearbox and drive
  • Chassis
  • Wheel suspension
  • Steering
  • Brake system
  • Wheels and tires
  • Body
  • Exterior
  • Interior
  • Electrical equipment
  • Fuses and electronics
  • Power devices
  • Ignition system
  • Lighting and signaling
  • Equipment and devices
  • Heating and ventilation
  • Electrical circuits
Vectra A (1988-1995) 
  • Power unit
  • Engine repair
  • Ignition system
  • Lubrication system
  • Cooling system
  • Injection system
  • Fuel system (carburetor)
  • Fuel system (diesel)
  • Exhaust system
  • Transmission
  • Clutch
  • Car gearbox
  • Chassis
  • Front suspension
  • Rear suspension
  • Steering
  • Brake system
  • Wheels and tires
  • Body
  • Exterior
  • Interior
  • Electrical equipment
  • Electrical circuits
Vectra A (1988-1995, petrol) 
  • General information
  • User manual
  • Maintenance
  • Power unit
  • SOHC engine
  • DOHC engine
  • Cooling and ventilation
  • Fuel system (carburetor)
  • Fuel system (injector)
  • Exhaust converter
  • Transmission
  • Clutch
  • Mechanical gearbox
  • Automatic gearbox
  • Drive shafts
  • Chassis
  • Brake system
  • Car suspension
  • Steering
  • Body
  • Body elements
  • Electrical equipment
  • Power devices
  • Equipment and devices
  • Electrical circuits
OpelBook.ru © 2017–2026 · Mobile version · · Sitemap: EN BG BY UA RS HR RO PL SK HU · Feedback · Site search
Astra F, petrol · Astra G, petrol · Astra G · Astra H · Astra J, petrol · Corsa B · Corsa C, petrol · Corsa C · Insignia A · Kadett D · Kadett E · Omega A · Omega B · Omega B2 · Vectra A, petrol · Vectra A · Vectra B, petrol · Vectra B · Vectra C · Zafira A, petrol · Frontera A, petrol · Frontera B · Ascona C · Vivaro A ·
We want your visit to be comfortable 🤝! We use cookies 🍪 to make that happen.