
- Checking the thickness of the brake pads of the front and rear wheels.
- Checking the condition and tightness of pipelines, hoses.
- Checking the condition and functioning of the parking brake.
- Brake system. Inspect pipelines, hoses, brake cylinders and make sure that there are no leaks or damage.
- Check the brake fluid level or change the brake fluid.
- Tires. Check the tread height and tire pressure. Check tires for wear and damage (including spare wheel).
- Tighten the wheel bolts to 110 Nm in a criss-cross pattern.
Checking the thickness of the brake pads
1. Mark the position of the wheel on the hub with paint. A balanced wheel can be set to its original position.
2. Remove the wheel bolts before jacking up the vehicle and placing it on jack stands
3. Place the vehicle on jack stands and remove the wheels.
Attention! Jacking up a vehicle or placing it on jack stands is dangerous. Therefore, it is recommended that you familiarize yourself with the safety precautions outlined in chapter «car jacking».
4. Check the residual thickness of the brake disc.
5. Check the residual thickness of the brake linings of the front and rear wheels. The residual thickness of the overlays, excluding the base, must be at least 3 mm. Pads can be inspected through a hole in the caliper (see illustrations 16.5 and 16.5a).
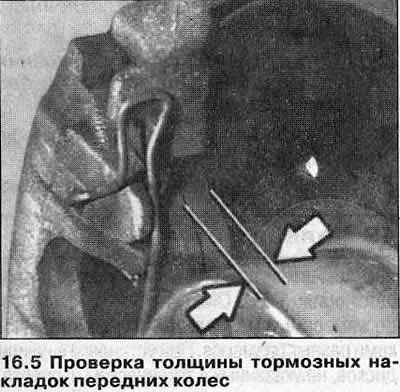
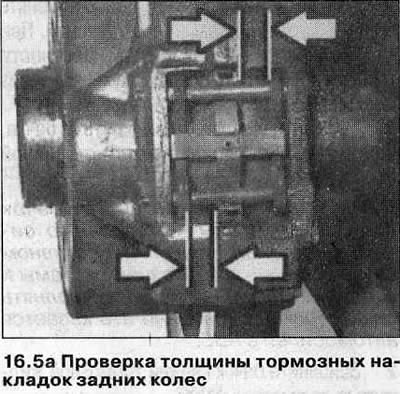
For a more accurate measurement, it is necessary to remove the brake pads and measure the thickness of the lining with a caliper. If even one brake lining is worn out, all four pads on the same axle must be replaced.
The wear limit for the front wheels has been reached if the residual thickness of the front wheel brake lining, together with the base, is no more than 8 mm. On the rear wheels, the lining must be replaced if the measured thickness of the lining together with the base is 6 mm.
Attention! If you follow the rule of thumb, then 1 mm of brake pad lining corresponds to at least 1000 km of run. This rule can be applied when operating the car in adverse conditions. Under normal operating conditions, pads last longer. With pad thickness (along with the base), equal to 11.0 mm, they are enough for at least another 3000 km.
6. Establish wheels, being guided by labels put before removal of wheels. Apply some bearing grease to the disc seat before installing the wheel.
7. Screw in wheel bolts and lower the car.
8. Tighten the wheel bolts in a criss-cross pattern to 110 Nm.
Parking brake actuator - adjustment
9. Jack up the vehicle so that its wheels are off the ground and about 5 cm from it.
Attention! Jacking up a vehicle or placing it on jack stands is dangerous. Therefore, it is recommended that you familiarize yourself with the safety precautions outlined in chapter «car jacking».
10. Release the parking brake and make sure the rear wheels turn freely.
11. Tighten the parking brake lever by 3 sector teeth and make sure that the rear wheels do not turn.
12. Lower the car on wheels.
13. Tighten the parking brake lever by 7 sector teeth. The vehicle cannot be moved in this parking brake position.
Otherwise, adjust the parking brake.
Visual check of a condition of brake pipelines and hoses
Attention! Jacking up the vehicle or placing it on jackstands carries the risk of injury. Therefore, it is recommended that you familiarize yourself with the safety precautions outlined in chapter «car jacking».
14. Jack up the car and jack it up.
15. Clean the brake pipes.
Attention! The pipelines of the brake system are made of metal and coated with a layer of polymer material to prevent corrosion. If the protective polymer layer is damaged, the pipeline may rust. Therefore, cleaning the brake lines with a wire brush, sandpaper or a screwdriver is not permitted.
16. Check up, lighting a lantern, tightness of the pipelines of the brake mechanism going from the main brake cylinder to ABS, and also to all four wheel brake mechanisms. The master brake cylinder is located in the engine compartment under the brake fluid expansion tank.
No kinks or dents are allowed on the pipelines of the brake system. They should not have corrosion pits or worn areas. Otherwise, the pipeline to the next joint should be replaced with a new one.
17. Brake hoses connect pipelines to the wheel brake cylinders and are routed near the moving parts of the car. They are made of high pressure material, but over time they can become porous, swell, or be cut by sharp objects. In the presence of at least one of these defects, the brake hose must be replaced.
18. Locate Damage By Bending Brake Hoses (see illustration). The hoses must not be twisted. Refer to color markings on hoses, if available.
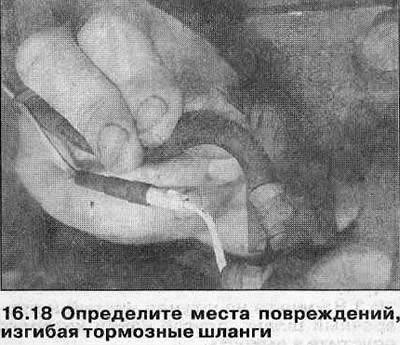
19. Turn the steering wheel all the way to the left and then to the right. Brake hoses must not touch other parts of the vehicle in any position of the wheels.
Joints of pipelines and hoses must not be wet. Moisture is evidence of a brake fluid leak. If the brake fluid expansion tank is wet, then the reservoir cap is most likely leaking.
20. Lower the car on wheels.
Visitor comments