


Contents: Condensate removal ⬇ Replacing the fuel filter ⬇ Condensate removal ⬇ Replacing the fuel filter ⬇ Replacing the fuel filter ⬇
Condensate removal
No special tools or devices are required.
Necessary parts for replacing worn ones:
- fuel filter appropriate for the engine type,
- filter seals (cars with X25DT engine) or filter cover (cars with 2.0/2.2 l engine).
A special container is required to collect condensate.
Caution! Do not allow diesel fuel to come into contact with rubber parts, especially the cooling system hoses. If fuel does come into contact with these parts, remove the fuel immediately, as any remaining fuel will destroy them over time.
Vehicles with 2.5L diesel engine (X25DT)
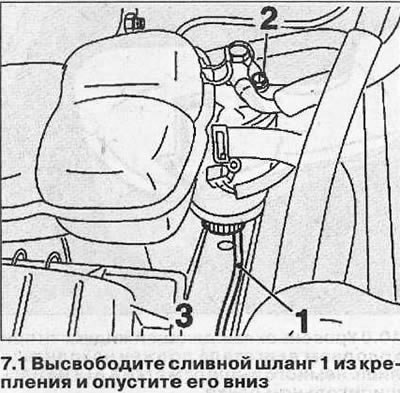
1. Release the drain hose 1 from the mount and lower it down (see illustration).
2. Place a container under the hose to collect condensate.
3. Loosen the 2 vent bolt on the filter cover (see illustration 7.1).
4. Unscrew the condensate drain plug at the bottom of the filter housing and drain approximately 100 cm³ of condensate (see illustration 7.1). As soon as fuel starts to flow out of the filter, tighten the drain plug.
5. Tighten the drain plug and vent bolt.
6. Secure hose 1 in the holder (see illustration 7.1).
Attention! After draining the condensate, bleeding the fuel system is not required.
Replacing the fuel filter
7. Completely drain the condensate from the fuel filter.
8. Disconnect the drain hose from the filter.
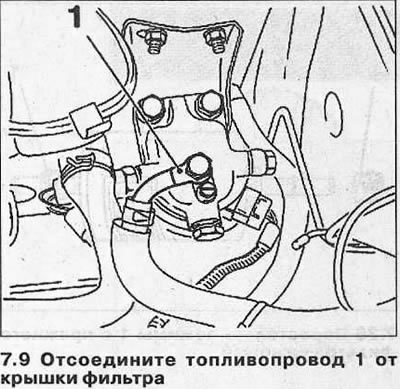
9. Disconnect fuel line 1 from the filter cover (see illustration).
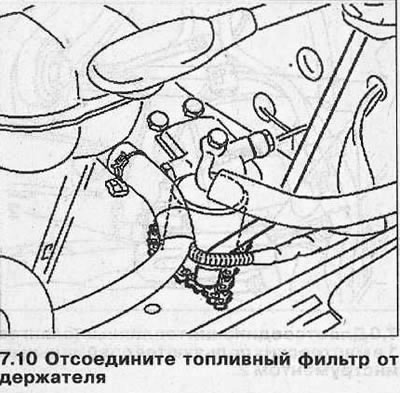
10. Disconnect the fuel filter from the holder and remove it (see illustration).
11. Install and screw on the new filter by hand, after wetting the gasket with diesel fuel.
12. Connect the fuel line to the filter, tightening it to a torque of 15 Nm, installing new sealing gaskets.
13. Connect the condensate drain hose to the fuel filter.
Vehicles with 2.5L diesel engine (Y25DT)
Attention! According to the maintenance plan, for vehicles with a 150 hp engine, draining condensate from the fuel filter is not required.
14. Disconnect the plug from the fuel pressure sensor on the fuel filter housing.
15. Disconnect the fuel lines from the filter, marking their installation position.
16. Unscrew the bolt and remove the fuel filter from the bracket.
17. Install a new fuel filter and connect the fuel lines and the fuel pressure sensor plug. If necessary, bleed the fuel system by turning on the ignition for about one minute.
Condensate removal
Cars with 2.0/2.2L diesel engine
18. Place a container under the fuel filter to collect condensate.
19. Unscrew the condensate drain plug at the bottom of the filter housing by about one turn (see arrow in illustration).
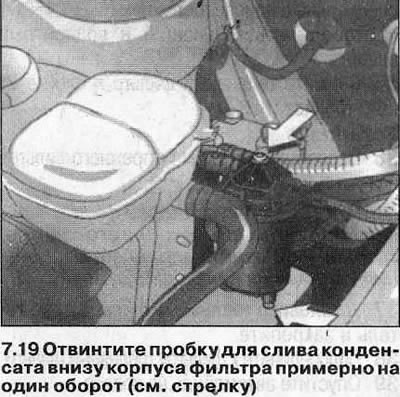
20. Loosen the central bolt on the fuel filter cover and drain approximately 100 cm³ of condensate. As soon as fuel starts to flow out of the filter, tighten the drain plug.
Caution! Never empty the fuel filter, otherwise you will have to remove air from the fuel system in a workshop.
21. Tighten the center bolt and drain plug to the specified torque.
Replacing the fuel filter
22. Loosen the central bolt on top of the filter housing.
23. Release the fuel filter from the holder by pushing it upwards.
24. Disconnect the fuel filter heater plug.
25. Disconnect both fuel hoses from the filter cover using the special tool HAZET 4501-1.
26. Completely unscrew the central bolt, remove the cover and take out the replaceable filter element.
Attention! The filter is filled to the brim with diesel fuel.
27. Drain the fuel from the filter and wipe it clean.
28. Install a new filter element and replace the central bolt and filter housing with new gaskets.
29. Fill the filter to the brim with clean diesel fuel and reinstall in the reverse order of removal. Make sure that the quick-release fasteners on the fuel hoses snap into place, which is accompanied by a clearly audible click.
Attention! If the engine does not start, it is necessary to remove air from the fuel system by contacting a workshop.
Replacing the fuel filter
Cars with gasoline engines
The fuel filter is located on the bottom of the car on the right side near the fuel tank. A jack and jack stands are required for replacement.
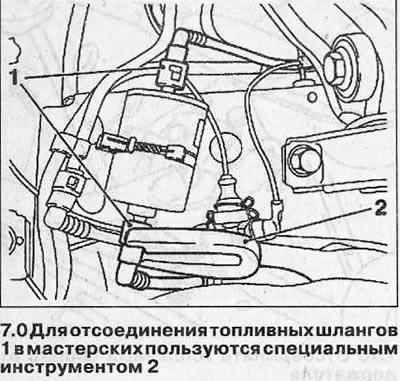
To disconnect fuel hoses 1, workshops use a special tool 2, for example, Opel KM-796 or HAZET 4501-1 (see illustration 7.0).
Removal
30. Relieve the pressure in the fuel system,
31. Jack up the car and place it on jack stands.
32. Place a container under the fuel filter to collect the fuel.
33. Mark the supply and return hoses with tape to avoid confusion when connecting them to the new filter.
34. Disconnect the fuel hose clamps using the special tool HAZET 4501-1 and disconnect the supply and return hoses.
35. Remove the fuel filter and drain the fuel from it.
Installation
36. Move clamps 1 from the old filter to the new one (see illustration).
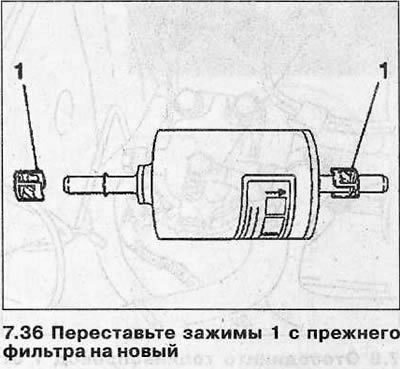
Attention! When installing the filter, follow the arrow on its body, which indicates the direction of fuel flow from the tank to the engine.
(Material copied from this website: www.OpelBook.ru)
37. Install the fuel filter into the holder and secure it.
38. Connect the fuel hoses to the filter.
39. Lower the car onto its wheels.
40. Perform a test drive and then check the fuel hose connections for leaks.
Visitor comments