
The necessary wear parts and the intended type of special tool are also indicated here.
It is recommended at least every 4-6 weeks to check and, if necessary, increase the pressure in the tires, check and also, if necessary, replenish the volume of engine oil and liquids of the cooling system, wiper and washer.
Attention! When buying spare parts, it is recommended to have a technical passport of the car with you, because often to identify a car you need to know its body number, model range or year of manufacture. In order to be completely sure that a part will be purchased that is absolutely identical to the previous one, it is recommended, if possible, to take the old part with you in order to compare it with the purchased one.
Engine and exhaust system
In accordance with the maintenance plan, the following work should be performed:
- Change engine oil and oil filter.
- Check the engine oil level, top up if necessary. Inspect the engine and make sure there are no oil leaks.
- Vehicles with a diesel engine. Remove condensation from the fuel filter or replace the replacement filter element.
- Vehicles with a gasoline engine. Replace fuel filter.
- Vehicles with a gasoline engine. Replace toothed belt.
- Check the composition of the exhaust gas and get a printout of fault codes (In workshop).
- Auxiliary drive belt. Check the status.
- Replace toothed belt and check tension roller.
- Cooling, heating and ventilation systems. Check the fluid level and antifreeze concentration and make sure they are tight.
- Vehicles with a 2.5 liter diesel engine. Replace coolant.
- exhaust system. Check the status.
- Fuel system. Check the tightness, laying of the fuel lines, the strength of their connections.
- Replace the air filter element. Vehicles with a gasoline engine. Replace spark plugs.
Engine oil change
The following tools and fixtures are required to change the oil:
- inspection pit or hydraulic garage lift,
- special tool for unscrewing the oil filter (pliers, chain wrench or tool HAZET 2172),
- a socket for unscrewing the oil drain bolt, as well as a container for collecting drained oil with a volume of at least 7 liters.
Necessary parts to replace worn ones:
- an aluminum or copper o-ring for the drain plug if the oil is to be drained rather than taken. The O-ring is sometimes supplied with the oil filter,
- replaceable oil filter element,
- 4.5 to 6.5 liters of engine oil (depending on engine type). Filling volumes when changing oil with filter replacement.
Engine, Volume
- Petrol 2.0 / 2.2 l - 4.5 l
- Petrol 2.5 / 3.0 l - 5.75 l
- Diesel 2.0 / 2.2 l - 5.5 l
- Diesel 2.5 l - 6.5 l
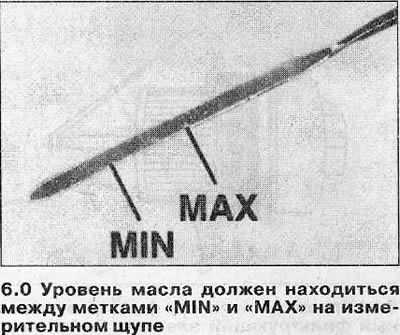
Filling volume when replenishing oil from the mark «MIN» up to the mark «MAX» on the dipstick is 1.0 l, for a diesel engine with a volume of 2.5-1.5 l.
The oil level must always be between these marks (see illustration 6.0).
When changing the oil, the oil filter must also be changed.
Under increased operating stress such as city driving, frequent driving in mountainous areas, operation of a vehicle with a trailer, or in very dusty conditions, change the engine oil in a shorter time.
For vehicles with a gasoline engine, engine oil can not be drained, but taken with a special probe (e.g. at some petrol stations) through the guide tube for the dipstick.
Draining engine oil
1. Warm up the engine. To do this, drive a short distance until the coolant temperature gauge starts showing the coolant operating temperature. After that, drive about another five kilometers to ensure that the oil temperature is normal.
2. Disconnect the wire terminal «masses» (-) from the battery.
Attention! When the battery is disconnected from the memory systems of some devices, such as a radio, previously entered data, including the security code, is deleted.
3. Vehicles with a V6 gasoline engine from 9/1998 and a diesel engine. Unscrew the oil filter cap using an appropriate socket. This ensures that the valve opens to allow oil to drain into the oil pan.
4. Place the vehicle horizontally on jack stands.
5. Remove if there is a mudguard (protection) engine.
6. Vehicles with Y25DT diesel engine. Remove the cover from the mudguard that covers the hole on it to drain the engine oil.
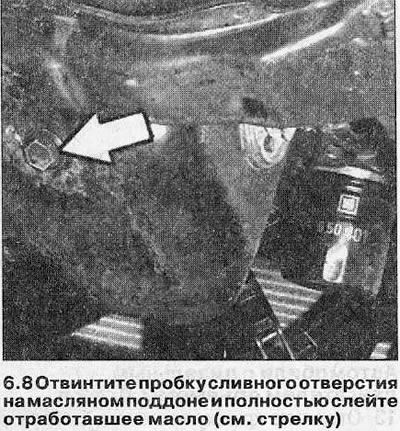
7. Substitute a container to collect the drained oil.
8. Unscrew the drain plug on the oil pan and completely drain the used oil (see arrow in illustration).
Attention! If a large amount of metal chips and metal abrasion products are found in engine oil, then this indicates the presence of scoring, for example, in crankshaft bearings or connecting rod bearings. To avoid further damage, the oil passages and oil circulation hoses must be thoroughly cleaned after the engine has been overhauled.
As an additional measure, if installed, replace the oil cooler.
9. After draining the engine oil, screw the plug into the drain hole.
Drain plug tightening torques
Gasoline engines
- Plug with copper sealing washer - 55 Nm
- Plug with metal sealing washer - 10 Nm
- Plug with rubber sealing washer - 10 Nm
- Diesel engines 2.0 / 2.2 l - 10 Nm
Diesel engine 2.5L (X25DT)
- Bolt M12 - 25 Nm
- Bolt M16 - 45 Nm
- Diesel engine 2.5L (Y25DT) - 10 Nm
10. Place a container under the oil filter.
Oil filter replacement
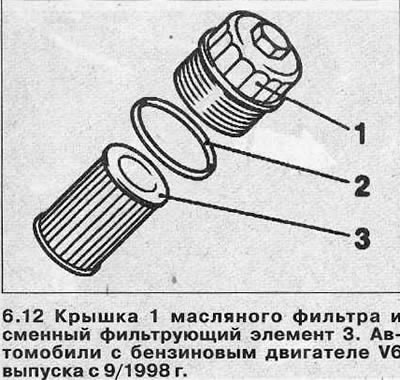
Vehicles with V6 petrol engine from 9/1998
11. Unscrew the oil filter cover and remove it together with the replaceable filter element, if it has not been removed before.
12. Install cover 1 with a new replaceable filter element 3, a new sealing ring 2 and tighten it with a force of 25 Nm (see illustration).
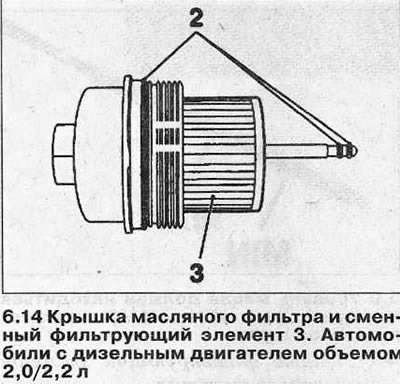
Vehicles with 2.0/2.2 L diesel engine
13. Unscrew the oil filter cover and remove it together with the replaceable filter element, if it has not been removed before.
14. Install the cover with a new replaceable filter element 3, new sealing rings 2 and tighten it with a force of 20 Nm. If necessary, tighten the cover up to 25 Nm (see illustration).
Vehicles with a 2.5L diesel engine
Attention! Depending on the configuration, to remove the oil filter, it may be necessary to dismantle some adjacent parts.
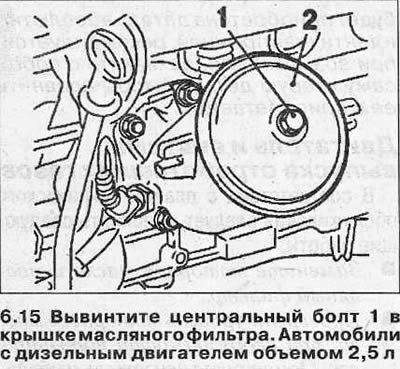
15. Unscrew the central bolt 1 in the oil filter cover and remove the oil filter cover 2 together with the central bolt (see illustration).
16. Remove the replaceable filter element from the filter housing and collect the leaked oil with a rag.
17. Insert a new replacement filter element into the oil filter housing.
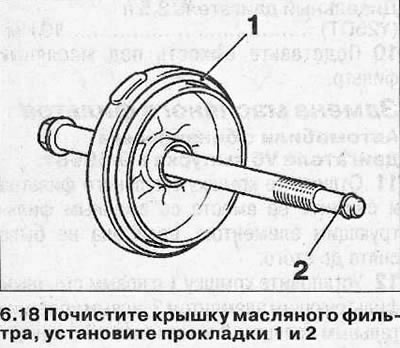
18. Clean the oil filter cover, install gaskets 1 and 2 on the cover and on the central bolt (see illustration).
19. Install the central bolt into the filter housing and put on the cover by pressing on it. The bolt must go into the threaded hole on the bottom of the filter.
20. Tighten the oil filter center bolt by hand and then to 25 Nm. If the cover is metal, then its tightening is 30 Nm.
Refilling engine oil
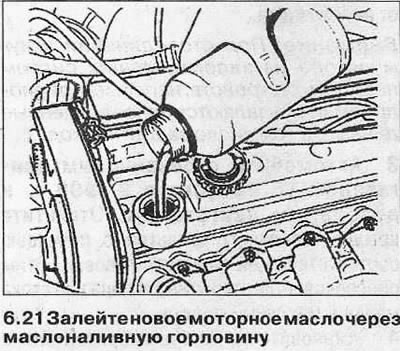
21. Fill in new engine oil through the oil filler neck in the cylinder head cover (see illustration). Attention! When refueling engine oil, it is recommended to fill in approximately 1/2 liter less than the filling volume without fail. Then start the engine and warm it up. Then turn off the engine and after a few minutes check the oil level and add oil if necessary. Excess oil must be removed because it can cause damage to the engine and catalytic seals.
22. Replace the oil filler cap and lower the vehicle onto its wheels.
23. Carry out a test drive, and upon completion, check the tightness of the fit of the drain plug and oil filter. Tighten them if necessary, with some care.
24. Check the oil level about 2 minutes after stopping the engine and top up if necessary.
25. Reinstall the engine mudguard. Attention! For better control over the condition and operation of the engine, it is recommended to fill in engine oil of the same type and brand. In this regard, it is recommended that after each oil change, a plate indicating the brand and viscosity of the filled oil be installed.
Attention! The indiscriminate use of oils of different types adversely affects the condition of the engine. If possible, do not mix engine oils of the same type, but different brands. If necessary, you can safely mix oil of the same brand and type, but of different viscosities.
Visual search for oil leaks
With increased oil consumption, check all places where leaks are possible. To this end:
26. Unscrew the oil filler cap and check the condition of its gasket.
27. Check the condition of the crankcase ventilation hose, for example from the crankcase to the cylinder head and from the head to the air filter or intake manifold.
28. Check the cylinder head cover gasket.
29. Check the cylinder head gasket.
30. Check the oil filter gasket.
31. Check the gasket on the engine oil drain plug.
32. Check the condition of the O-ring of the oil level sensor
33. Check the oil pan gasket.
34. Check the front and rear oil seals of the camshaft and crankshaft.
35. Check up tightness of a casing of a drive of the gas-distributing mechanism.
Since oil leaks usually spread over a large surface area of the engine, it can be difficult to determine the location of the leak at a glance. The following search method is recommended:
36. Wash the engine. To do this, spray the engine with an aerosol cleaner and, after allowing it to act, rinse with water. Before this, cover the generator and fuse box with a plastic bag.
Attention! Engine washing should only be carried out on car washes equipped with an oil catcher.
37. Sprinkle the outside of the connecting joints and their gaskets with lime or talc.
38. Check the oil level again, top up if necessary.
39. Take a test drive. Since the oil liquefies when the engine is hot and is therefore released more quickly at leaks, it is best to make this trip on a high-speed road, covering a distance of about 30 km.
40. Examine the engine at the end of the test drive, illuminating it with a lantern. Locate leaks and repair.
Engine oil level - check
After about every 1000 km, the engine oil level should be checked and topped up if necessary.
Per 1000 km of run, oil consumption is allowed no more than 1 liter. Exceeding this volume indicates wear of the oil seals and / or piston rings.
41. Install the car on a horizontal surface.
42. Stop the engine and wait about 3 minutes for the oil to drain into the sump.
43. Pull out the oil level indicator (probe) and wipe it dry with a clean cloth.
44. Insert the probe all the way into place and pull it out again. The oil level must be in the area between the marks (see illustration).
45. Add engine oil only when the level is close to the MIN·mark.
The difference between the MAX and MIN·marks is approximately 1 liter. For vehicles with a diesel engine of 2.5-1.5 liters.
46. Fill in oil through the oil filler neck in the cylinder head cover. Use only recommended types and grades of oils without additives.
Visitor comments