
- Lubricate the tailgate hinges.
- Lubricate the door opening limiters, door hinges, hood latch.
- Conduct a visual inspection of the body, the state of anti-corrosion protection of the bottom and body cavities and eliminate damage.
- Check the condition of the seat belts.
- Replace the heater/air conditioner dust filter element.
Seat Belts - Visual Check
Given that seat belts are an important element of passive safety, they must be replaced immediately if they do not function properly.
Attention! The noise that occurs when the seat belts are retracted is due to the operation of the automatic belt winder. Never lubricate the mechanism to eliminate these noises. In extreme cases, exchange the seat belt for another. It is forbidden to disassemble the automatic retractor of the seat belts, as this may pop out the tensioned spring. Danger of accident!
1. Pull the seat belt completely out of the retractor. Check the belt webbing for broken fibers. Damage can be caused, for example, by a pinched belt or a burning cigarette. In this case, replace the belt.
If places with scuffs are found, but the fibers are intact, then the belt does not need to be replaced.
If the belt is heavy, check that the belt is not twisted. If necessary remove a covering of an average rack.
If the automatic retractor does not work, replace the belt.
2. Clean the webbing with soap and water only, never use solvents or chemical cleaners.
Dust filter (cabin filter) — replacement of the replaceable filter element
Required parts to replace worn ones:
- replaceable dust filter element.
The dust filter is installed on the lower right under the windshield when viewed in the direction of travel.
Removing
3. Unscrew the bolts securing the right side of the fairing cover (see arrows in the illustration, part 1).
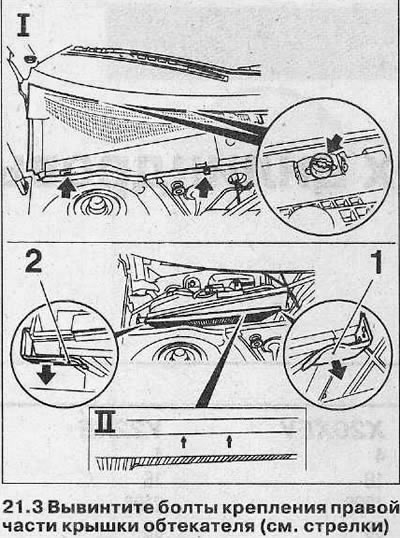
4. Remove the glass washer jet and fairing grille.
5. Remove clips 1 and 2 and remove the replacement filter element.
Fairing check
6. Make sure, by illuminating the fairing channel with a torch, that it is not clogged or dirty. Remove dirt if necessary, as water could get into the front passenger's footwell.
Installation
7. Install the filter element in such a way that the arrows II marked «AIR FLOW» («air flow direction») on the filter indicated in the direction of the air flow, i.e. to the salon.
8. Secure the replacement filter element with the clips.
9. Reinstall the washer jet and fairing grille.
Visitor comments