


Contents: Measuring the tread depth ⬇ Tire pressure - checking ⬇ Checking the tire valve ⬇ Anti-skid chains ⬇ Wheel replacement/replacement ⬇ Wheel balancing ⬇ Some recommendations for tire care ⬇ Tire cleaning ⬇ Tire storage ⬇ Tire running-in ⬇ Tires and wheels - designations ⬇ Letter designations of the maximum…⬇ Date of manufacture of tires ⬇ Incorrect tire wear ⬇
Depending on the model and configuration, OPEL OMEGA vehicles can be equipped with tubeless radial tires and wheels of different sizes. When installing tires or wheels that are not specified in the technical passport, a corresponding entry should be made in the vehicle documents. As a rule, permission from the manufacturer is required for this.
Please note: When using tires and wheels of certain sizes, the use of anti-skid chains is not permitted.
When replacing a disc, you should consider not only its width and diameter, but also the depth of the press-in. The depth of the press-in is the distance from the middle of the disc to the surface where the wheel disc meets the brake disc.
All disc wheels are made with a ring protrusion. The ring protrusion is a bead pressed onto the landing shelf, which does not allow the disc to squeeze the tubeless tire even at a very sharp turn of the car.
Measuring the tread depth
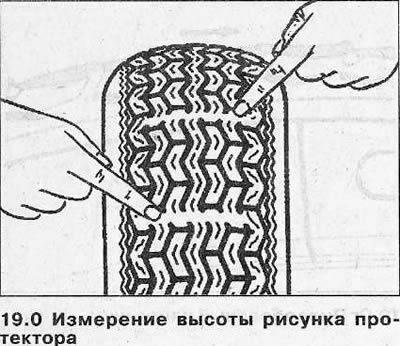
According to existing legislation, the use of tires with a residual tread height of at least 1.6 mm over the entire tread is permitted.
For safety reasons, it is recommended to replace summer tires when the remaining tread height is 2 mm, and winter tires when it is 4 mm.
The tread depth should be measured at the points of greatest wear. There are tire wear marks (TWI) at the bottom of the longitudinal tread grooves. The locations of the marks are marked on the sidewall of the tire with the letters TWI or triangles.
Tire pressure - checking
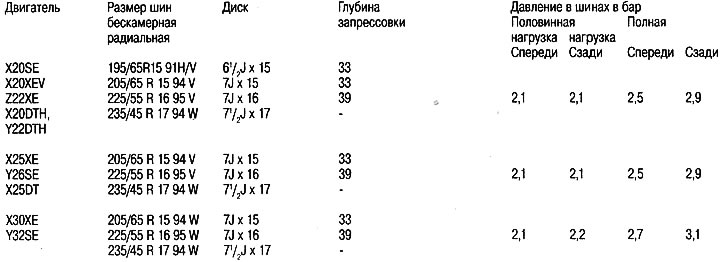
Tire pressure is set by the vehicle manufacturer based on various parameters. These include vehicle load and maximum permissible speed.
It is important to maintain the correct pressure in the wheels of the appropriate size. Maintaining the prescribed tire pressure is of great importance for ensuring safe driving, as well as for the service life of the tires. For this reason, it is recommended to check the tire pressure at least once every two weeks, as well as before each long trip (including the spare wheel).
1. Check the pressure only when the tires are cold. Increased tire pressure resulting from a long journey cannot be released. The tire pressure increases by approximately 0.2-0.4 bar during long-term driving.
Winter tyres are generally used with excess pressure, i.e. approximately 0.2 bar higher than summer tyres. The values recommended by the winter tyre manufacturer must be observed. If the winter tyres have a speed limit, the corresponding maximum permissible speed must be indicated on a sticker that must be visible to the driver. When driving with a trailer, the tyre pressure must be increased to the values specified in the "Full load" column.
The prescribed tire pressure is given in the vehicle's operating instructions.
When checking the tire pressure as part of the maintenance, the pressure in the spare tire should also be checked. The air pressure in the spare tire should correspond to the maximum load of the vehicle.
Tools required:
- pump or compressor (at the gas station).
2. Unscrew the protective cap of the tire valve.
3. Check and adjust tire pressure to specified values.
Checking the tire valve
4. Unscrew the protective cap of the tire valve.
5. Lubricate the valve opening with soapy water or spit on it. If a bubble forms, tighten the valve with the other end of the protective cap.
6. Check the valve again. If bubbles still form and the valve no longer tightens, replace it. Have the work done by a workshop.
7. Screw the protective cap onto the valve.
Anti-skid chains
The installation of anti-skid chains is permitted only on drive wheels.
The speed of movement with anti-skid chains should not exceed 50 km/h. On roads without snow drifts and ice, the chains must be removed.
It is recommended to use only chains with small links, no more than 15 mm, including the connecting link.
Wheel replacement/replacement
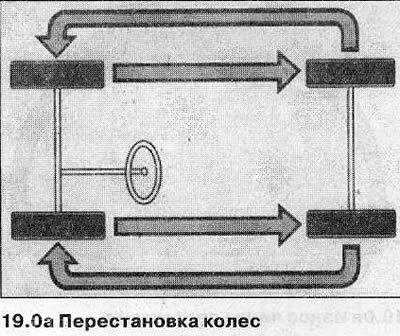
It is not advisable to change the direction of rotation of the tires when rotating the wheels, since the tires are adjusted to the new direction of rotation only after significant wear. On some tire models, the direction of movement is indicated by an arrow on the sidewall of the tire. In these cases, the indicated direction of movement must be strictly observed.
If the front wheels are noticeably more worn, it is recommended to swap them with the rear ones. This ensures approximately equal service life for all 4 wheels.
Attention! Do not change tires individually, but at least tires on both wheels of one axle. In this case, tires with a greater residual tread depth should always be installed at the front, on the front wheels. Only tires of the same type and, if possible, with the same tread pattern and from the same manufacturer should be installed on all 4 wheels. Tires that have been manufactured for more than 6 years should only be installed in cases of extreme necessity and, in doing so, exercise extreme caution when driving; never install used tires whose origin is unknown. When replacing rims and tires, be sure to also change the valve.
Removal the wheel
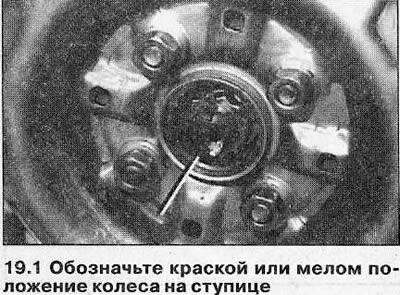
1. Mark the position of the wheel on the hub with paint or chalk if the wheel is to be re-installed. Thanks to the marks, the balanced wheel can be installed in its original position (see illustration).
Light metal alloy wheels are covered with a layer of protective varnish. Be careful not to damage this layer when removing or installing the wheel. If necessary, paint over the damaged area with the appropriate varnish.
2. Clean dirty wheel bolts. Replace bolts with new ones if their threads are damaged or rusty. Do not lubricate wheel bolts.
3. Tighten the wheel bolts in a crisscross pattern in several passes. The tightening torque for all wheel types is 110 Nm.
Caution! Bolts tightened with different force or on one side may cause the wheel to jam on the hub or the hub itself.
Wheel balancing
Serially produced wheels are balanced at the factory. Balancing is necessary to equalize different weight distributions and material errors. Unbalanced wheels manifest themselves during movement through jolts and shaking. The steering wheel begins to shake at high speed.
Typically, this shaking only occurs within a certain speed range and stops when the speed increases or decreases.
Over time, wheel imbalance can lead to problems with the suspension, steering and shock absorbers.
Wheel balancing must be performed after each tire repair because tire wear and repairs cause changes in the weight distribution of the tire material.
Attention! Balancing the front wheels without removing them from the vehicle is impossible due to the hydraulic support installed on the transverse suspension arm.
Some recommendations for tire care
Tires have a kind of "memory", and improper handling of them, and this includes, for example, fast or frequent driving over curbs or rails, often results in their failure. Moreover, this happens only some time later and at the most inopportune moment.
Tire cleaning
Do not wash your tires with a steam jet. If the nozzle of this device is held too close to the tire, its rubber layer will be irreversibly destroyed within a few seconds, which cannot be corrected even with cold water. Tires cleaned in this way must be replaced for safety reasons.
Tires that have been in contact with oil or grease for a long time are also subject to replacement. In this case, the tire first swells and then takes its normal shape and looks undamaged, but the load-bearing capacity of the tire is reduced.
Tire storage
Tires should be stored in a cool, dark and dry place. They should not come into contact with lubricants, oils or fuel.
Store wheels lying down or hanging on wheel rims in the garage or basement. If tires are not mounted on rims, they should be stored standing up.
Before removing the wheels, increase the tire pressure slightly (approximately 0.3-0.5 bar). For winter tires, use your own rims, since remounting tires to summer rims is not justified in terms of savings.
Tire running-in
New tires have a particularly smooth surface. This is due to the manufacturing process. For this reason, new tires, including a new spare tire, must be run in. During the running in process, as a result of the wear that has begun, the smooth surface becomes rough.
Until the first 300 km of driving with new tires, the driver must be especially careful when driving on wet roads.
Tires and wheels - designations
Example of designation on disc wheels 61/2J x 14 ET33
6½ is the width of the rim in inches.
J - letter indicating the height and contour of the side (B - low side).
x - designation of a solid disk.
14 - landing diameter in inches.
ET33 - pressing depth 33 mm.
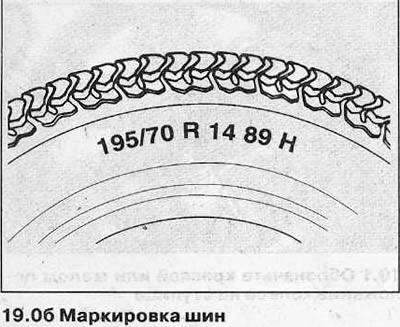
195 - tire profile width in mm.
/70 - height to width ratio (the height of the tire profile is 70% of the width).
If there is no special designation of the profile height, (for example, 155 R 13), this means that in this case the usual or "normal" ratio is used. For radial tires it is 82%.
R - radial tire.
14 - landing diameter in inches.
89 is a number indicating the permissible load on the tire.
Attention! If there is an M + s between the designations 14 and 89, then we are talking about a tire with a winter tread pattern.
H - letter indicating the maximum permitted speed for these tires (in this case up to 210 km/h).
The letter indicating the maximum permitted speed for these tires is located after the tire size. The maximum permitted speed designation applies to both summer and winter tires (see illustration 19.06).
Letter designations of the maximum permitted speed for tires
Letter designation, Maximum permissible speed
Q — 160 km/h
S — 180 km/h
T - 190 km/h
H - 210 km/h
V — 240 km/h
W — 270 km/h
Date of manufacture of tires
The date of manufacture is indicated on the tire as a manufacturer's code.
Example: DOT CUL2 UM8 0703 TUBELESS
DOT - Department of Transport (US Department of Transportation).
CU is an abbreviated designation of the tire manufacturer.
L2 - tire size.
UM8 - tire construction.
0703 - date of issue, 7th working week 2003.
Note: If instead of a 4-digit digital code there is only a 3-digit code followed by the symbol (, this means that the tire was manufactured in the past decade. For example, the designation 509 (stands for the 50th production week of 1999.
TUBELESS - tubeless tire (TUBETYPE - tube tire)
Attention! Starting from 10/98, new tires must additionally have a control number.
EEC (Economic Commission for Europe) UN, which is applied to the sidewall of the tire. This number confirms that the tire complies with the ECE standard. If, after 10/98, tires without the ECE control number are installed, the vehicle operating permit is cancelled.
Incorrect tire wear
For the front wheels, slightly greater wear on the tread shoulder compared to the wear on its middle part is normal.
Moreover, due to the slope of the road, the wear of the tread shoulder facing the middle of the road (for the left wheel - the outer shoulder, for the right - the inner shoulder) may be more pronounced.
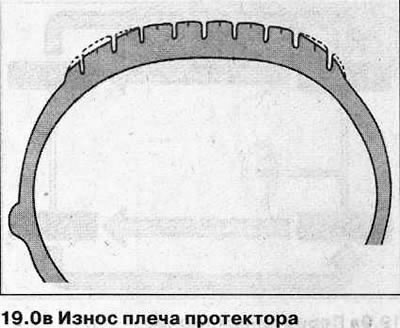
Uneven tire wear is mostly a consequence of too low or too high tire pressure, and can also be caused by incorrect adjustment of wheel mounting angles, poor wheel balancing, as well as defects in shock absorbers and discs.
Saw-tooth tread wear is usually caused by overloading the vehicle.
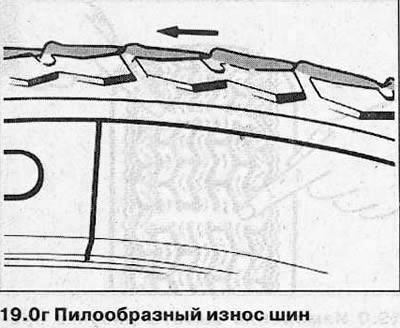
Incorrect wheel alignment and wheel imbalance produce typical tire wear patterns, which are listed in the list of faults.
Visitor comments