
Maintenance work
The engine must be off.
Press the brake pedal 10 times.
Now keep the pedal fully depressed and start the engine.
If the brake booster is working properly, then the pedal should move a little. If the pedal does not go down, then the brake booster is faulty.
The defect most likely lies in the low pressure system: the vacuum hose from the intake manifold to the brake booster is leaky, the return valve in the vacuum hose is leaky, a defect in the rubber ring between the brake master cylinder and the servo or brake booster membrane.
To check the check valve, remove the vacuum hose to the servo on the distributor part at the intake manifold - it cannot be blown out, but suction is possible.
When installing a new valve, the arrow on the valve body must point in the direction of the intake manifold.
To replace a defective rubber ring between the main brake cylinder and the booster, the cylinder must be dismantled.
In conclusion, there is still a defect in the brake booster itself. In this case, repair is not possible - replace it.
Removing the brake booster
At the driver's feet, remove the lining under the dashboard.
Remove the safety clip from the piston rod pin and remove the pin.
In an impellent compartment remove a rubber lining from a forward wall.
Remove the vacuum hose from the brake booster.
Unscrew the main brake cylinder from the brake booster.
Unscrew the wiring harness channel on the front wall.
Remove the box with the relay on the brake booster.
Where necessary, unscrew the brake pipes from the ABS hydraulic unit.
Loosen the brake booster mounting bolts.
Behind on the brake booster unscrew four fixing nuts.

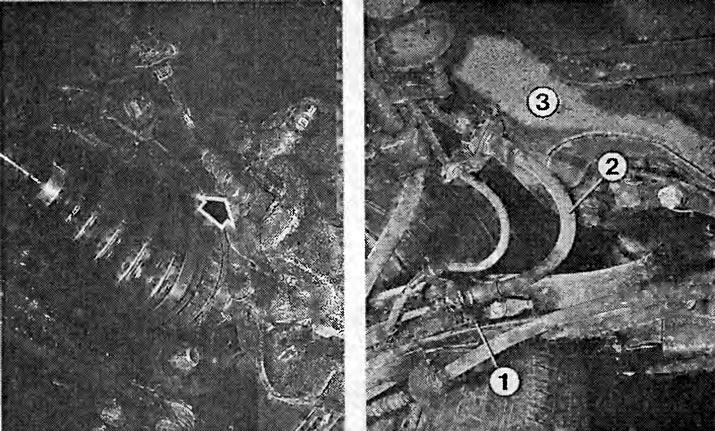
The brake booster is located on the left in the engine compartment. The numbers indicate:
1 - vacuum hose to the intake manifold;
2 - brake booster;
3 - expansion tank with brake fluid;
4 - main brake cylinder;
5 - fixing nut of the main brake cylinder.
Slightly skew the brake booster in the engine compartment and pull it up.
If a new brake booster is being installed, remove the bracket, locknut and fork from the old one.
Loosely screw the hex nut and fork onto the piston rod of the new brake booster.
Adjust the length of the piston rod: the distance from the fork to the adjacent surface with four spacer fingers should be 149.5 + 0.5 mm. Lock the hex nut (18 Nm).
Screw the bracket with a new gasket (20 Nm).
Insert the brake booster into the front wall from the side of the engine compartment. Tighten the fixing nuts to 20 Nm.
Brake pipes on the hydraulic unit - 20 Nm.
Lubricate the pivot pin lightly before installation.
Insert a new O-ring between the brake booster and the master cylinder.
After installation, check the function of the brake booster.
Replacement of brake pipes
Unscrew the union nut of the brake pipe. To do this, adhere to the mutual screw connection, for example, with a brake hose.
If the nut is rusted to the tube, which because of this rotates with it, then in any case the tube must be replaced. Thin-walled tubes break off quickly.
To loosen tubing connections, the following technique can be used if this piece of tubing already needs to be replaced:
Saw off the brake pipe next to the screw connection, unscrew the nut with a wrench like «nut» with a hexagon.
If the new tube needs to be bent a little more, then this can only be done with a large radius. Otherwise, the thin pipe will break off.
Use your thumb to hold the inside of the tube while bending it. This way you can work slowly along the radius.
Do not forget any protective tubing hoses that may be present.
Lay the brake pipes in the spacer brackets.
Tightening torque 16 Nm.
Dismantling the brake hoses
Front brake hose: remove the corresponding front wheel.
If necessary, remove the brake pad wear indicator wire clip from the brake hose.

brake pipe (2) attached to the brake line (1) union nut (3). The brake hose, in turn, is secured to the bracket with a safety bracket (4).
Left: in front, the brake hose is attached to the brake caliper with a hollow bolt. The hollow bolt may only be tightened to 40 Nm.
On right: The photo shows the brake line (2), laid between two brackets on a support (3) rear axle and, accordingly, on the trailing arm (1). In the brackets, the brake hose is fixed with metal clips.
Unscrew the union nut of the corresponding brake pipe, while pressing the connecting element in the opposite direction.
Remove the safety shields from the brackets with tongs.
Remove the hollow bolt from the brake caliper. Remove the brake hose. Use new gaskets when installing.
Rear brake hose: unscrew both union nuts of the brake pipes, press the connecting element in the opposite direction.
Remove the safety shields from the brackets with tongs.
Remove the brake hose from the brackets.
Mounting: do not mount the brake hoses twisted. For control, longitudinal strips along the hoses are used.
Tightening torques: brake hose on brake caliper 40 Nm, brake hose on brake pipe 16 Nm.
Remove air from the brake system.
Immediately after repair, check if the hoses are rubbing anywhere.
Recheck after a long drive.
Visitor comments