
Attention: It is necessary to replace all the brake pads of one vehicle axle at the same time, even if only one of them has reached the wear limit! Use only pads approved by the manufacturer!
Corsa models up to August 2003
1. The procedures for replacing and checking the condition of the rear brake pads are basically the same as those for the front brakes. You must follow all the instructions in Section 5.
2. Support the front wheels with wheel chocks, remove the rear wheels and place the rear of the vehicle on jack stands.
3. Turn out a bolt of the bottom directing finger and turn a support on an axis of the top directing finger upwards.
4. The brake pads of the rear brake mechanisms are installed in the guide on the sliding plates (see resist. illustration). Remove the pads from the guide first, and then the plates.
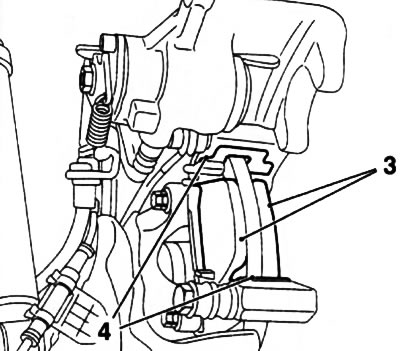
6.4. brake pads (3) and plates (4) sliding rear disc brakes
Attention: If you plan to re-install the same brake pads, when removing them, you must mark the places of their installation!
5. Carry out all the checks and recommendations given in paragraphs 4 to 7 Section 5 (see above).
6. Depress the brake piston using a special tool Opel-KM-610/7 (see resist. illustration), using the KM-6007-10 adapter, or using the Hazet-4970/6 fixture. Slowly turn the tool handle to the right (clockwise) - the piston will provide significant resistance. When the piston is pressed, the brake fluid will be squeezed out into the reservoir, monitor the fluid level, pump out the excess if necessary.
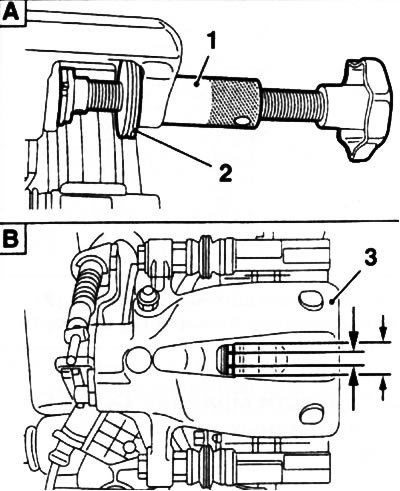
6.6. Adapter KM-6007-10 (2) special tool Opel-KM-6007 (1) should fit snugly on the caliper (3).
Attention: Press the piston only with a special tool! The use of improvised means can lead to a violation of the adjustment of the parking brake!
7. The piston at first wring out back against the stop. Then again turn the axis of the fixture so that the piston groove is in line with the viewing window of the caliper (see illustration 6.6, B).
8. Before installing new brake pads, clean the mating surfaces of the brake mechanism and guides with alcohol. Lubricate the guide at the indicated points (see resist. illustration) thin layer of heat-resistant grease. Install new slip plates.
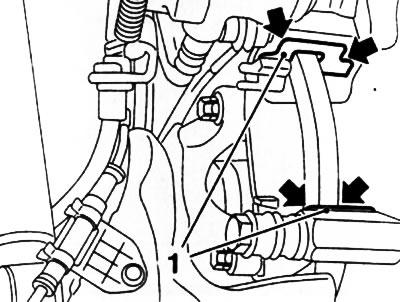
6.8. Lubrication points (indicated by arrows) brake shoe guide: 1. Sliding plates
9. Fit new brake pads between the plates. Install pad with acoustic wear indicator (with appropriate equipment) from the brake piston side.
10. After installing the pad, remove the protective film from its reverse side - an adhesive is applied to it to connect to the caliper.
11. Place the caliper on the guide and pads, while making sure that the sliding plates do not bend and that the brake pads do not stick together with the caliper too early.
12. Install a new caliper lower guide pin bolt and tighten to torque while holding the bolt from turning with a second wrench.
13. Further installation is carried out in the reverse order of removal. Follow the instructions given in Section 5.
Corsa models since September 2003 and Meriva models
Note: On these models, the removal / installation of the brake pads of the rear brake mechanisms is carried out in almost the same way as described above. The following is a description of the differences only.
14. Remove the caliper (see Section 8).
15. Using a special tool Opel-KM-6007 (see illustration 6.6A), using the KM-6007-30 adapter, depress the brake piston.
16. Remove the brake shoes with sliding plates from the shoe guide.
Attention: Be careful when removing the inner pad - do not damage its back surface! When reinstalling the same brake pads, replace the adhesive film on the back of the inner pad!
Visitor comments