
Attention: It is necessary to replace all the brake pads of one vehicle axle at the same time, even if only one of them has reached the wear limit! Use only pads approved by the manufacturer!
1. The procedures for replacing and checking the condition of the rear brake pads are basically the same as those for the front brakes. You must follow all the instructions in Section 5.
2. Support the front wheels with wheel chocks, jack up the rear of the vehicle and place it on jack stands. Remove both rear wheels.
3. Using a screwdriver, disconnect the spring clips (see resist. illustration) brake pads from the caliper and remove them.
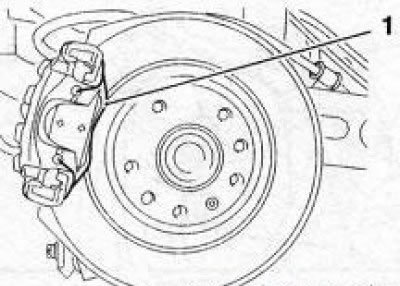
6.3 Rear brake spring clip
4. Remove dustproof caps of openings of directing fingers of a support. Turn out bolts of fastening of directing fingers (see resist. illustration) and remove the caliper with the inner brake pad. Remove the inner pad from the caliper and tie the caliper to the strut with a piece of wire - do not leave it hanging on the hose.
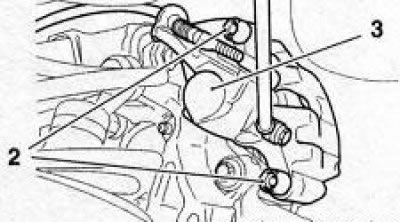
6.4 Bolts (2) caliper guide pins (3) rear brake mechanism
6. Remove the outer guide block.
Attention: If you plan to re-install the same brake pads, when removing them, you must mark the places of their installation. It is not allowed to change the brake pads from the outside to the inside and from the right wheel to the left!
7. Complete all checks.
8. Depress the brake piston using a special tool Opel-KM-6007 (see resist. illustration), using adapters KM-6007-10 and KM-6007-20 or using Hazeit 4970/6. Slowly turn the tool handle to the right (clockwise). When the piston is pressed, the brake fluid will be squeezed out into the reservoir, monitor the fluid level, pump out the excess if necessary.
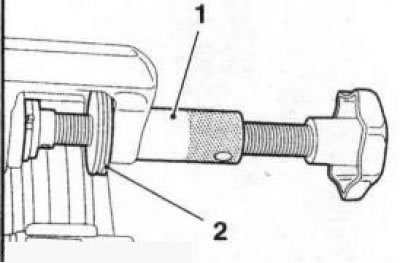
6.8 Thrust flange (2) special tool Opel-KM-6007 (1) should fit snugly on the caliper
Attention: Press the piston only with a special tool! The use of improvised means can lead to a violation of the adjustment of the parking brake!
9. Before installing new brake pads, clean the mating surfaces of the brake mechanism and rubbing alcohol. Lubricate their pad rubbing surfaces (see resist. illustration) thin layer of heat-resistant grease.
10. Insert inner shoe with spring clips (see illustration) so that the springs fall into the groove of the piston.
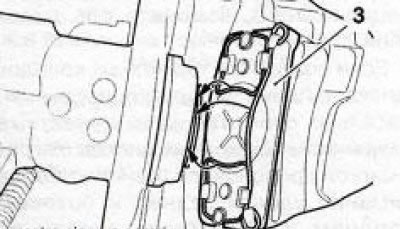
6.10 Fitting the inner shoe (3) rear brake mechanism with spring clamps - the springs must fit into the mounting groove on the piston (see arrows)
11. Insert the outer brake shoe into the guide, install the caliper, screw in the guide pin mounting bolts and tighten them to the required torque.
12. Further installation is carried out in the reverse order of removal. Follow the instructions given in Section 5.
13. Before starting intensive use, let the brake pads get used a little. To do this, brake the car several times from a speed of 80 km / h to a speed of 40 km / h by gently pressing the pedal. Then let the brake cool down.
Note: After changing the pads for about 200 km, try to avoid sudden braking as much as possible.
Visitor comments