
OpelBook.ru
Cars AvtoVAZ Cars Mitsubishi Cars BMW Cars Mercedes Cars Nissan Cars Toyota Cars Chevrolet
English Русский
Български
Беларускі
Український
Српски
Hrvatski
Română
Polski
Slovenský
Magyar
 |  Sitemap  |  Contacts  |    


Main Astra Corsa Insignia Kadett Omega Vectra Zafira Others Articles
Vectra A (1988-1995, petrol) Vectra A (1988-1995) Vectra B (1995-2002, petrol) Vectra B (1995-2002) Vectra C (2002-2008)
  • Main
  • Vectra
  • Vectra C
  • Chassis
  • Brake system
  • Checking the condition and replacing brake lines and hoses

Checking the condition and replacing brake lines and hoses (Opel Vectra C)

            0

1. The service brake system operates at a fairly high pressure: 2.0-2.5 bar, so metal tubes of the appropriate cross-section are used as brake lines. However, to supply fluid to the moving elements of the suspension and chassis, it is necessary to use hoses that are capable of withstanding the required loads with a certain margin of safety.

2. Every time you perform maintenance, check all elements of the brake system for cracks, signs of damage to the protective shell, traces of fluid leaks, swelling and other damage. Hoses are a critical and most vulnerable component of the brake system, so they must be inspected with the utmost care. If any questionable signs are detected, the suspected hose must be replaced.

Attention: Do not allow brake hoses to come into contact with oil or gasoline, do not paint them, or expose them to special compounds for anti-corrosion protection of the underbody.


3. Over time, during vehicle operation, old brake hoses may swell, reducing their flow area - this complicates the return of brake fluid to the master cylinder and the complete removal of the brake pads from the disk. As a result, the brake mechanisms heat up, which can lead to failure of both the mechanisms themselves and the wheel bearings.

4. Replacement steel and flexible brake lines can always be purchased at branded service stations, as well as in branded automotive accessory stores.

Attention: Do not under any circumstances use any replacement tubes other than branded ones, specially designed for installation in the brake circuit of your vehicle.


5. If it is necessary to replace metal brake lines, it is necessary to contact an Opel service station, since their installation requires a certain skill and qualification; careless handling can lead to bending of the tubes and affect the size of the channel cross-section. Brake lines must be located at a distance of at least 20 mm from moving or vibrating components of the body, suspension or steering gear. When installing, it is necessary to use all standard clamps and line holders.

6. Before replacing the hose, check the brake fluid level in the reservoir and add the required amount if necessary. Remove the corresponding wheel. Prepare plugs to plug the brake lines after disconnecting them and a rag to remove spilled brake fluid.
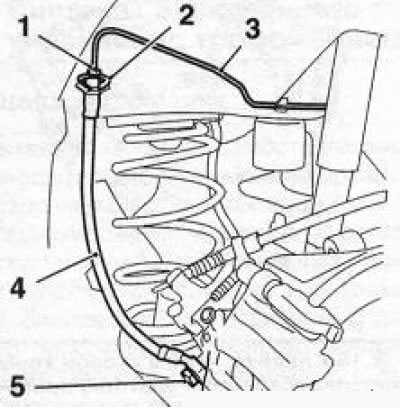
4.6 Fastening the brake hose (4) of the rear wheel: 1. Union nut; 2. Locking bracket; 3. Metal…

4.6 Fastening the brake hose (4) of the rear wheel: 1. Union nut; 2. Locking bracket; 3. Metal brake line; 5. Hollow bolt


(Information taken from the website: «opelbook.ru»)

Note: The procedure for replacing the front brake hose is described below. Replacing the rear brake hose is almost identical, with the only difference being that an intermediate hose holder is not provided (see accompanying illustration).


7. To loosen the union nut connections of the flexible hoses with the steel tubes of the hydraulic lines, use special open-end wrenches with a slotted head. After loosening the union nut, remove the locking bracket and release the brake hose from the support bracket (see accompanying illustration) in the wheel arch, - the locking bracket must be installed in place after disconnecting the hose. Immediately close the brake pipe with the prepared plug.
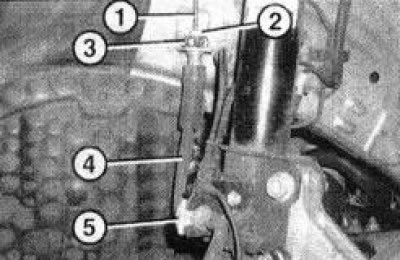
4.7 After loosening the union nut (2) of the union nut with the metal line (1), remove the locking…

4.7 After loosening the union nut (2) of the union nut with the metal line (1), remove the locking bracket (3) and release the brake hose (4) from the bracket: 5. Locking plate


8. Unscrew the hollow bolt (see accompanying illustration) and disconnect the brake hose from the caliper nipple. Remove the old sealing washers - the washers must be replaced during assembly.
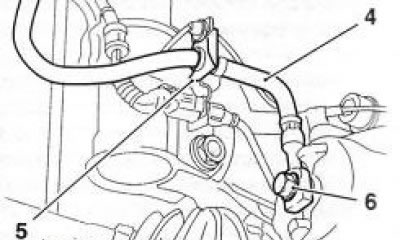
4.8 Fastening the brake hose (4): 5. Locking plate; 6. Hollow bolt

4.8 Fastening the brake hose (4): 5. Locking plate; 6. Hollow bolt


9. Release the hose from the intermediate holder on the shock absorber strut (see illustration 4.8), for which use pliers to remove the locking plate.

10. Make sure that the new brake hoses exactly match the dimensions and characteristics of those removed from the vehicle.

11. Fasten the brake hose with new sealing rings to the caliper, tighten the hollow bolt with the required force. Then remove the plug and connect the hose to the metal brake line, tighten the union nut. After that, fasten the hose in the intermediate holder on the shock absorber stand - make sure that the hose does not twist during installation.

12. With the front wheels raised, turn the steering wheel to the right and left - the hose should not interfere with the moving parts of the steering mechanism and should not come into contact with other structural elements.

13. After replacing the hose, be sure to remove air from the brake system using a special device. Check the fluid level in the brake master cylinder reservoir, and make the appropriate adjustments if necessary.

14. Before operating the vehicle, make sure that the brakes are functioning properly.


This article is available at russian, bulgarian, belarusian, ukrainian, serbian, croatian, romanian, polish, slovak, hungarian
Checking the article: Meshcheryakov Damir

Share information:

Previous articles
Opel Vectra C: Brake system
Next articles

Bleeding the brake system
Electronic braking control systems
Specifications and description of the brake system
Replacing the front disc brake pads
Replacing the rear wheel disc brake pads
Removal and installation front brake calipers/pad guides
Removal and installation rear brake calipers/pad guides
Removal, installation and inspection of the brake disc
Removal and installation of the master brake cylinder (MBC)


See similar ones from other Opel car manuals:
▶ Checking the condition and replacing brake lines and hoses Opel Astra H (2004-2009)
▶ Checking the condition and replacing brake lines and hoses Opel Corsa B (1993-2000)
▶ Checking brake lines and hoses Opel Insignia A (2008-2017)
▶ Checking the condition and replacing the engine compartment… Opel Frontera A (1991-1998, petrol)
▶ Rear Brake Pads — Checking and Replacing Opel Omega B2 (1999-2003)
Link to this page in different formats

Visitor comments


No comments yet


How much will 15 + 19 =


Vectra C (2002-2008) 
  • General information
  • User manual
  • Vehicle device
  • Maintenance
  • Troubleshooting
  • Power unit
  • Engine repair
  • Cooling system
  • Power and control system
  • Engine electrics
  • Transmission
  • Clutch
  • Car gearbox
  • Drive shafts
  • Chassis
  • Car suspension
  • Steering
  • Brake system
  • Body
  • Exterior
  • Interior
  • Doors, locks and windows
  • Heating and ventilation
  • Electrical equipment
  • Equipment and devices
  • Headlights and lighting
  • Electrical circuits
Vectra B (1995-2002) 
  • General information
  • User manual
  • Weekly checks
  • Maintenance (gasoline)
  • Maintenance (diesel)
  • Troubleshooting
  • Power unit
  • SOHC gasoline engine
  • DOHC petrol engine
  • Diesel engine 1.7 liter
  • Diesel engine 2.0 liters
  • Engine repair
  • Cooling system
  • Fuel system (gasoline)
  • Fuel system (diesel)
  • Charging system
  • Launch system
  • Ignition and preheat
  • Transmission
  • Clutch
  • Mechanical gearbox
  • Automatic gearbox
  • Drive shafts
  • Chassis
  • Brake system
  • Wheel suspension
  • Steering
  • Body
  • Exterior
  • Interior
  • Doors and windows
  • Heating and ventilation
  • Electrical equipment
  • Equipment and devices
  • Electrical circuits
Vectra B (1995-2002, petrol) 
  • General information
  • Maintenance
  • Help with malfunctions
  • Power unit
  • Engine repair
  • Exhaust system
  • Cooling system
  • Fuel system
  • Multec injection system
  • Four point injection
  • Transmission
  • Clutch
  • Gearbox and drive
  • Chassis
  • Wheel suspension
  • Steering
  • Brake system
  • Wheels and tires
  • Body
  • Exterior
  • Interior
  • Electrical equipment
  • Fuses and electronics
  • Power devices
  • Ignition system
  • Lighting and signaling
  • Equipment and devices
  • Heating and ventilation
  • Electrical circuits
Vectra A (1988-1995) 
  • Power unit
  • Engine repair
  • Ignition system
  • Lubrication system
  • Cooling system
  • Injection system
  • Fuel system (carburetor)
  • Fuel system (diesel)
  • Exhaust system
  • Transmission
  • Clutch
  • Car gearbox
  • Chassis
  • Front suspension
  • Rear suspension
  • Steering
  • Brake system
  • Wheels and tires
  • Body
  • Exterior
  • Interior
  • Electrical equipment
  • Electrical circuits
Vectra A (1988-1995, petrol) 
  • General information
  • User manual
  • Maintenance
  • Power unit
  • SOHC engine
  • DOHC engine
  • Cooling and ventilation
  • Fuel system (carburetor)
  • Fuel system (injector)
  • Exhaust converter
  • Transmission
  • Clutch
  • Mechanical gearbox
  • Automatic gearbox
  • Drive shafts
  • Chassis
  • Brake system
  • Car suspension
  • Steering
  • Body
  • Body elements
  • Electrical equipment
  • Power devices
  • Equipment and devices
  • Electrical circuits
OpelBook.ru © 2017–2026 · Mobile version · · Sitemap: EN BG BY UA RS HR RO PL SK HU · Feedback · Site search
Astra F, petrol · Astra G, petrol · Astra G · Astra H · Astra J, petrol · Corsa B · Corsa C, petrol · Corsa C · Insignia A · Kadett D · Kadett E · Omega A · Omega B · Omega B2 · Vectra A, petrol · Vectra A · Vectra B, petrol · Vectra B · Vectra C · Zafira A, petrol · Frontera A, petrol · Frontera B · Ascona C · Vivaro A ·
We want your visit to be comfortable 🤝! We use cookies 🍪 to make that happen.