


Contents: Removal ⬇ Installation ⬇
Note: The calipers cannot be repaired in a regular workshop - contact an Opel service station or replace them as a whole.
Removal
Caution: After removing the brake pads, do not press the brake pedal, otherwise the piston may be pushed out of the housing. In this case, you will have to go to a service station to install the piston back.
1. Raise the car and place it on stands, remove the corresponding wheels.
2. Remove the cap from the brake master cylinder reservoir, place a piece of polyethylene film underneath it and screw it back into place - placing the film underneath will seal the cap and prevent fluid from leaking when the flexible brake hose nipple is released. Alternatively, the hose can be clamped with a suitable clamp.
3. Thoroughly wipe the hose nipple connection on the caliper. Unscrew the hollow bolt of the connector and remove the copper sealing washers, the washers must be replaced without fail. Immediately plug the open end of the hose and the nipple to prevent dirt from getting into the system or connect it to a new caliper
Note: If the caliper is removed only to remove the brake pads or brake disc, do not disconnect the hose. In this case, tie the caliper to the body with wire so that the hose is not twisted or stretched.
4. Remove the brake pads and caliper (see section 5 and 6).
5. Remove 2 mounting bolts (Togh) and remove the shoe guide from the steering knuckle (see accompanying illustrations).
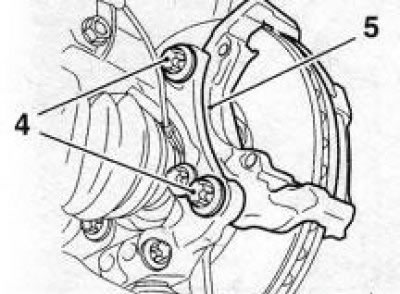
7.5 Torx bolts (4) for securing the guide (5) of the front brake mechanism
Caution: A lot of force is required to loosen/tighten the guide mounting bolts! It is recommended to install the wheels and lower the car to the ground before performing this operation.
Installation
6. Before installation, clean the threads of all bolts from any remaining compound and lubricate them with fresh compound (for example, Loctite Tour 243).
7. Installation is performed in the reverse order of removal. A lot of force is required to tighten the guide mounting bolts (230 Nm!) - check the reliability of the vehicle mounting in the suspended position. It is recommended to install the wheels in place and lower the vehicle.
8. If the brake hose was disconnected, do not forget to replace the sealing washers and bleed air from the brake system (see Section 3), the hose should not be twisted or kinked.
Note: It is sufficient to bleed only the circuit whose support was removed.
Check that the hoses on the front wheels do not touch them at maximum steering angle.
9. Remove the clamp that is squeezing the hose, or remove the polyethylene from under the master cylinder reservoir cover.
10. Press the foot brake pedal several times to seat the pads.
12. Install the wheel, lower the vehicle to the ground and tighten the wheel bolts to the required torque.
13. Check the fluid level in the master cylinder reservoir and make the appropriate adjustments if necessary (see Chapter 1)
14. Before operating the vehicle, check that the brake system is functioning properly.
Visitor comments