
Examination
1. Mark with paint the position of the rear wheels relative to the hub. This will allow the assembly to set the balanced wheel in its original position.
2. Loosen the wheel nuts. The vehicle must be on wheels during this operation.
3. Install the car on the goats and remove the rear wheels.
Attention! If the brake pads are to be reinstalled for later use, they should be marked before removal. Swapping pads from the right wheel to the left and vice versa is not allowed. Such a rearrangement can lead to uneven braking of the wheels. Be sure to change all front brake pads, even if only one of them has reached the minimum wear limit.
4. Inspect the brake linings of the shoes and measure their thickness using a ruler or caliper. If the residual thickness of at least one of the brake pads has reached the minimum allowable limit, then replace all the rear wheel pads together with the preload springs.
Removing
Attention! The procedure for removing and installing the rear wheel brake pads is the same as for the front wheels.
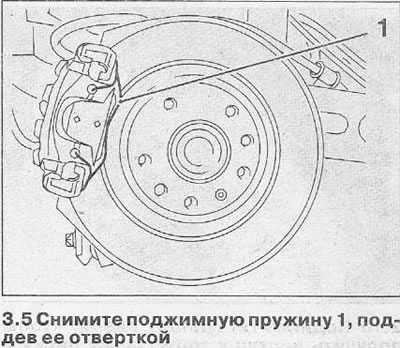
5. Remove the compression spring 1 by prying it with a screwdriver and releasing the ends from the holes on the caliper (see illustration).
6. Remove the protective caps from the heads of both caliper mounting bolts and unscrew them (see illustration).
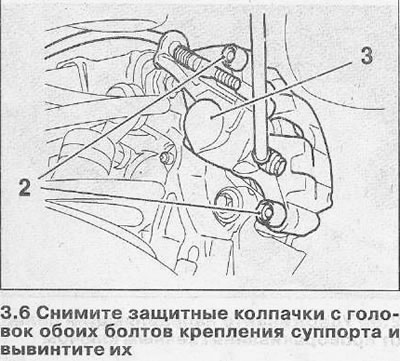
7. Remove the caliper 3 together with the inner pad with guide (see illustration 3.6).
8. Remove the inner pad from the caliper and secure it with wire to the body.
Attention! Do not disconnect the brake hose from the caliper. Otherwise, the brake system after installing the caliper will have to be pumped. Do not stretch the brake hose or kink it.
9. Remove the outer brake shoe from the guide.
Installation
10. Clean the caliper and pad support plates and remove any rust from the brake disc.
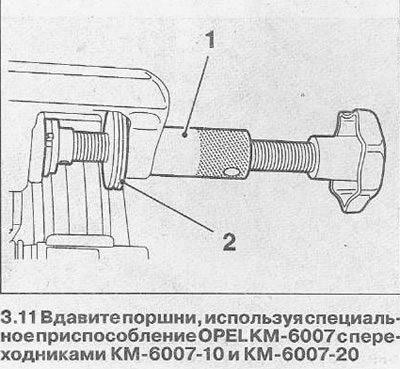
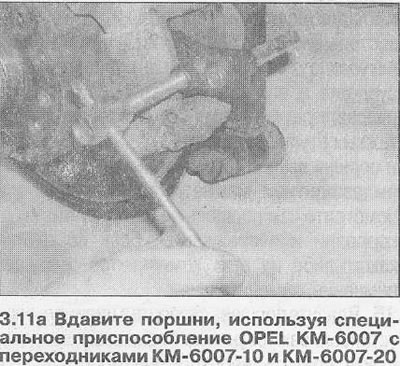
11. Press both pistons completely into their cylinders using the special tool OPEL KM-6007 with adapters KM-6007-10 and KM-6007-20 or HAZET 4970/6 (see illustrations 3.11 and 3.11a).
Attention! The pistons must not be pushed in with normal tools. In this case, the mechanism for adjusting the parking brake pads is damaged.
Attention! When the piston is depressed, the brake fluid is squeezed out of the wheel brake cylinder into the expansion tank. Observe the liquid in the tank, if necessary, select it.
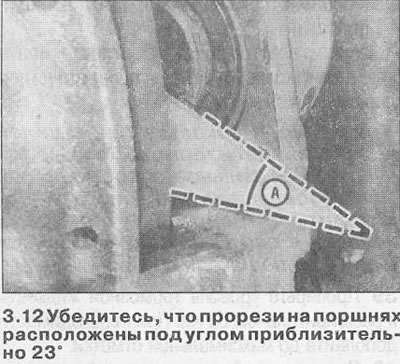
12. Make sure the slots on the pistons are at the bottom, at an angle of approximately 23°. Make a template out of cardboard to achieve this (see illustration).
13. Apply a small amount of high temperature grease to the top and bottom edges of the metal bases of the new brake pads (see illustration). When doing this, take some care and accuracy to prevent grease from getting on the surface of the brake linings.

14. Insert the new brake pads into the caliper and guide and make sure they move freely.
15. Install the compression spring on the pads.
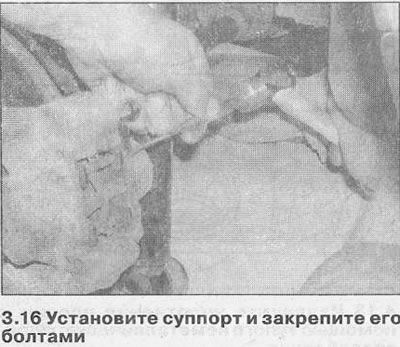
16. Install the caliper and secure it with bolts (see illustration).
17. Replace the second rear brake pads in the same way.
18. Squeeze out a brake pedal some times that brake pads were established in a working position.
19. Install the rear wheels in accordance with the labels applied during removal and secure them with bolts.
20. Lower the vehicle and tighten the wheel bolts in a criss-cross pattern to 110 Nm.
Attention! Depress the brake pedal with force several times until a strong resistance is felt. When this action is performed, the brake pads are centered and they self-adjust to the working position.
21. Check the brake fluid level in the expansion tank. If necessary, top up to the maximum mark.
Visitor comments