
OpelBook.ru
Cars AvtoVAZ Cars Mitsubishi Cars BMW Cars Mercedes Cars Nissan Cars Toyota Cars Chevrolet
English Русский
Български
Беларускі
Український
Српски
Hrvatski
Română
Polski
Slovenský
Magyar
 |  Sitemap  |  Contacts  |    


Main Astra Corsa Insignia Kadett Omega Vectra Zafira Others Articles
Frontera A (1991-1998, petrol) Frontera B (1998-2004) Ascona C (1981-1988) Vivaro A (2001-2014)
  • Main
  • Opel
  • Frontera A
  • Chassis
  • Brake system
  • Replacing rear brake pads

Replacing rear brake pads (Opel Frontera A)

            0

Brake pads are replaced in pairs, even if one of them does not appear to be defective. To determine the degree of wear of the brake pads, the brake drums are removed in the manner described above. The thickness of new brake pads is 5 mm, the minimum thickness is 1 mm.

1. Raise the rear of the vehicle and place it on stands.

2. Loosen the nuts and remove the wheels.

3. Place chocks under the front wheels.

4. Remove the brake drums.

5. Inspect the brakes and wipe them with a damp cloth.
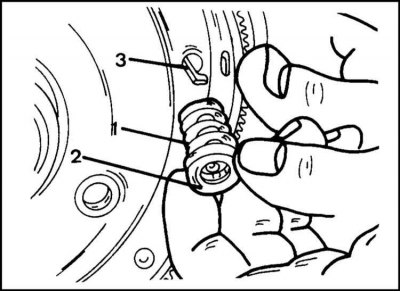
6. Press your finger on the back of the anchor pins and squeeze the spring plate with pliers as…


6. Press your finger on the back of the anchor pins and squeeze the spring plate with pliers as shown.

7. Press the plate inward and turn it so that the head of the pin can be passed through the spring plate.
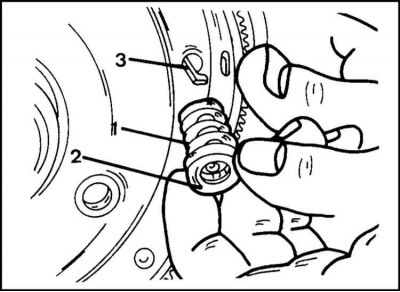
8. Remove the spring plate, spring and pin. The described work is carried out on both wheels.…


8. Remove the spring plate, spring and pin. The described work is carried out on both wheels. Removing the spring (2) is shown in the illustration. Remove the pin (3) from the back of the brake shield.


9. Use a screwdriver to push the parking brake lever towards the center so that the cable can be disconnected.
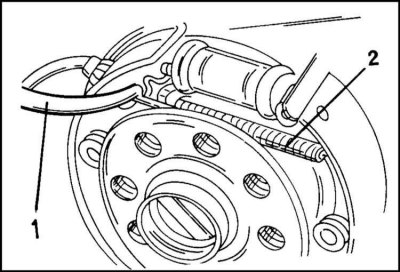
10. Use pliers to unhook one end of the top spring as shown.

10. Use pliers to unhook one end of the top spring as shown.

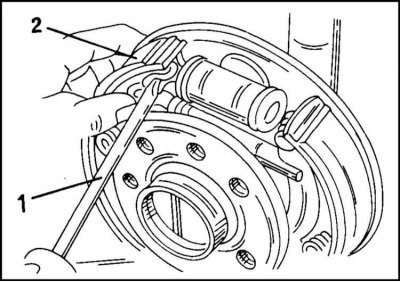
11. Use a screwdriver to push the brake shoe outward as shown so that the adjustment mechanism can…


11. Use a screwdriver to push the brake shoe outward as shown so that the adjustment mechanism can be removed. In this case, it is also necessary to remove the vertical spring. Be careful not to damage the wheel cylinder protective cap.

12. Unhook the lower return spring and remove both brake shoes. If the axle shaft is removed, this work can be done without difficulty. In most cases, the axle shaft is not removed in these cases. And then the pads are removed through the hub and brake shield.

13. Immediately secure the wheel cylinder piston with a rubber band to prevent it from coming out. Do not press the brake pedal under any circumstances, as the piston may pop out.


Since both brake pads have been removed, they need to be marked to avoid confusion during installation.

1. Clean the parts thoroughly.

2. Check the condition of the wheel cylinder caps. If traces of liquid are found on the wheel cylinder, the latter is repaired or replaced.

3. Replace deformed and weak springs, as they create uneven pressure on the brake pads.

4. Thoroughly clean the contact areas of the brake pads with the brake shield and lubricate with heat-resistant grease.

New brake pads may be with or without the parking brake lever installed. In the latter case, the lever must be moved from the old brake. The lever can be secured either by a pin with a locking ring or by riveting. In the latter case, it is necessary to drill out the rivet.

1. Remove the rubber ring from the wheel cylinder, install the first shoe and secure with an anchor pin and other parts in the reverse order of removal.

2. Install the adjustment mechanism and the second shoe.

3. Insert the ends of both brake shoes into the supports and press the parking brake lever inward so that the cable can be hooked onto it.

4. After this, move the lever outward. The pin in the lever should be opposite the edge of the brake pads.

5. Use pliers to install the lower tension spring.

6. Hook the top tension spring. Note how the end of the spring engages on the side of the adjustment mechanism.

7. Now you can install the brake drum. If it does not fit onto the brake pad, the pads can be compressed using the adjusting rod.

8. After installing the brake drums, have an assistant press the brake pedal while listening to the brake. A click inside the drum indicates that the adjustment mechanism is working properly.


9. Adjust the parking brake.

The brake shoes must be worn in to the drum. Therefore, during the initial period of operation, you should not press the brake pedal sharply.


This article is available at russian, bulgarian, belarusian, ukrainian, serbian, croatian, romanian, polish, slovak, hungarian
Checking the article: Meshcheryakov Damir

Share information:

Previous articles
Opel Frontera A: Brake system
Next articles

Removal and installation the rear brake drum
Brake discs — removal and installation
Removal, repair and installation of front brake calipers
Replacing the front brake pads
Brake system specifications
Brake system — general information
Rear Wheel Cylinder — Removal and Installation
Removal and installation the rear brake shield
Removal and installation rear brake pads
Removal, repair and installation of the rear caliper
Replacing the rear brake disc cover
Replacing the parking brake pads


See similar ones from other Opel car manuals:
▶ Replacing the rear wheel disc brake pads Opel Astra H (2004-2009)
▶ Replacing the rear wheel disc brake pads Opel Corsa C (2000-2006)
▶ Replacing rear brake pads Opel Insignia A (2008-2017)
▶ Replacing the brake pads of the rear disc brake mechanisms Opel Kadett E (1984-1995)
▶ Rear Brake Pads — Checking and Replacing Opel Omega B2 (1999-2003)
Link to this page in different formats

Visitor comments


No comments yet


How much will 18 + 23 =


Vivaro A (2001-2014) 
  • General information
  • User manual
  • Power unit
  • Petrol engine F4R
  • Diesel engine F9Q
  • Diesel engine G9U
  • Transmission
  • Clutch and drive shafts
  • Manual gearbox
  • Chassis
  • Front suspension
  • Rear suspension
  • Brake system
  • Body
  • Exterior
  • Interior
  • Electrical equipment
  • Heating and ventilation
  • Air conditioner
  • Equipment and devices
  • Electrical diagrams
Ascona C (1981-1988) 
  • General information
  • Maintenance
  • Power unit
  • Gasoline engines
  • Diesel engines
  • Cooling system
  • Fuel and exhaust system
  • Contact ignition system
  • Contactless ignition system
  • Transmission
  • Clutch
  • Mechanical gearbox
  • Automatic gearbox
  • Drive shafts
  • Chassis
  • Steering
  • Brake system
  • Car suspension
  • Body
  • Exterior
  • Interior
  • Doors and windows
  • Electrical equipment
  • Equipment and devices
  • Power devices
  • Electrical circuits
Frontera B (1998-2004) 
  • General information
  • User manual
  • Maintenance
  • Power unit
  • Petrol engines 2.2 l
  • Petrol engines 3.2 l
  • Diesel engines 2.2 l
  • Cooling system
  • Fuel system (petrol)
  • Fuel system (diesel)
  • Ignition system
  • Transmission
  • Clutch
  • Manual gearbox MUA5C
  • Automatic gearbox 4L30E
  • Chassis
  • Suspension and axles
  • Steering
  • Brake system
  • Body
  • Exterior
  • Interior
  • Doors, locks and windows
  • Heating and air conditioning
  • Electrical equipment
  • Power devices
  • Equipment and devices
  • Lighting and signaling
  • Electrical diagrams
Frontera A (1991-1998, petrol) 
  • General information
  • Introduction to guide
  • User manual
  • Maintenance
  • Power unit
  • Engine repair
  • Lubrication system
  • Cooling system
  • Power and exhaust system
  • Engine electrics
  • Transmission
  • Clutch
  • Mechanical gearbox
  • Cardan shafts
  • Chassis
  • Brake system
  • Front suspension
  • Rear suspension
  • Steering
  • Body
  • Repair and care
  • Electrical equipment
  • Equipment and devices
  • Electrical circuits
OpelBook.ru © 2017–2026 · Mobile version · · Sitemap: EN BG BY UA RS HR RO PL SK HU · Feedback · Site search
Astra F, petrol · Astra G, petrol · Astra G · Astra H · Astra J, petrol · Corsa B · Corsa C, petrol · Corsa C · Insignia A · Kadett D · Kadett E · Omega A · Omega B · Omega B2 · Vectra A, petrol · Vectra A · Vectra B, petrol · Vectra B · Vectra C · Zafira A, petrol · Frontera A, petrol · Frontera B · Ascona C · Vivaro A ·
We want your visit to be comfortable 🤝! We use cookies 🍪 to make that happen.