
OpelBook.ru
Cars AvtoVAZ Cars Mitsubishi Cars BMW Cars Mercedes Cars Nissan Cars Toyota Cars Chevrolet
English Русский
Български
Беларускі
Український
Српски
Hrvatski
Română
Polski
Slovenský
Magyar
 |  Sitemap  |  Contacts  |    


Main Astra Corsa Insignia Kadett Omega Vectra Zafira Others Articles
Frontera A (1991-1998, petrol) Frontera B (1998-2004) Ascona C (1981-1988) Vivaro A (2001-2014)
  • Main
  • Opel
  • Frontera A
  • Chassis
  • Brake system
  • Rear Wheel Cylinder — Removal and Installation

Rear Wheel Cylinder — Removal and Installation (Opel Frontera A)

            0

Contents: Removal ⬇ Repair ⬇ Installation ⬇
A repair kit is available for repairing the wheel cylinder. Compare the repair kit parts with the removed parts to eliminate assembly errors.

Removal


1. Raise the rear of the vehicle and support it on stands.

2. Loosen the nuts and remove the wheel.

3. Remove the brake drum. This will provide better access to the wheel cylinder.

4. In the engine compartment, unscrew the reservoir cap on the master brake cylinder.

5. Place the plastic wrap over the neck and screw on the lid. This will prevent brake fluid from leaking out of the system.
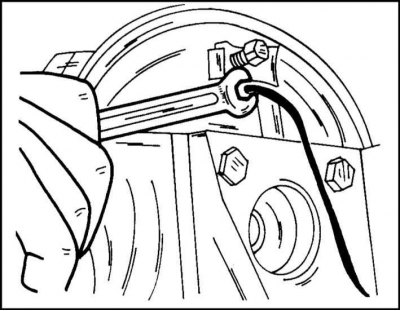
6. Loosen the union nut of the brake line from the back of the brake shield and disconnect the line.


6. Loosen the union nut of the brake line from the back of the brake shield and disconnect the line.

7. Carefully move the pipeline to the side.

8. Seal the end of the pipe with tape to prevent dirt from getting into the system.

9. Loosen the cylinder mounting bolts and remove the cylinder from the outside.

Repair
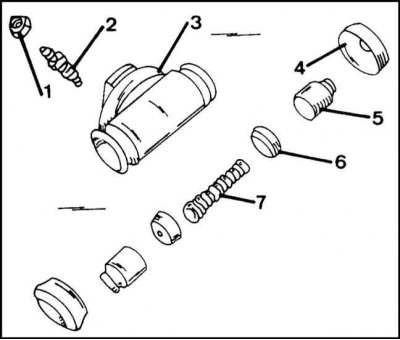


Wheel cylinder assembly diagram: 1 - anther; 2 - air bleed nipple; 3 - wheel cylinder; 4 -…

Wheel cylinder assembly diagram: 1 - anther; 2 - air bleed nipple; 3 - wheel cylinder; 4 - protective cap; 5 - piston; 6 - brake cuff; 7 - return spring


1. The illustration Wheel Cylinder Assembly Diagram shows the wheel cylinder assembly diagram. After removing one of the protective caps, the pistons exit the cylinder under the action of the spring. If this does not happen, tap the cylinder on a wooden block.

2. Remove the cuffs. Pay attention to their position.

3. Clean and check all parts thoroughly. If there are cracks or burrs on the working surface of the cylinder, it must be replaced. When replacing any part, the entire repair kit must be installed.

4. Lubricate the seals with brake fluid or grease and insert the first seal with the working edge into the cylinder.

5. Lubricate the piston and insert it, pressing it against the cuff.

6. On the other side, insert the return spring and insert the second cuff into the cylinder.

7. Insert the second piston, being careful not to push out the first piston.

8. Install protective caps on both sides of the pistons and cylinder body.

9. Clean the cylinder from brake fluid or grease.

Installation


1. Install the wheel cylinder from the outside onto the brake shield.

2. Screw in the mounting bolts from the inside and tighten them to a torque of 10 Nm.

3. Attach the pipeline to the cylinder and tighten the union nut to 16 Nm. The nut thread has a fine pitch. Therefore, screw it on and tighten it carefully.

4. Carefully connect the brake shoes to the wheel cylinder.

5. Install the brake drum as described above.

Material taken from an internet portal opelbook

6. Remove the polyethylene from the neck of the tank.

7. Bleed the brake system as described below.


This article is available at russian, bulgarian, belarusian, ukrainian, serbian, croatian, romanian, polish, slovak, hungarian
Checking the article: Meshcheryakov Damir

Share information:

Previous articles
Opel Frontera A: Brake system
Next articles

Replacing rear brake pads
Removal and installation the rear brake drum
Brake discs — removal and installation
Removal, repair and installation of front brake calipers
Replacing the front brake pads
Brake system specifications
Removal and installation the rear brake shield
Removal and installation rear brake pads
Removal, repair and installation of the rear caliper
Replacing the rear brake disc cover
Replacing the parking brake pads
Master Brake Cylinder — Removal and Installation


See similar ones from other Opel car manuals:
▶ Rear Brake Wheel Cylinder — Removal, Repair and Installation Opel Astra F (1991-1998, petrol)
▶ Removal and installation of the wheel cylinder of the rear… Opel Kadett E (1984-1995)
▶ Rear Wheel Cylinder (Drum Brakes) — Removal, Overhaul and… Opel Vectra A (1988-1995, petrol)
▶ Pressure regulator valve in the hydraulic circuits of the… Opel Corsa B (1993-2000)
▶ Replacing the rear wheel speed sensors Opel Insignia A (2008-2017)
Link to this page in different formats

Visitor comments


No comments yet


How much will 23 + 37 =


Vivaro A (2001-2014) 
  • General information
  • User manual
  • Power unit
  • Petrol engine F4R
  • Diesel engine F9Q
  • Diesel engine G9U
  • Transmission
  • Clutch and drive shafts
  • Manual gearbox
  • Chassis
  • Front suspension
  • Rear suspension
  • Brake system
  • Body
  • Exterior
  • Interior
  • Electrical equipment
  • Heating and ventilation
  • Air conditioner
  • Equipment and devices
  • Electrical diagrams
Ascona C (1981-1988) 
  • General information
  • Maintenance
  • Power unit
  • Gasoline engines
  • Diesel engines
  • Cooling system
  • Fuel and exhaust system
  • Contact ignition system
  • Contactless ignition system
  • Transmission
  • Clutch
  • Mechanical gearbox
  • Automatic gearbox
  • Drive shafts
  • Chassis
  • Steering
  • Brake system
  • Car suspension
  • Body
  • Exterior
  • Interior
  • Doors and windows
  • Electrical equipment
  • Equipment and devices
  • Power devices
  • Electrical circuits
Frontera B (1998-2004) 
  • General information
  • User manual
  • Maintenance
  • Power unit
  • Petrol engines 2.2 l
  • Petrol engines 3.2 l
  • Diesel engines 2.2 l
  • Cooling system
  • Fuel system (petrol)
  • Fuel system (diesel)
  • Ignition system
  • Transmission
  • Clutch
  • Manual gearbox MUA5C
  • Automatic gearbox 4L30E
  • Chassis
  • Suspension and axles
  • Steering
  • Brake system
  • Body
  • Exterior
  • Interior
  • Doors, locks and windows
  • Heating and air conditioning
  • Electrical equipment
  • Power devices
  • Equipment and devices
  • Lighting and signaling
  • Electrical diagrams
Frontera A (1991-1998, petrol) 
  • General information
  • Introduction to guide
  • User manual
  • Maintenance
  • Power unit
  • Engine repair
  • Lubrication system
  • Cooling system
  • Power and exhaust system
  • Engine electrics
  • Transmission
  • Clutch
  • Mechanical gearbox
  • Cardan shafts
  • Chassis
  • Brake system
  • Front suspension
  • Rear suspension
  • Steering
  • Body
  • Repair and care
  • Electrical equipment
  • Equipment and devices
  • Electrical circuits
OpelBook.ru © 2017–2026 · Mobile version · · Sitemap: EN BG BY UA RS HR RO PL SK HU · Feedback · Site search
Astra F, petrol · Astra G, petrol · Astra G · Astra H · Astra J, petrol · Corsa B · Corsa C, petrol · Corsa C · Insignia A · Kadett D · Kadett E · Omega A · Omega B · Omega B2 · Vectra A, petrol · Vectra A · Vectra B, petrol · Vectra B · Vectra C · Zafira A, petrol · Frontera A, petrol · Frontera B · Ascona C · Vivaro A ·
We want your visit to be comfortable 🤝! We use cookies 🍪 to make that happen.