
OpelBook.ru
Cars AvtoVAZ Cars Mitsubishi Cars BMW Cars Mercedes Cars Nissan Cars Toyota Cars Chevrolet
English Русский
Български
Беларускі
Український
Српски
Hrvatski
Română
Polski
Slovenský
Magyar
 |  Sitemap  |  Contacts  |    


Main Astra Corsa Insignia Kadett Omega Vectra Zafira Others Articles
Frontera A (1991-1998, petrol) Frontera B (1998-2004) Ascona C (1981-1988) Vivaro A (2001-2014)
  • Main
  • Opel
  • Frontera A
  • Chassis
  • Brake system
  • Master Brake Cylinder — Removal and Installation

Master Brake Cylinder — Removal and Installation (Opel Frontera A)

            0

Contents: Removal ⬇ Installation ⬇ Repair of the main brake cylinder ⬇

Removal


Before removing the master cylinder, press the brake pedal several times to relieve the vacuum in the brake booster.

When removing the master cylinder, it is necessary to take into account the differences in the design of the brake system models. Description regarding brake mechanisms with ABS is given separately.

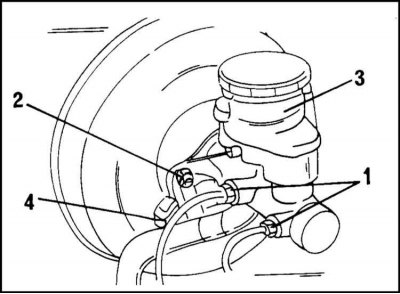
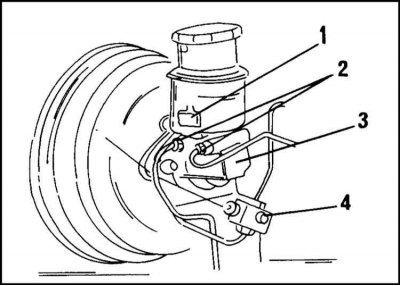
The following illustrations show the appearance of the brake master cylinder for both versions (without ABS).
View of the main brake cylinder of a car produced before mid-1995: 1 - brake lines; 2 - fastening…

View of the main brake cylinder of a car produced before mid-1995: 1 - brake lines; 2 - fastening nuts; 3 - tank; 4-pin switch

View of the main brake cylinder of a car produced since mid-1995: 1 - plug connection; 2 - brake…

View of the main brake cylinder of a car produced since mid-1995: 1 - plug connection; 2 - brake lines; 3 - tee; 4 - master brake cylinder


1. Disconnect the ground cable from the battery.
2. Disconnect the plug connection (4) of the brake fluid emergency level sensor at the location…


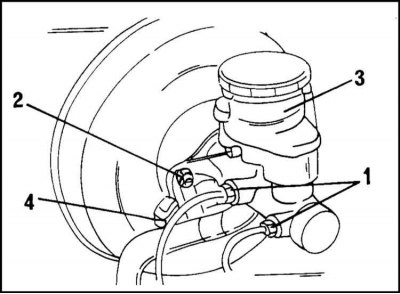
2. Disconnect the plug connection (4) of the brake fluid emergency level sensor at the location shown in the illustration.

3. Suck the fluid out of the reservoir on the master cylinder. For this you can use a pear. To do this, you can also open the air bleed nipple from the system and drain the liquid.

4. Place a container under the tank and disconnect the pipeline (1) from the cylinder. Remember where it is connected.

5. Loosen the two mounting nuts and remove the master cylinder from the vacuum booster. Be careful not to let brake fluid come into contact with paintwork.

6. For a new model cylinder, disconnect the tee holder.

7. Remove the seals and spacer element from the same cylinder.
8. If the cylinder is being replaced, the reservoir must be removed. It sits on two rubber grommets…


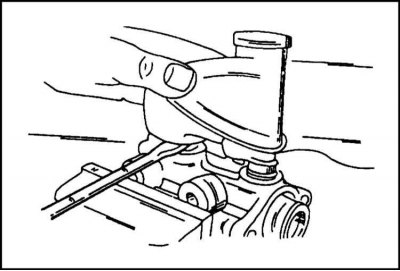
8. If the cylinder is being replaced, the reservoir must be removed. It sits on two rubber grommets and can be carefully pryed out with a screwdriver as shown.


Installation


The master cylinder is installed in the reverse order of removal.

1. Tighten the cylinder mounting nuts to a torque of 13 Nm, and the pipeline connection to a torque of 12 Nm. The pipeline connection at the tee is tightened to a torque of 16 Nm.

2. Finally, bleed the brake system as described in section 6.

3. If the reservoir was removed, install it on the master cylinder through the rubber bushings, lubricating them with brake fluid.

Repair of the main brake cylinder


As already mentioned, the master cylinder of a car produced since mid-1995 cannot be repaired.

Earlier cylinders can be disassembled, repaired and reassembled, but it is recommended that this be done in a workshop.


This article is available at russian, bulgarian, belarusian, ukrainian, serbian, croatian, romanian, polish, slovak, hungarian
Checking the article: Meshcheryakov Damir

Share information:

Previous articles
Opel Frontera A: Brake system
Next articles

Replacing the parking brake pads
Replacing the rear brake disc cover
Removal, repair and installation of the rear caliper
Removal and installation rear brake pads
Removal and installation the rear brake shield
Rear Wheel Cylinder — Removal and Installation
Bleeding the brake system
Vacuum brake booster — removal and installation
Parking brake — removal, installation and adjustment
Pressure regulator — removal and installation
Brake hoses for front and rear brake mechanisms
Anti-lock braking system (ABS) — removal and installation


See similar ones from other Opel car manuals:
▶ Master Brake Cylinder — Removal, Repair and Installation Opel Astra F (1991-1998, petrol)
▶ Master brake cylinder Opel Corsa C (2000-2006, petrol)
▶ Replacing the master brake cylinder Opel Insignia A (2008-2017)
▶ Removal and installation the brake master cylinder Opel Kadett E (1984-1995)
▶ Master Brake Cylinder — Removal and Installation Opel Omega B (1993-1999)
Link to this page in different formats

Visitor comments


No comments yet


How much will 12 + 13 =


Vivaro A (2001-2014) 
  • General information
  • User manual
  • Power unit
  • Petrol engine F4R
  • Diesel engine F9Q
  • Diesel engine G9U
  • Transmission
  • Clutch and drive shafts
  • Manual gearbox
  • Chassis
  • Front suspension
  • Rear suspension
  • Brake system
  • Body
  • Exterior
  • Interior
  • Electrical equipment
  • Heating and ventilation
  • Air conditioner
  • Equipment and devices
  • Electrical diagrams
Ascona C (1981-1988) 
  • General information
  • Maintenance
  • Power unit
  • Gasoline engines
  • Diesel engines
  • Cooling system
  • Fuel and exhaust system
  • Contact ignition system
  • Contactless ignition system
  • Transmission
  • Clutch
  • Mechanical gearbox
  • Automatic gearbox
  • Drive shafts
  • Chassis
  • Steering
  • Brake system
  • Car suspension
  • Body
  • Exterior
  • Interior
  • Doors and windows
  • Electrical equipment
  • Equipment and devices
  • Power devices
  • Electrical circuits
Frontera B (1998-2004) 
  • General information
  • User manual
  • Maintenance
  • Power unit
  • Petrol engines 2.2 l
  • Petrol engines 3.2 l
  • Diesel engines 2.2 l
  • Cooling system
  • Fuel system (petrol)
  • Fuel system (diesel)
  • Ignition system
  • Transmission
  • Clutch
  • Manual gearbox MUA5C
  • Automatic gearbox 4L30E
  • Chassis
  • Suspension and axles
  • Steering
  • Brake system
  • Body
  • Exterior
  • Interior
  • Doors, locks and windows
  • Heating and air conditioning
  • Electrical equipment
  • Power devices
  • Equipment and devices
  • Lighting and signaling
  • Electrical diagrams
Frontera A (1991-1998, petrol) 
  • General information
  • Introduction to guide
  • User manual
  • Maintenance
  • Power unit
  • Engine repair
  • Lubrication system
  • Cooling system
  • Power and exhaust system
  • Engine electrics
  • Transmission
  • Clutch
  • Mechanical gearbox
  • Cardan shafts
  • Chassis
  • Brake system
  • Front suspension
  • Rear suspension
  • Steering
  • Body
  • Repair and care
  • Electrical equipment
  • Equipment and devices
  • Electrical circuits
OpelBook.ru © 2017–2026 · Mobile version · · Sitemap: EN BG BY UA RS HR RO PL SK HU · Feedback · Site search
Astra F, petrol · Astra G, petrol · Astra G · Astra H · Astra J, petrol · Corsa B · Corsa C, petrol · Corsa C · Insignia A · Kadett D · Kadett E · Omega A · Omega B · Omega B2 · Vectra A, petrol · Vectra A · Vectra B, petrol · Vectra B · Vectra C · Zafira A, petrol · Frontera A, petrol · Frontera B · Ascona C · Vivaro A ·
We want your visit to be comfortable 🤝! We use cookies 🍪 to make that happen.