
Removing
Disconnect the negative battery terminal.
Depress the foot brake pedal several times to remove the vacuum from the booster.
Disconnect the connector from the brake fluid level sensor located in the reservoir cap. When doing this, use a blower or a clean battery hydrometer to remove the brake fluid.
Place a container under the master cylinder to collect the escaping fluid.
Note the location of the brake fluid lines, then unscrew the nuts and disconnect the lines from the master cylinder.
Unscrew the two nuts, remove the master cylinder from the studs located on the amplifier.
Remove any dirt from the outer surface of the cylinder, then use a screwdriver to carefully remove the fluid reservoir and seals from the top of the cylinder.
Repair
Optional on models with normal (without ABS) brake system, the master cylinder can be repaired as follows. Repair of the master cylinder on models with an ABS system cannot be done.
Brake Master Cylinder Type GMF
Clamp the master cylinder in a soft-seated vise.
Carefully remove the O-ring from the end of the cylinder bore.
Press lightly on the piston with a piece of wood or plastic, then hold the piston down by inserting a smooth pin or 3.0 mm rod through the reservoir opening into the cylinder.
Remove the circlip from the end of the cylinder bore with a screwdriver. Be careful not to damage the piston and bore.
Remove the pin or rod holding the piston.
Remove the main piston assembly from the cylinder and, if necessary, by tapping lightly on the cylinder through the wooden gasket, release it from its cylinder (pic. 9.26.).
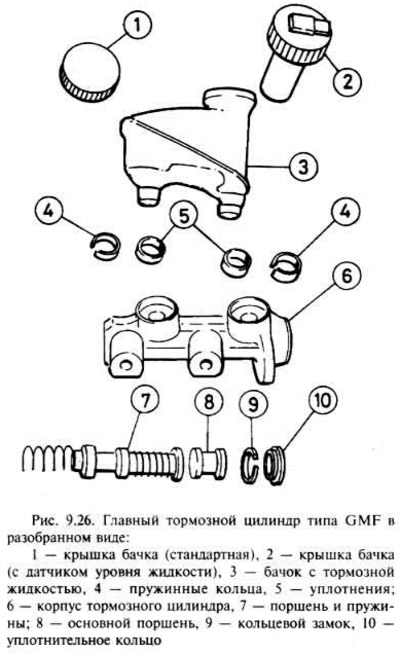
Apply low pressure air, such as from a foot pump, to the front opening of the reservoir in the cylinder to push the piston out.
Remove dirt from all parts by flushing with clean brake fluid or denatured alcohol and inspect them for wear or damage. In particular, check the surfaces of the pistons and cylinder bores for scratches and corrosion. If there are obvious signs of wear, replace the complete brake master cylinder.
If the cylinder bore is in good condition, repairs can be made as indicated below.
Lubricate the cylinder bore with clean brake fluid or brake grease, then clamp the cylinder in a soft-seated vise in a horizontal position.
Remove the plug from the end of the assembly tube and insert the short section of the tube into the bore of the cylinder up to the shoulder on the tube.
Take a suitable piece of wood or plastic to push the pieces out of the pipe into the cylinder bore, then hold the main piston in the recessed position by inserting a pin or rod.
Place a new circlip on the end of the cylinder bore, making sure it fits properly and that the piston moves freely.
Push in the main piston and remove the pin or rod from the reservoir opening.
Install a new O-ring on the end of the cylinder bore.
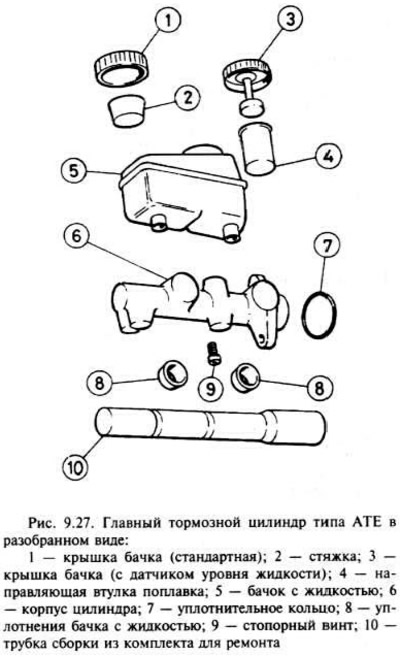
ATE brake master cylinder
Clamp the master cylinder in a soft-seated vise.
Carefully remove the O-ring from the end of the cylinder bore.
Press in the main piston with a suitable piece of wood or plastic, then remove the circlip from the end of the cylinder bore.
Remove the main piston assembly, noting the location of the gaskets.
Press the other piston with a wooden or plastic stick and remove the set screw from the end of the cylinder body.
Remove the other piston assembly from the cylinder, if necessary, by tapping the cylinder through the wood washer to release the piston from the bore.
Remove dirt from parts with clean brake fluid or denatured alcohol only and inspect them for wear and damage. If there are signs of wear, replace the complete master cylinder assembly.
If the cylinder bore is in good condition, repairs can be made as indicated below.
Lubricate the cylinder bore with clean brake fluid or brake grease, then clamp the cylinder in a soft-seated vise in a horizontal position.
Place a new O-ring on the lock screw, then screw it into the cylinder body a few turns, but without it entering the bore.
Remove the caps from the ends of the assembly tube, then remove all parts from the short section of the tube and push the short section into the long section so that they are flush.
Insert the assembly tube into the cylinder bore up to the collar on the short sleeve, then use a wooden or plastic stick to push the piston into the cylinder bore until it contacts the thorium of the cylinder.
Lightly tighten the lock screw, then pull out the wood tool and assembly tube, and fully tighten the lock screw (pic. 9.27.).
Place the master cylinder in a vise with the cylinder bore up.
Lightly lubricate the main piston skirt and seal grooves with special grease. Install the stop washer on the piston.
Adjust the assembly tube so that the end of the long section is flush with the inner shoulder of the short section.
Install the front seal on the master piston with the open end towards the front of the master cylinder.
Install the assembly tube on the cylinder to press the seal, insert the piston and tube partially into the bore of the cylinder, then remove the tube.
Install the intermediate ring on the main piston, then install the other seal using the assembly tube as previously noted.
Place the stop washer on the main piston, then lightly press the piston with a stick and install a new cylinder bore snap ring. Make sure that it sits correctly and that the piston moves freely.
Install a new O-ring at the end of the cylinder bore.
Installation
Installation is carried out in the reverse order of removal, however, after completion, completely drain the brake fluid from the hydraulic system, as indicated in the second section.
Visitor comments