OpelBook.ru
Cars AvtoVAZ Cars Mitsubishi Cars BMW Cars Mercedes Cars Nissan Cars Toyota Cars Chevrolet
English Русский
Български
Беларускі
Український
Српски
Hrvatski
Română
Polski
Slovenský
Magyar
 |  Sitemap  |  Contacts  |    


Main Astra Corsa Insignia Kadett Omega Vectra Zafira Others Articles
Astra F (1991-1998, petrol) Astra G (1998-2004, petrol) Astra G (1998-2004) Astra H (2004-2009) Astra J (2009-2015, petrol)
  • Main
  • Astra
  • Astra F
  • Chassis
  • Brake system
  • Rear Circuit Pressure Regulating Valve — Removal, Installation and Adjustment

Rear Circuit Pressure Regulating Valve — Removal, Installation and Adjustment (Opel Astra F)

            0

Contents: Models with sedan and hatchback body ⬇ Removal ⬇ Installation ⬇ Adjustment ⬇ Station wagon and van models ⬇ Removal ⬇ Installation ⬇

Models with sedan and hatchback body


Removal


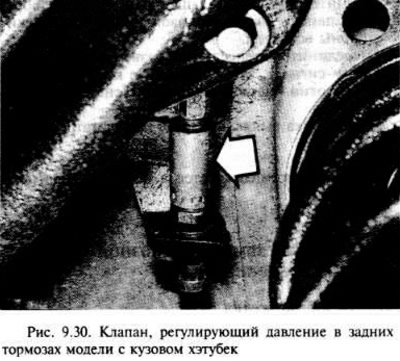
There are two valves installed: one for each hydraulic circuit - they are located at the rear under the car (fig. 9.30.).

There are two valves installed: one for each hydraulic circuit - they are located at the rear under…


Place chocks under the front wheels, raise the rear of the car and securely support it on stands under the axle.

When working under the hood, remove the brake fluid reservoir cap and secure a piece of polyethylene to the neck with a rubber band or cover it with a cap. This will reduce fluid loss during work.

Working under the rear of the car, unscrew the nut and disconnect the brake pipe from one of the valves. Fluid may leak, so you need to plug the end of the pipe.

Disconnect the flexible hose from the valve.

Remove the valve spring clip from its bracket on the underbody, noting that on some models it also secures the ABS sensor wire. Remove the valve.

Repeat the same operations with the other valve.

Installation


Installation is the reverse of removal, but remove the plastic film from the reservoir neck and completely drain the fluid from the hydraulic system as described in the second section.


Adjustment


The valves are calibrated at the factory and cannot be adjusted.

Station wagon and van models


Removal


Use one dual valve which is located under the rear of the car above the rear suspension torsion bar.

(The source is on the online website: OPELBOOK)

Further work procedure is as indicated in the second and third points.

Unhook the spring from the valve lever.

Unscrew the nuts and disconnect the brake pipes from the valve. Fluid may leak, so close the ends of the pipes.

Remove the two screws and the valve from the bracket located on the underbody.

If the valve needs to be replaced, the protective screen should be removed from the old valve and installed on the new one.

Installation


Install the valve onto the bracket on the underbody and tighten the two bolts.

Connect the two brake pipes to the valve and tighten the nuts. Note that the two nuts are different in size; also, try not to tighten the nuts too much.

Connect the spring to the valve lever.

Install the road wheels and lower the vehicle to the ground.

Completely drain the hydraulic system as described in Section Two.


This article is available at russian, bulgarian, belarusian, ukrainian, serbian, croatian, romanian, polish, slovak, hungarian
Checking the article: Trifonova Emilia

Share information:

Previous articles
Opel Astra F: Brake system
Next articles

Handbrake cables — removal and installation
Handbrake lever — removal, repair and installation
Handbrake — adjustment
Master Brake Cylinder — Removal, Repair and Installation
Brake booster check valve — checking, removing and installing
Hydrovacuum booster — removal and installation
Brake light switch — removal and installation
Brake System Warning Lights — General Information
Anti-lock braking system ABS, components — removal and installation


See similar ones from other Opel car manuals:
▶ Pressure regulator valve in the hydraulic circuits of the… Opel Corsa B (1993-2000)
▶ Checking the opening pressure of the steam valve Opel Insignia A (2008-2017)
▶ Rear brake pressure regulator device for van brake drive Opel Kadett E (1984-1995)
▶ Valve clearances — checking and adjustment Opel Omega A (1986-1993)
▶ Pressure Regulating Valves — Removal and Installation Opel Vectra A (1988-1995, petrol)
Link to this page in different formats

Visitor comments


No comments yet


How much will 29 + 37 =


Astra J (2009-2015, petrol) 
  • General information
  • Vehicle device
  • User manual
  • Faults en route
  • Maintenance
  • Power unit
  • Engine repair
  • Cooling and lubrication system
  • Engine power system
  • Exhaust system
  • Transmission
  • Clutch
  • Car gearbox
  • Drive shafts
  • Chassis
  • Front suspension
  • Rear suspension
  • Steering
  • Brake system
  • Wheels and tires
  • Body
  • Exterior
  • Interior
  • Doors and windows
  • Body Care
  • Heating and air conditioning
  • Security systems
  • Electrical equipment
  • Equipment and devices
  • Lighting and signaling
  • Power devices
  • Electrical circuits
Astra H (2004-2009) 
  • General information
  • Introduction to the guide
  • Troubleshooting
  • User manual
  • Maintenance
  • Power unit
  • Engine repair
  • Cooling and heating
  • Power and exhaust system
  • Ignition system
  • Launch and charge system
  • Transmission
  • Mechanical gearbox
  • Automatic gearbox
  • Drive shafts
  • Chassis
  • Brake system
  • Car suspension
  • Steering
  • Body
  • Interior
  • Exterior
  • Electrical equipment
  • Equipment and devices
  • Electrical circuits
Astra G (1998-2004) 
  • General information
  • Introduction to manual
  • User manual
  • Maintenance
  • Power unit
  • SOHC gasoline engines
  • DOHC gasoline engines
  • Diesel engines 1.7 and 2.0
  • Engine repair
  • Cooling system
  • Supply system
  • Injection system (gasoline)
  • Injection system (diesel)
  • Exhaust system
  • Charge and launch system
  • Ignition system (gasoline)
  • Preheat system (diesel)
  • Transmission
  • Manual gearbox
  • Automatic gearbox
  • Clutch
  • Drive shafts
  • Chassis
  • Brake system
  • Wheel suspension
  • Steering
  • Body
  • Exterior
  • Interior
  • Doors and windows
  • Ventilation and heating
  • Electrical equipment
  • Equipment and devices
  • Electrical circuits
Astra G (1998-2004, petrol) 
  • General information
  • User manual
  • Car care
  • Maintenance
  • Power unit
  • Single shaft engines
  • Twin shaft engines
  • Engine repair
  • Cooling and heating
  • Fuel and exhaust systems
  • Starting and charging system
  • Ignition system
  • Transmission
  • Clutch
  • Mechanical gearbox
  • Automatic gearbox
  • Drive shafts
  • Chassis
  • Brake system
  • Car suspension
  • Steering
  • Body
  • Interior
  • Exterior
  • Electrical equipment
  • Equipment and devices
  • Wiring diagrams Opel Astra
  • Wiring diagrams Opel Zafira
Astra F (1991-1998, petrol) 
  • General information
  • Maintenance
  • Power unit
  • Engine in car
  • Engine removed
  • Cooling system
  • Heating and ventilation
  • Fuel supply (carburetor)
  • Fuel supply (injector)
  • Emission control
  • Ignition system
  • Transmission
  • Clutch
  • Mechanical gearbox
  • Automatic gearbox
  • Drive shafts
  • Chassis
  • Brake system
  • Car suspension
  • Steering
  • Body
  • Exterior
  • Interior
  • Electrical equipment
  • Equipment and devices
  • Electrical circuits
OpelBook.ru © 2017–2026 · Mobile version · · Sitemap: EN BG BY UA RS HR RO PL SK HU · Feedback · Site search
Astra F, petrol · Astra G, petrol · Astra G · Astra H · Astra J, petrol · Corsa B · Corsa C, petrol · Corsa C · Insignia A · Kadett D · Kadett E · Omega A · Omega B · Omega B2 · Vectra A, petrol · Vectra A · Vectra B, petrol · Vectra B · Vectra C · Zafira A, petrol · Frontera A, petrol · Frontera B · Ascona C · Vivaro A ·
We want your visit to be comfortable 🤝! We use cookies 🍪 to make that happen.