
Removing
Disconnect the negative battery terminal.
Working inside the vehicle, remove the clips and remove the lower trim panel at the driver's feet.
Disconnect the wire connector from the brake light switch, then turn the latter counterclockwise and remove from the bracket.
Remove the retaining ring from the right side of the axle connecting the amplifier fork to the pedal.
Using suitable pliers, remove the return spring from the pedal so that the booster fork axle and pedal can be removed.
Disconnect the vacuum tube from the hydraulic booster.
Remove the two nuts and carefully detach the brake master cylinder from the studs on the power steering. Move the master cylinder slightly forward, being careful not to stress the brake fluid lines.
Unscrew the four nuts securing the amplifier bracket from the bulkhead (you will need a socket wrench to get the bottom bolt out), then tilt the bracket/amplifier assembly and remove it from the engine compartment.
If desired, the support bracket can be detached from the amplifier by unscrewing the four nuts. The rubber bushing can now be removed from the booster.
To remove the fork from the coupling on the amplifier rod, remove the retaining ring.
Installation
Before installing the amplifier, check the correct plug size as follows.
Measure from the end face of the booster housing to the center of the axle hole at the end of the fork. It should be 255.5 mm (pic. 9.25.).
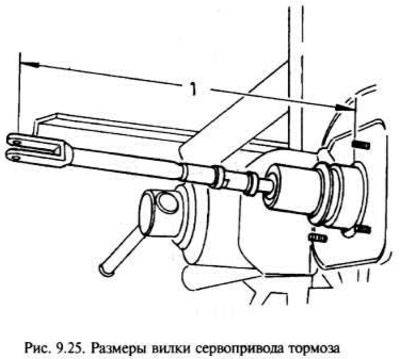
If adjustment is required, loosen the lock nut on the traction sleeve (drive rod). Rotate the fork until it reaches the correct size, then tighten the lock nut.
Where required, install the rubber grommet and booster on the support bracket. Tighten the nuts to the required torque.
Install the amplifier with the bracket in place, and then the assembly itself on the partition. Using new self-locking nuts, tighten the nuts to the correct torque.
Connect the main brake cylinder to the amplifier and tighten the nuts to the required torque.
Connect the vacuum line to the booster.
Further installation is carried out in the reverse order of removal. After its completion, check the operation of the hydraulic vacuum booster.
Visitor comments