
Removing
Place chocks under the front wheels, raise the rear of the vehicle and secure it to stands under the axle.
Remove the brake pads as outlined in the previous section.
Working under the hood, remove the brake fluid reservoir cap and secure a piece of polyethylene to the filler neck with rubber band or put the cap back on. This will reduce the loss of brake fluid during operations.
Loosen the brake fluid line nut on the back of the caliper and disconnect it, being careful not to damage it. Fluid may leak, so plug open ends.
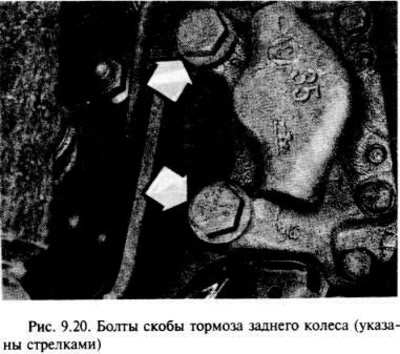
Loosen the two screws and remove the bracket (pic. 9.20.).
Repair
Brush off dirt and dust from the bracket, being careful not to inhale the dust.
Note that you should not try to separate the two halves of the staple.
Use a screwdriver to pry out the dust seal clips, then carefully remove the dust seals.
Using an appropriate clamp, clamp one of the pistons in its fully retracted position, then apply low pressure air, such as from a foot pump, into the fluid inlet at the back of the brace housing to push the other piston out of the cylinder. Make sure that the piston does not fall out, this may damage it.
Temporarily cover the bore of the cylinder from which the piston was removed with a piece of wood or something else, then remove the clamp from the other piston and again apply low pressure compressed air to the bracket to push the piston out.
Carefully pry the seal out of the grooves in the bracket holes using a plastic or wooden tool.
Inspect the surfaces of the pistons and their bores in the caliper for obvious metal-to-metal contact. If obvious marks are found, replace the entire staple assembly.
If pistons and bores are in good condition, remove seals and replace.
Remove dirt from the piston and cylinder bore with brake fluid or denatured alcohol (dirt cannot be removed by any other means).
Apply some brake cylinder paste to the pistons, cylinder bore surfaces and seals.
Start assembly by installing the seals in the grooves of the clevis cylinder bores.
Install the dust seals into the grooves on the pistons, then carefully insert the pistons into the cylinder bores until they engage the seals. It may be necessary to rotate the pistons to prevent them from seizing.
Insert the dust seals into the bracket and install the clips.
Installation
Install bracket, tighten bolts as required.
Connect the brake fluid line and tighten the nut.
Install the brake pads as instructed in the previous section.
Install the road wheel and lower the vehicle to the ground.
Remove a piece of polyethylene from the neck of the brake fluid reservoir and bleed the brake circuit as indicated in the second section of this chapter.
Visitor comments