
OpelBook.ru
Cars AvtoVAZ Cars Mitsubishi Cars BMW Cars Mercedes Cars Nissan Cars Toyota Cars Chevrolet
English Русский
Български
Беларускі
Український
Српски
Hrvatski
Română
Polski
Slovenský
Magyar
 |  Sitemap  |  Contacts  |    


Main Astra Corsa Insignia Kadett Omega Vectra Zafira Others Articles
Kadett D (1979-1984) Kadett E (1984-1995)
  • Main
  • Kadett
  • Kadett E
  • Chassis
  • Rear suspension
  • Removal, installation and repair of rear wheel hubs on vehicles with the «20XE» engine

Removal, installation and repair of rear wheel hubs on vehicles with the «20XE» engine (Opel Kadett E)

            0

Remove the rear wheel.

Unscrew the two bolts securing the caliper to the disc. Without disconnecting the brake hose, move the caliper to the side and hang it on a technical hook to the body so that the brake hose is not loaded.

Disconnect the parking brake cable and tension spring from the parking brake shoe actuator lever.

Loosen the parking brake shoe clearance adjustment bolt.

Using a screwdriver as a lever, remove the wheel hub cap.

Remove the cotter pin and unscrew the hub nut, remove the lock washer.
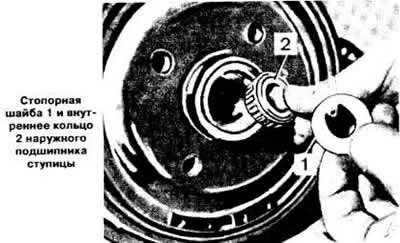
Remove the cotter pin and unscrew the hub nut, remove the lock washer.


Remove the brake disc, which is made integral with the hub.

Check the condition of the hub axle and replace it if necessary.

Use a screwdriver to remove the mudguard ring from the hub.

Remove the inner race of the inner hub bearing.

Support the hub on the KM 466 2 mandrel using a drift (see picture) press out the outer ring of the inner bearing, moving the drift around the circumference to prevent jamming. Using the drift, press out the outer ring of the outer bearing.
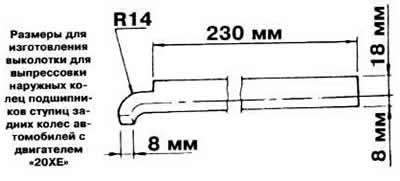
Support the hub on the KM 466 2 mandrel using a drift (see picture) press out the outer ring of the…


Clean the hub and check its condition.


Press the outer ring of the outer bearing into the hub until it stops.

Press the outer ring of the inner bearing into the hub.

Install the inner ring of the inner bearing into the hub.

Using a mandrel of the required diameter, press the mud-deflecting ring into the hub.

Fill the hub bearings with bearing grease, lubricate the working edge of the mud-deflecting ring with grease.

Install the brake disc into place, forming a single unit with the hub.

Press in the inner ring of the outer bearing, install the lock washer, and tighten the hub nut.

Adjust the clearance in the hub bearings as described above.

Connect the parking brake cable and tension spring to the parking brake shoe actuator lever.

Adjust the clearance between the parking brake shoes and drum as specified in the section "Brake system".

(The source is on the online website www.OpelBook.ru)

Install the brake caliper in place and tighten the mounting bolts to a torque of 6.5 kgf·m.

Check the condition of the brake shoe linings and replace them if necessary.

Install the rear wheel.

Press the brake pedal sharply two or three times to set the pistons to the working position.


This article is available at russian, bulgarian, belarusian, ukrainian, serbian, croatian, romanian, polish, slovak, hungarian
Checking the article: Shapovalov Yaroslav

Share information:

Previous articles
Opel Kadett E: Rear suspension
Next articles

Replacement of rear wheel hub bearings on all models of vehicles, except for vehicles with the «20XE» engine
Removal and installation of rear wheel hubs on all models of vehicles, except for vehicles with the «20XE» engine
Adjusting the clearance in the rear wheel hub bearings
Rear suspension device
Removal and installation the rear suspension beam
Removal and installation the anti-roll bar
Rear wheel hub device for cars with the «20 XE» engine


See similar ones from other Opel car manuals:
▶ Rear Brake Wheel Cylinder — Removal, Repair and Installation Opel Astra F (1991-1998, petrol)
▶ Removal and installation rear brake discs (all-wheel drive… Opel Vectra A (1988-1995)
▶ Pressure regulator valve in the hydraulic circuits of the… Opel Corsa B (1993-2000)
▶ Replacing the rear wheel speed sensors Opel Insignia A (2008-2017)
▶ Engine — preparation for first start after major repair Opel Omega A (1986-1993)
Link to this page in different formats

Visitor comments


No comments yet


How much will 23 + 47 =


Kadett E (1984-1995) 
  • General information
  • Vehicle description
  • Operation and maintenance
  • OHV power unit
  • Engine design
  • Check and repair
  • Engine work
  • OHC power unit
  • Engine design
  • Engine repair
  • Ignition system
  • Cooling and lubrication
  • Supply system
  • Fuel injection «LE-Jetronic»
  • Fuel injection «LE3-Jetronic»
  • Motronic ML4.1 system
  • Motronic M1.5 system
  • Motronic M2.5 system
  • Transmission
  • Clutch
  • Gearbox F10 and F13
  • Gearbox F16 and F20
  • Automatic gearbox
  • Drive shafts
  • Chassis
  • Front suspension
  • Rear suspension
  • Steering
  • Brake system
  • Electrical equipment
  • Equipment and devices
  • Electrical circuits
Kadett D (1979-1984) 
  • General information
  • Car care
  • Maintenance
  • Power unit
  • Gasoline engines
  • Lubrication system
  • Cooling system
  • Power system (gasoline)
  • Carburetor Solex 35 PDSI
  • Carburetor Varajet II
  • Carburetor 1B1
  • Fuel injection (gasoline)
  • Diesel engines
  • Fuel system (diesel)
  • Transmission
  • Clutch
  • Manual gearbox
  • Chassis
  • Front suspension
  • Rear suspension
  • Steering
  • Brake system
  • Wheels and tires
  • Body
  • Body elements
  • Doors and windows
  • Electrical equipment
  • Equipment and devices
  • Lighting system
  • Power devices
  • Ignition system
  • Electrical circuits
OpelBook.ru © 2017–2026 · Mobile version · · Sitemap: EN BG BY UA RS HR RO PL SK HU · Feedback · Site search
Astra F, petrol · Astra G, petrol · Astra G · Astra H · Astra J, petrol · Corsa B · Corsa C, petrol · Corsa C · Insignia A · Kadett D · Kadett E · Omega A · Omega B · Omega B2 · Vectra A, petrol · Vectra A · Vectra B, petrol · Vectra B · Vectra C · Zafira A, petrol · Frontera A, petrol · Frontera B · Ascona C · Vivaro A ·
We want your visit to be comfortable 🤝! We use cookies 🍪 to make that happen.