
OpelBook.ru
Cars AvtoVAZ Cars Mitsubishi Cars BMW Cars Mercedes Cars Nissan Cars Toyota Cars Chevrolet
English Русский
Български
Беларускі
Український
Српски
Hrvatski
Română
Polski
Slovenský
Magyar
 |  Sitemap  |  Contacts  |    


Main Astra Corsa Insignia Kadett Omega Vectra Zafira Others Articles
Omega A (1986-1993) Omega B (1993-1999) Omega B2 (1999-2003)
  • Main
  • Omega
  • Omega A
  • Power unit
  • Diesel engines
  • Valve clearances — checking and adjustment

Valve clearances — checking and adjustment (Opel Omega A)

            0

Contents: General information ⬇ Checking and adjusting ⬇

General information


To compensate for thermal expansion of the valves, a gap is provided in the valve mechanism, which must be set correctly. If the gap is too small, the valve timing changes. Late closing and early opening of the valves leads to a loss of engine power and uneven operation. In extreme situations, the valves can become deformed from impacts with the pistons, and the valve seats can burn. If the gap is too large, the valves open late and close early, i.e. the valve timing changes, engine power decreases, and the engine runs unevenly. Valve installation is considered correct when they are perfectly sealed, have an acceptable gap, and do not knock in the guide bushings.

The valve clearance can be checked and adjusted both on a cold and warm engine.

Checking and adjusting


1. Remove the cylinder head cover (see illustration). Unscrew the oil screen (see illustration).
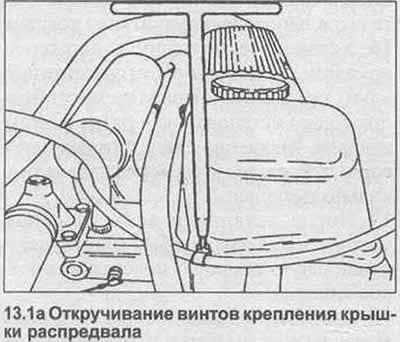
1. Remove the cylinder head cover (see illustration). Unscrew the oil screen (see illustration).
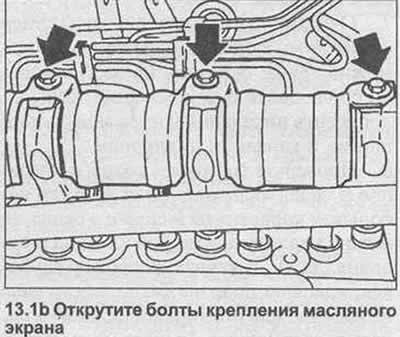

1. Remove the cylinder head cover (see illustration). Unscrew the oil screen (see illustration).


2. Set the gearbox to neutral position, apply the handbrake.


3. Turn the engine by the central bolt of the crankshaft pulley in the direction of normal engine rotation. This will also turn the camshaft.

4. Set the piston of the 1st cylinder to TDC. To do this, turn the crankshaft until the valves of the 1st cylinder overlap. "Overlapping" the valves means that while the camshaft cam that controls the position of the intake valve begins to release the valve mechanism lever, the cam that controls the exhaust valve begins to press the lever to open the valve. The valves are overlapped if both cams are facing down and the bisector of the angle between the cam apexes is vertical. At this time, the mark on the camshaft gear coincides with the mark on the housing (see illustration).
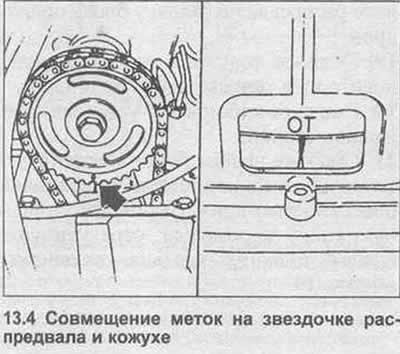
4. Set the piston of the 1st cylinder to TDC. To do this, turn the crankshaft until the valves of…


5. In this position, check the clearances of the following valves: exhaust and intake valves of the 4th cylinder, intake valve of the 3rd cylinder, exhaust valve of the 2nd cylinder (see illustration).
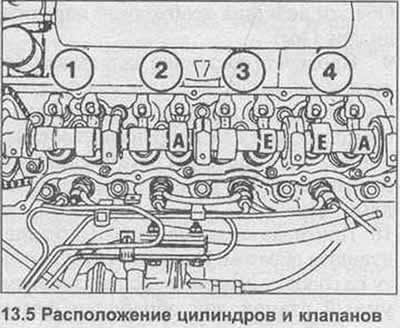
5. In this position, check the clearances of the following valves: exhaust and intake valves of the…


6. To check the valve clearance, insert the feeler gauge into the gap between the lever and the camshaft cam, while the feeler gauge should be slightly "clamped".


7. Valve clearance: for the inlet valve - 0.2 mm, for the outlet valve - 0.3 mm.

8. Turn the crankshaft 1 full revolution in the direction of normal rotation, the valves of the 4th cylinder should be closed. The mark on the camshaft gear will turn 180° and will be facing up (see illustration). The TDC mark on the flywheel is now again opposite the indicator on the clutch box.
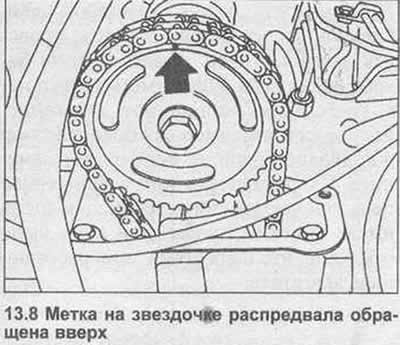
8. Turn the crankshaft 1 full revolution in the direction of normal rotation, the valves of the 4th…


9. Measure the clearances of the following valves: exhaust and intake valves of cylinder 1, intake valve of cylinder 2, exhaust valve of cylinder 3.

10. If the valve clearances do not correspond to the permissible value, rotate the bolt of the corresponding lever using a special key (see illustration).
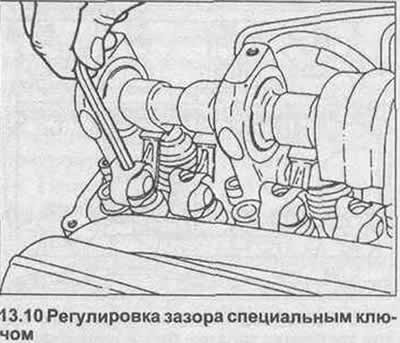
10. If the valve clearances do not correspond to the permissible value, rotate the bolt of the…


11. Install the oil screen, tighten the bolts with a tightening torque of 10 Nm.

12. Place the new cylinder head cover gasket, carefully and evenly tighten the cover screws.


This article is available at russian, bulgarian, belarusian, ukrainian, serbian, croatian, romanian, polish, slovak, hungarian
Checking the article: Zinoviev Kirill

Share information:

Previous articles
Opel Omega A: Diesel engines
Next articles

Cylinder head — removal and installation (engine in a car)
Engine Mounting Brackets — Replacement
Pallet — removal and installation with engine in car
Engine — complete disassembly
Engine Auxiliaries — Removal
Engine disassembly — general description
Engine Components — Inspection and Refurbishment
Cylinder head — overhaul
Engine — assembly
Engine Accessories — Installation
Engine — installation
Pre-heating system — description and serviceability check


See similar ones from other Opel car manuals:
▶ Checking and adjusting valve clearances (1.7L DOHC engines) Opel Astra G (1998-2004)
▶ Checking and adjusting valve clearances on a diesel engine Opel Corsa B (1993-2000)
▶ Checking and adjusting valve clearances Opel Vectra A (1988-1995)
▶ Checking and adjusting valve clearances Opel Frontera B (1998-2004)
▶ Checking the opening pressure of the steam valve Opel Insignia A (2008-2017)
Link to this page in different formats

Visitor comments


No comments yet


How much will 47 + 44 =


Omega B2 (1999-2003) 
  • General information
  • User manual
  • Maintenance
  • Troubleshooting
  • Power unit
  • Petrol 4-cylinder
  • Petrol 6-cylinder
  • Engine overhaul
  • Diesel engines 2.0 l
  • Diesel engines 2.5 l
  • Cooling and heating
  • Injection system (gasoline)
  • Fuel system (diesel)
  • Fuel system
  • Exhaust system
  • Ignition system
  • Transmission
  • Clutch
  • Mechanical gearbox
  • Automatic gearbox
  • Main gear and shafts
  • Chassis
  • Brake system
  • Car suspension
  • Steering
  • Body
  • Body elements
  • Electrical equipment
  • Equipment and devices
  • Electrical circuits
Omega B (1993-1999) 
  • General information
  • User manual
  • Tips for the car owner
  • Maintenance (gasoline)
  • Maintenance (diesel)
  • Power unit
  • Petrol engine SOHC 2.0 l
  • Petrol engine DOHC 2.0 l
  • Petrol engines 2.5 and 3.0 l
  • Repair of gasoline engines
  • Diesel engine 2.0 l
  • Diesel engine repair 2.0 l
  • Diesel engine 2.5 l
  • Cooling and heating
  • Power system (petrol)
  • Emission reduction
  • Fuel system (diesel 2.0 l)
  • Fuel system (diesel 2.5 l)
  • Launch system
  • Ignition system
  • Transmission
  • Clutch
  • Mechanical gearbox
  • Automatic gearbox
  • Drive shafts
  • Chassis
  • Brake system
  • Wheel suspension
  • Steering
  • Body
  • Exterior
  • Interior
  • Doors and windows
  • Electrical equipment
  • Equipment and devices
  • Wiring diagrams (early)
  • Wiring diagrams (late)
Omega A (1986-1993) 
  • General information
  • User manual
  • Maintenance
  • Changes and additions
  • Troubleshooting
  • Power unit
  • Gasoline engines
  • Diesel engines
  • Cooling system
  • Fuel system (gasoline)
  • Fuel system (diesel)
  • Ignition system
  • Transmission
  • Clutch
  • Mechanical gearbox
  • Automatic gearbox
  • Cardan shaft
  • Drive shafts
  • Chassis
  • Brake system
  • Car suspension
  • Steering
  • Body
  • Exterior
  • Interior
  • Electrical equipment
  • Power devices
  • Lighting and appliances
  • Electrical circuits
OpelBook.ru © 2017–2026 · Mobile version · · Sitemap: EN BG BY UA RS HR RO PL SK HU · Feedback · Site search
Astra F, petrol · Astra G, petrol · Astra G · Astra H · Astra J, petrol · Corsa B · Corsa C, petrol · Corsa C · Insignia A · Kadett D · Kadett E · Omega A · Omega B · Omega B2 · Vectra A, petrol · Vectra A · Vectra B, petrol · Vectra B · Vectra C · Zafira A, petrol · Frontera A, petrol · Frontera B · Ascona C · Vivaro A ·
We want your visit to be comfortable 🤝! We use cookies 🍪 to make that happen.