
OpelBook.ru
Cars AvtoVAZ Cars Mitsubishi Cars BMW Cars Mercedes Cars Nissan Cars Toyota Cars Chevrolet
English Русский
Български
Беларускі
Український
Српски
Hrvatski
Română
Polski
Slovenský
Magyar
 |  Sitemap  |  Contacts  |    


Main Astra Corsa Insignia Kadett Omega Vectra Zafira Others Articles
Frontera A (1991-1998, petrol) Frontera B (1998-2004) Ascona C (1981-1988) Vivaro A (2001-2014)
  • Main
  • Opel
  • Frontera B
  • Power unit
  • Petrol engines 3.2 l
  • Checking and adjusting valve clearances

Checking and adjusting valve clearances (Opel Frontera B)

            0

Remove the cylinder head cover (see the relevant chapter).

Using the pulley mounting bolt, slowly turn the crankshaft and measure the valve clearances under each camshaft cam.

If any valve clearance is outside the permissible limits, adjust it by installing an adjusting shim of the appropriate thickness on the valve lifter.
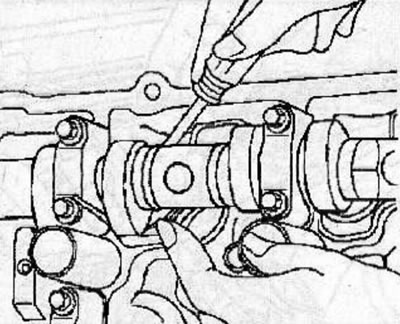
If any valve clearance is outside the permissible limits, adjust it by installing an adjusting shim…


To remove the adjusting washer, use the pulley mounting bolt to slowly turn the crankshaft so that the camshaft cam contour is directed to the side or upward and does not touch the adjusting washer.
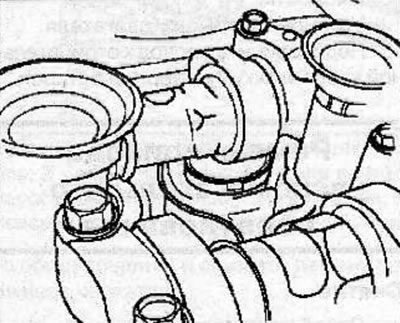
To remove the adjusting washer, use the pulley mounting bolt to slowly turn the crankshaft so that…


Make sure that the KM-6046 holder supports are correctly assembled on the base so that the supports are located opposite the beveled edge.
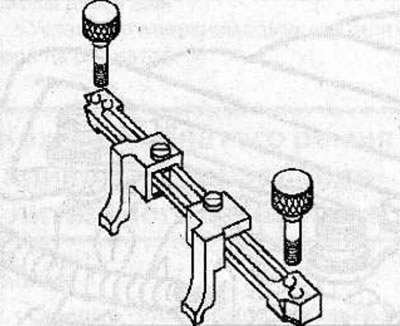
Make sure that the KM-6046 holder supports are correctly assembled on the base so that the supports…


Turn the crankshaft using the pulley mounting bolt so that the camshaft cam presses on the adjustable valve tappet, this will allow the valve clearances of adjacent valves to be adjusted.


Article posted on an online resource: OPELBOOK.ru

Install the KM-6046 holder so that the holder supports press on two adjacent pushers (the figure shows the inner camshaft of the right cylinder head).

The thumb screws must be screwed into two of the four holes located in the base of the tool as shown in the table.
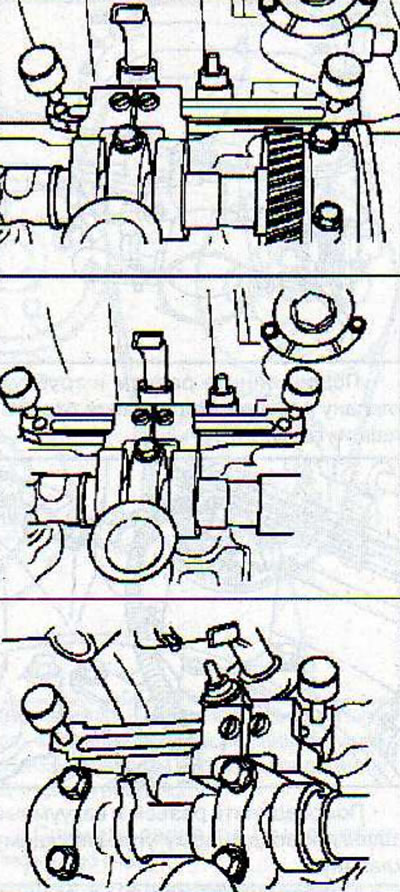
The thumb screws must be screwed into two of the four holes located in the base of the tool as…


ValvesTool base
Rear holesFront holes
Front pairExternalInternal
Middle pairExternalExternal
Back pairInternalExternal

Warning: Make sure that the KM-6046 holder supports are located on the cam centerline, not the camshaft centerline.


The thumb screws should be positioned in a similar manner when adjusting the valve clearances on the other three camshafts.

Using the pulley mounting bolt, turn the crankshaft so that the camshaft lobe points to the side or up and does not touch the tappet adjusting washer.

Use a small screwdriver or magnet to remove the adjusting washer.
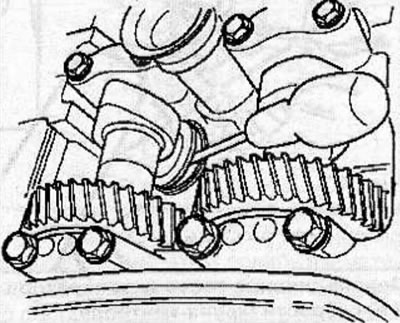
Use a small screwdriver or magnet to remove the adjusting washer.


Use a micrometer to measure the thickness of the removed adjusting washer.


Calculate the thickness of the new adjusting shim so that the valve clearance is within the specified value.

Select a new shim with a thickness closest to the calculated value.

Install a new adjusting washer onto the valve lifter.

Using the pulley mounting bolt, turn the crankshaft so that the camshaft cam moves away from the tool, while the valve tappet should be pressed by the camshaft cam and remove the KM-6046 holder.

Adjust the remaining valve clearances in the same manner.

Recheck the valve clearances.


This article is available at russian, bulgarian, belarusian, ukrainian, serbian, croatian, romanian, polish, slovak, hungarian
Checking the article: Chernov Alexander

Share information:

Previous articles
Opel Frontera B: Petrol engines 3.2 l
Next articles

Checking and adjusting valve timing
Checking engine oil pressure
Measuring engine oil temperature
Checking the tightness of cylinders
Compression check
General information
Expansion air chamber
Auxiliary equipment drive belt
Timing belt covers for gas distribution mechanism drive
Timing belt for gas distribution mechanism drive
Replacing the front camshaft oil seal
Camshafts


See similar ones from other Opel car manuals:
▶ Checking and adjusting valve clearances (1.7L DOHC engines) Opel Astra G (1998-2004)
▶ Checking and adjusting valve clearances on a diesel engine Opel Corsa B (1993-2000)
▶ Checking and adjusting valve clearances Opel Vectra A (1988-1995)
▶ Adjusting clearances in the valve drive mechanism Opel Kadett E (1984-1995)
▶ Valve clearances — checking and adjustment Opel Omega A (1986-1993)
Link to this page in different formats

Visitor comments


No comments yet


How much will 18 + 50 =


Vivaro A (2001-2014) 
  • General information
  • User manual
  • Power unit
  • Petrol engine F4R
  • Diesel engine F9Q
  • Diesel engine G9U
  • Transmission
  • Clutch and drive shafts
  • Manual gearbox
  • Chassis
  • Front suspension
  • Rear suspension
  • Brake system
  • Body
  • Exterior
  • Interior
  • Electrical equipment
  • Heating and ventilation
  • Air conditioner
  • Equipment and devices
  • Electrical diagrams
Ascona C (1981-1988) 
  • General information
  • Maintenance
  • Power unit
  • Gasoline engines
  • Diesel engines
  • Cooling system
  • Fuel and exhaust system
  • Contact ignition system
  • Contactless ignition system
  • Transmission
  • Clutch
  • Mechanical gearbox
  • Automatic gearbox
  • Drive shafts
  • Chassis
  • Steering
  • Brake system
  • Car suspension
  • Body
  • Exterior
  • Interior
  • Doors and windows
  • Electrical equipment
  • Equipment and devices
  • Power devices
  • Electrical circuits
Frontera B (1998-2004) 
  • General information
  • User manual
  • Maintenance
  • Power unit
  • Petrol engines 2.2 l
  • Petrol engines 3.2 l
  • Diesel engines 2.2 l
  • Cooling system
  • Fuel system (petrol)
  • Fuel system (diesel)
  • Ignition system
  • Transmission
  • Clutch
  • Manual gearbox MUA5C
  • Automatic gearbox 4L30E
  • Chassis
  • Suspension and axles
  • Steering
  • Brake system
  • Body
  • Exterior
  • Interior
  • Doors, locks and windows
  • Heating and air conditioning
  • Electrical equipment
  • Power devices
  • Equipment and devices
  • Lighting and signaling
  • Electrical diagrams
Frontera A (1991-1998, petrol) 
  • General information
  • Introduction to guide
  • User manual
  • Maintenance
  • Power unit
  • Engine repair
  • Lubrication system
  • Cooling system
  • Power and exhaust system
  • Engine electrics
  • Transmission
  • Clutch
  • Mechanical gearbox
  • Cardan shafts
  • Chassis
  • Brake system
  • Front suspension
  • Rear suspension
  • Steering
  • Body
  • Repair and care
  • Electrical equipment
  • Equipment and devices
  • Electrical circuits
OpelBook.ru © 2017–2026 · Mobile version · · Sitemap: EN BG BY UA RS HR RO PL SK HU · Feedback · Site search
Astra F, petrol · Astra G, petrol · Astra G · Astra H · Astra J, petrol · Corsa B · Corsa C, petrol · Corsa C · Insignia A · Kadett D · Kadett E · Omega A · Omega B · Omega B2 · Vectra A, petrol · Vectra A · Vectra B, petrol · Vectra B · Vectra C · Zafira A, petrol · Frontera A, petrol · Frontera B · Ascona C · Vivaro A ·
We want your visit to be comfortable 🤝! We use cookies 🍪 to make that happen.