
OpelBook.ru
Cars AvtoVAZ Cars Mitsubishi Cars BMW Cars Mercedes Cars Nissan Cars Toyota Cars Chevrolet
English Русский
Български
Беларускі
Український
Српски
Hrvatski
Română
Polski
Slovenský
Magyar
 |  Sitemap  |  Contacts  |    


Main Astra Corsa Insignia Kadett Omega Vectra Zafira Others Articles
Frontera A (1991-1998, petrol) Frontera B (1998-2004) Ascona C (1981-1988) Vivaro A (2001-2014)
  • Main
  • Opel
  • Frontera B
  • Power unit
  • Petrol engines 3.2 l
  • Timing belt for gas distribution mechanism drive

Timing belt for gas distribution mechanism drive (Opel Frontera B)

            0

Contents: Removal ⬇ Examination ⬇ Installation ⬇

Removal


Remove the timing belt covers of the gas distribution mechanism (see the relevant chapter).
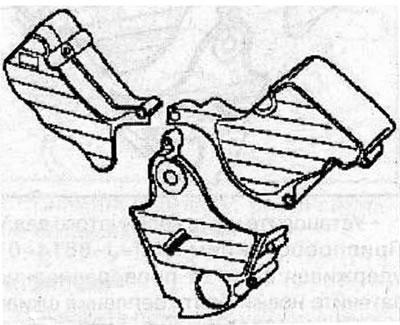
Remove the timing belt covers of the gas distribution mechanism (see the relevant chapter).


Remove the bolts and remove the hydraulic timing belt tensioner from the cylinder block. To prevent air from entering the hydraulic tensioner, hold it so that the tensioner plunger is on top.
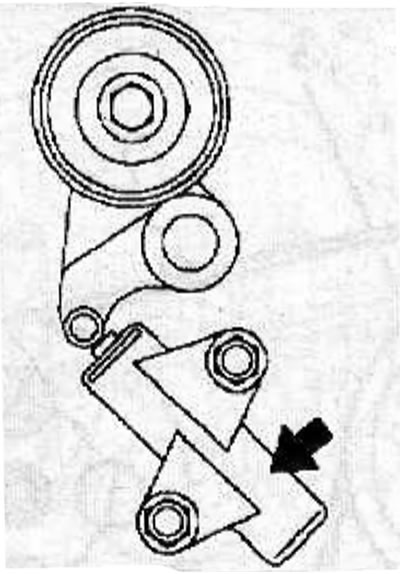
Remove the bolts and remove the hydraulic timing belt tensioner from the cylinder block. To prevent…


Press the plunger into the hydraulic timing belt tensioner and lock it in this position by inserting a 1.4 mm diameter steel wire (arrow) into the aligned holes of the tensioner housing and plunger.
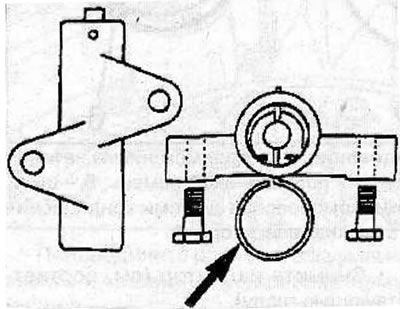
Press the plunger into the hydraulic timing belt tensioner and lock it in this position by…


Remove the timing belt from the engine pulleys.


Warnings!
  • After removing the timing belt, do not turn the crankshaft, as this may cause the pistons to collide with the valves.
  • Mark the direction of rotation of the timing belt to reinstall it in its original position.
  • Do not bend the timing belt with a bending radius of less than 30 mm or change its direction of rotation.
  • Avoid getting oil or lubricant on the timing belt, as this will cause it to deteriorate.
  • When removing the timing belt, do not use any tools, otherwise the belt may be damaged.
  • Do not expose the timing belt to sunlight or high temperatures.


Examination


Replace the timing belt if it is contaminated with oil or grease.

Check the timing belt for damage, wear, delamination, cracks on the teeth and at the base of the teeth, as well as for defects on the ends and back of the belt. If there are any defects, replace the timing belt.

Check the tensioner pulley and idler pulley for smooth rotation and absence of noise when rotating. If necessary, replace the tensioner pulley or idler pulley.

Installation


Align the camshaft pulley alignment marks (arrows) with the pointers. Make sure that the groove on the crankshaft pulley is aligned with the mark (arrows) on the oil pump housing.
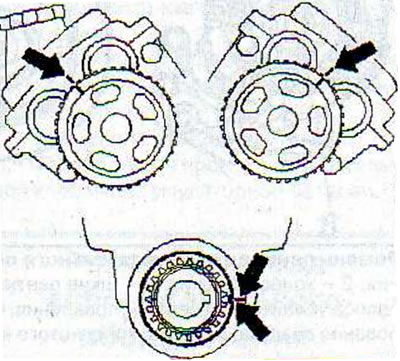
Align the camshaft pulley alignment marks (arrows) with the pointers. Make sure that the groove on…


Material copied from this portal Opelbook.ru


Install the timing belt onto the engine pulleys in the following sequence:
  • Right cylinder head camshaft pulley, aligning the white line on the belt with the mark on the front of the cylinder head cover.
  • Left cylinder head camshaft pulley, aligning the white line on the belt with the mark on the front of the cylinder head cover.
  • Crankshaft pulley, aligning the dotted line on the belt with the mark on the oil pump.
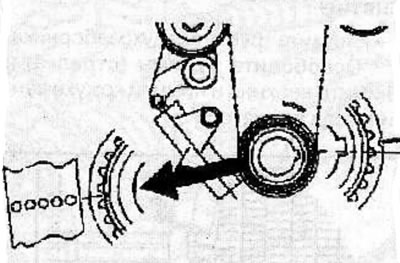
Crankshaft pulley, aligning the dotted line on the belt with the mark on the oil pump.

  • Water pump pulley.
  • Idle pulley.
  • Tensioner pulley.

Use clerical clamps to secure the timing belt of the gas distribution mechanism drive to each engine pulley.
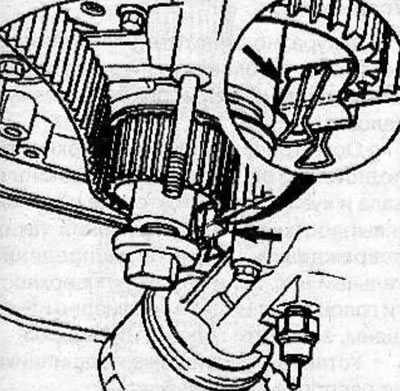
Use clerical clamps to secure the timing belt of the gas distribution mechanism drive to each…


Warning: The letters on the timing belt must be read from left to right when looking at the belt from the front of the engine.


Install the hydraulic timing belt tensioner onto the cylinder block, move the tensioner roller away from the timing belt and secure the tensioner with bolts, tightening them to a torque of 25 Nm.
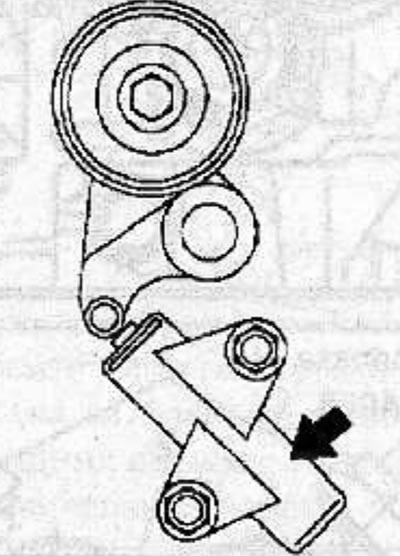


Install the hydraulic timing belt tensioner onto the cylinder block, move the tensioner roller away…


Remove the locking pin (arrow) from the hydraulic timing belt tensioner.
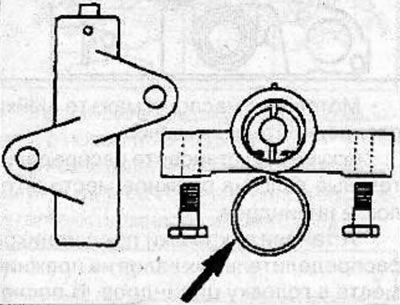
Remove the locking pin (arrow) from the hydraulic timing belt tensioner.


Install the crankshaft pulley and hand tighten its mounting bolt.

Turn the crankshaft two revolutions.

Remove the crankshaft pulley, install the timing belt covers and secure with bolts, tightening them to a torque of 19 N·m.
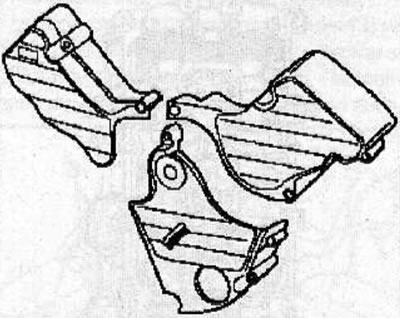
Remove the crankshaft pulley, install the timing belt covers and secure with bolts, tightening them…


Install the crankshaft pulley and secure it with the bolt, tightening it to a torque of 167 N·m.


This article is available at russian, bulgarian, belarusian, ukrainian, serbian, croatian, romanian, polish, slovak, hungarian
Checking the article: Chernov Alexander

Share information:

Previous articles
Opel Frontera B: Petrol engines 3.2 l
Next articles

Timing belt covers for gas distribution mechanism drive
Auxiliary equipment drive belt
Expansion air chamber
Checking and adjusting valve clearances
Checking and adjusting valve timing
Checking engine oil pressure
Replacing the front camshaft oil seal
Camshafts
Exhaust manifold (left side)
Cylinder head
Replacing the crankshaft guide bearing
Flywheel and ring gear replacement


See similar ones from other Opel car manuals:
▶ Checking the timing belt of the gas distribution mechanism Opel Insignia A (2008-2017)
▶ Timing belt of the gas distribution mechanism-check Opel Omega B2 (1999-2003)
▶ Timing Belt for Camshaft Drive — Removal and Installation Opel Astra G (1998-2004, petrol)
▶ Checking the installation of the timing mechanism drive of… Opel Kadett E (1984-1995)
▶ Toothed drive belt and sprockets (without automatic… Opel Vectra A (1988-1995, petrol)
Link to this page in different formats

Visitor comments


No comments yet


How much will 21 + 36 =


Vivaro A (2001-2014) 
  • General information
  • User manual
  • Power unit
  • Petrol engine F4R
  • Diesel engine F9Q
  • Diesel engine G9U
  • Transmission
  • Clutch and drive shafts
  • Manual gearbox
  • Chassis
  • Front suspension
  • Rear suspension
  • Brake system
  • Body
  • Exterior
  • Interior
  • Electrical equipment
  • Heating and ventilation
  • Air conditioner
  • Equipment and devices
  • Electrical diagrams
Ascona C (1981-1988) 
  • General information
  • Maintenance
  • Power unit
  • Gasoline engines
  • Diesel engines
  • Cooling system
  • Fuel and exhaust system
  • Contact ignition system
  • Contactless ignition system
  • Transmission
  • Clutch
  • Mechanical gearbox
  • Automatic gearbox
  • Drive shafts
  • Chassis
  • Steering
  • Brake system
  • Car suspension
  • Body
  • Exterior
  • Interior
  • Doors and windows
  • Electrical equipment
  • Equipment and devices
  • Power devices
  • Electrical circuits
Frontera B (1998-2004) 
  • General information
  • User manual
  • Maintenance
  • Power unit
  • Petrol engines 2.2 l
  • Petrol engines 3.2 l
  • Diesel engines 2.2 l
  • Cooling system
  • Fuel system (petrol)
  • Fuel system (diesel)
  • Ignition system
  • Transmission
  • Clutch
  • Manual gearbox MUA5C
  • Automatic gearbox 4L30E
  • Chassis
  • Suspension and axles
  • Steering
  • Brake system
  • Body
  • Exterior
  • Interior
  • Doors, locks and windows
  • Heating and air conditioning
  • Electrical equipment
  • Power devices
  • Equipment and devices
  • Lighting and signaling
  • Electrical diagrams
Frontera A (1991-1998, petrol) 
  • General information
  • Introduction to guide
  • User manual
  • Maintenance
  • Power unit
  • Engine repair
  • Lubrication system
  • Cooling system
  • Power and exhaust system
  • Engine electrics
  • Transmission
  • Clutch
  • Mechanical gearbox
  • Cardan shafts
  • Chassis
  • Brake system
  • Front suspension
  • Rear suspension
  • Steering
  • Body
  • Repair and care
  • Electrical equipment
  • Equipment and devices
  • Electrical circuits
OpelBook.ru © 2017–2026 · Mobile version · · Sitemap: EN BG BY UA RS HR RO PL SK HU · Feedback · Site search
Astra F, petrol · Astra G, petrol · Astra G · Astra H · Astra J, petrol · Corsa B · Corsa C, petrol · Corsa C · Insignia A · Kadett D · Kadett E · Omega A · Omega B · Omega B2 · Vectra A, petrol · Vectra A · Vectra B, petrol · Vectra B · Vectra C · Zafira A, petrol · Frontera A, petrol · Frontera B · Ascona C · Vivaro A ·
We want your visit to be comfortable 🤝! We use cookies 🍪 to make that happen.