OpelBook.ru
Cars AvtoVAZ Cars Mitsubishi Cars BMW Cars Mercedes Cars Nissan Cars Toyota Cars Chevrolet
English Русский
Български
Беларускі
Український
Српски
Hrvatski
Română
Polski
Slovenský
Magyar
 |  Sitemap  |  Contacts  |    


Main Astra Corsa Insignia Kadett Omega Vectra Zafira Others Articles
Frontera A (1991-1998, petrol) Frontera B (1998-2004) Ascona C (1981-1988) Vivaro A (2001-2014)
  • Main
  • Opel
  • Frontera B
  • Power unit
  • Petrol engines 3.2 l
  • Camshafts

Camshafts (Opel Frontera B)

            0

Contents: Removal ⬇ Examination ⬇ Installation ⬇

Removal


Disconnect the cable from the negative battery terminal.

Mark the location and disconnect all hoses, connectors and cables from the cylinder head cover area.
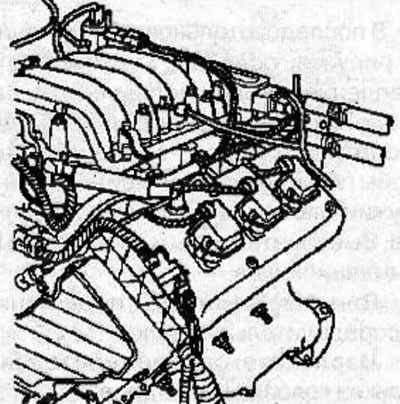
Mark the location and disconnect all hoses, connectors and cables from the cylinder head cover area.


Remove 2 bolts (2) on each ignition coil, disconnect the connectors (1) and remove the ignition coils (3).
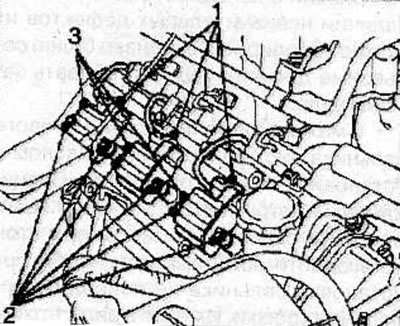
Remove 2 bolts (2) on each ignition coil, disconnect the connectors (1) and remove the ignition…


Remove 8 bolts and remove the cylinder head cover from the cylinder head.

Remove the gasket from the cylinder head.

Remove the timing belt of the gas distribution mechanism drive (see the relevant chapter).

Warnings:
  • Mark the camshaft bearing caps on each cylinder head to ensure they are installed correctly in their original position.
  • The camshaft bearing caps have straight grooves and are not interchangeable.


Screw the M5x0.8 screws (arrow) into the camshaft gears, so that both sections of the gear are rigidly connected together.
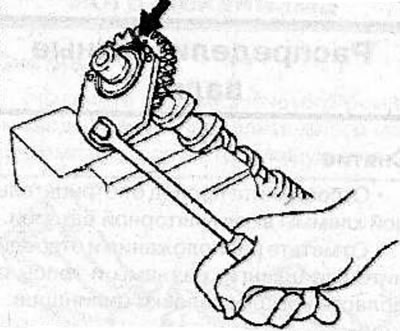


Screw the M5x0.8 screws (arrow) into the camshaft gears, so that both sections of the gear are…


In the sequence shown in the illustration, loosen the camshaft bearing cap bolts one-half turn or one turn at a time to gradually relieve the valve spring pressure on the bearing caps. Remove the bolts and bearing caps.

Remove the camshaft end bearings.

Remove the camshafts from the cylinder head.
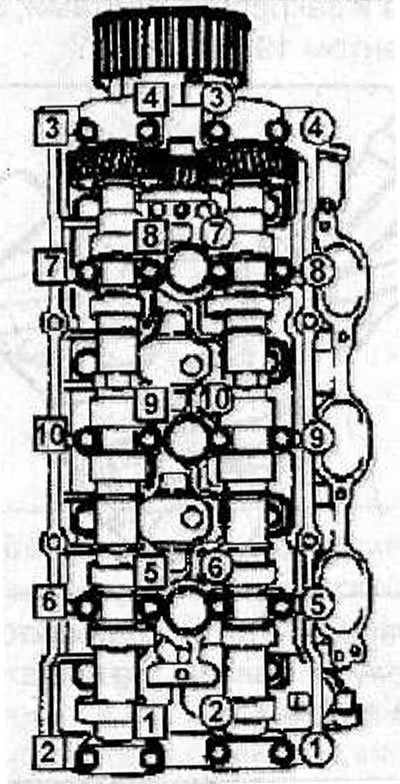
Remove the camshafts from the cylinder head.


Examination


Check the camshafts for scratches and wear.

Check the condition of the cam contours. Using a micrometer, measure the height of each camshaft lobe at two points. If the camshaft cam lobe height is less than the specified value, replace the camshaft.

Place the camshaft on two V-shaped prisms and, rotating the shaft, measure its runout using an arrow-type indicator.
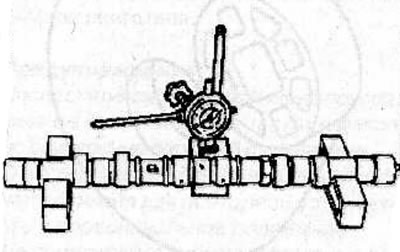
Place the camshaft on two V-shaped prisms and, rotating the shaft, measure its runout using an…


If the runout exceeds the maximum permissible value, replace the camshaft.


Measure the camshaft bearing clearances.
  • Install the camshaft bearing caps and secure with bolts, tightening them to the required torque.
  • Use a bore gauge to measure the inner diameter of the camshaft bearings.
  • Use a micrometer to measure the diameter of the camshaft journals.
  • Calculate the clearances in the camshaft bearings. If the clearance exceeds the maximum permissible value, replace the camshaft. If necessary, replace the bearing caps and cylinder head as a set.

Text copied from a web portal opelbook.ru

Installation


Carefully clean the sealing surfaces of the cylinder head and camshaft bearing caps.

Inspect the working surfaces of the camshaft and cam bearings for scratches and wear. If such damage is found, replace the camshaft. If the cylinder head running surfaces are excessively worn, replace the cylinder head.

Install the end bearings onto the camshafts.

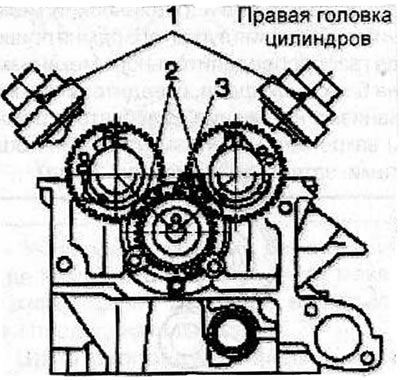
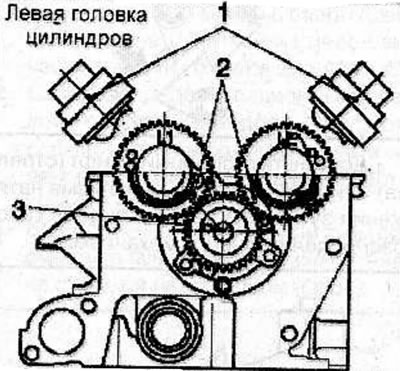
Align the alignment marks:
  • Installation marks on the drive.
  • Timing marks on the camshaft (one point for the right cylinder head and two points for the left cylinder head).
  • Installation marks on the retainer.

Installation marks on the retainer.


Installation marks on the retainer.


Lubricate the camshaft journals with engine oil.


Carefully install the camshafts back into place in the cylinder head.

Install the camshaft bearing caps back into the cylinder head. In the sequence shown in the figure, tighten the camshaft bearing cap mounting bolts in several passes to a torque of 10 N·m. If the camshaft bearing cap tightening sequence is violated, the shafts may be damaged.
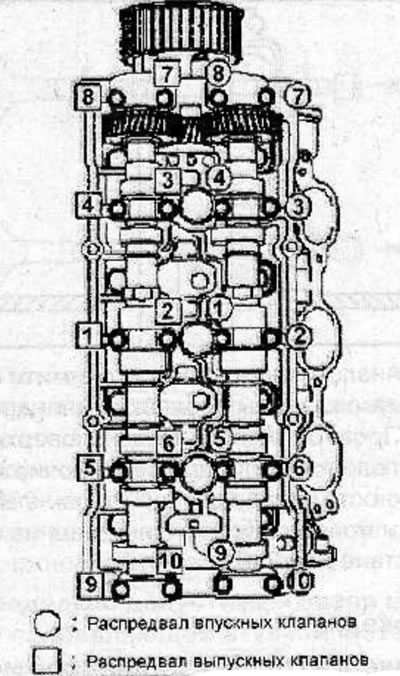
Install the camshaft bearing caps back into the cylinder head. In the sequence shown in the figure,…


Remove the screws connecting the two sections of the gear.
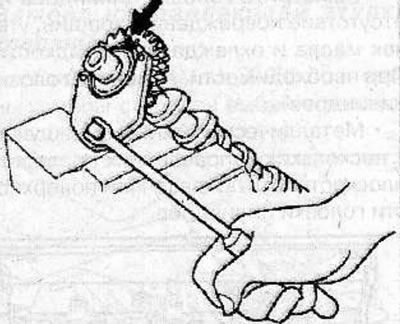
Remove the screws connecting the two sections of the gear.


Apply a 2-3 mm diameter layer of sealant to the side walls of the front and rear camshaft bearing caps.
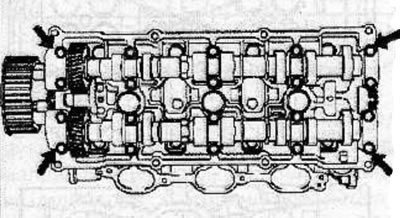
Apply a 2-3 mm diameter layer of sealant to the side walls of the front and rear camshaft bearing…


Install the cylinder head cover with a new gasket.


Tighten the cylinder head cover bolts to 9 Nm in the sequence shown in the illustration.
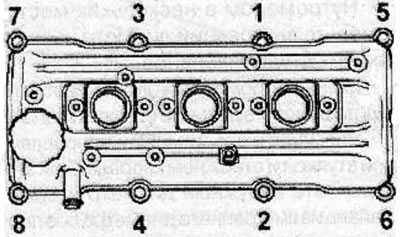
Tighten the cylinder head cover bolts to 9 Nm in the sequence shown in the illustration.


Install the timing belt of the gas distribution mechanism drive (see the relevant chapter).

Install the ignition coils (3) on the cylinder head and secure with the bolts (2), tightening them to a torque of 4 N·m. Connect the connectors (1) to the ignition coils.
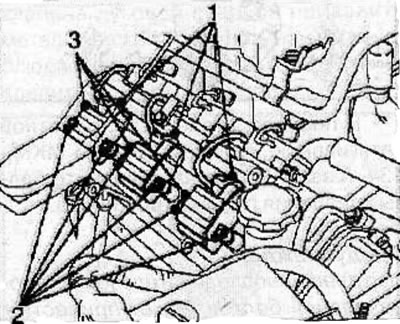
Install the ignition coils (3) on the cylinder head and secure with the bolts (2), tightening them…


Reconnect all previously disconnected hoses, connectors and cables.

Connect the cable to the negative terminal of the battery.


This article is available at russian, bulgarian, belarusian, ukrainian, serbian, croatian, romanian, polish, slovak, hungarian
Checking the article: Chernov Alexander

Share information:

Previous articles
Opel Frontera B: Petrol engines 3.2 l
Next articles

Replacing the front camshaft oil seal
Timing belt for gas distribution mechanism drive
Timing belt covers for gas distribution mechanism drive
Auxiliary equipment drive belt
Expansion air chamber
Checking and adjusting valve clearances
Exhaust manifold (left side)
Cylinder head
Replacing the crankshaft guide bearing
Flywheel and ring gear replacement
Replacing the rear crankshaft oil seal
Carter — removal and installation


See similar ones from other Opel car manuals:
▶ Removal and installation of camshafts and valve lifters,… Opel Astra H (2004-2009)
▶ Removal and installation of gear wheels of crankshaft and… Opel Corsa B (1993-2000)
▶ Replacing camshafts Opel Insignia A (2008-2017)
▶ Camshafts and hydraulic tappets — removal, inspection and… Opel Omega B2 (1999-2003)
▶ Camshafts, repair dimensions for models C16NZ2, 1.8 and 2.0… Opel Vectra A (1988-1995, petrol)
Link to this page in different formats

Visitor comments


No comments yet


How much will 50 + 38 =


Vivaro A (2001-2014) 
  • General information
  • User manual
  • Power unit
  • Petrol engine F4R
  • Diesel engine F9Q
  • Diesel engine G9U
  • Transmission
  • Clutch and drive shafts
  • Manual gearbox
  • Chassis
  • Front suspension
  • Rear suspension
  • Brake system
  • Body
  • Exterior
  • Interior
  • Electrical equipment
  • Heating and ventilation
  • Air conditioner
  • Equipment and devices
  • Electrical diagrams
Ascona C (1981-1988) 
  • General information
  • Maintenance
  • Power unit
  • Gasoline engines
  • Diesel engines
  • Cooling system
  • Fuel and exhaust system
  • Contact ignition system
  • Contactless ignition system
  • Transmission
  • Clutch
  • Mechanical gearbox
  • Automatic gearbox
  • Drive shafts
  • Chassis
  • Steering
  • Brake system
  • Car suspension
  • Body
  • Exterior
  • Interior
  • Doors and windows
  • Electrical equipment
  • Equipment and devices
  • Power devices
  • Electrical circuits
Frontera B (1998-2004) 
  • General information
  • User manual
  • Maintenance
  • Power unit
  • Petrol engines 2.2 l
  • Petrol engines 3.2 l
  • Diesel engines 2.2 l
  • Cooling system
  • Fuel system (petrol)
  • Fuel system (diesel)
  • Ignition system
  • Transmission
  • Clutch
  • Manual gearbox MUA5C
  • Automatic gearbox 4L30E
  • Chassis
  • Suspension and axles
  • Steering
  • Brake system
  • Body
  • Exterior
  • Interior
  • Doors, locks and windows
  • Heating and air conditioning
  • Electrical equipment
  • Power devices
  • Equipment and devices
  • Lighting and signaling
  • Electrical diagrams
Frontera A (1991-1998, petrol) 
  • General information
  • Introduction to guide
  • User manual
  • Maintenance
  • Power unit
  • Engine repair
  • Lubrication system
  • Cooling system
  • Power and exhaust system
  • Engine electrics
  • Transmission
  • Clutch
  • Mechanical gearbox
  • Cardan shafts
  • Chassis
  • Brake system
  • Front suspension
  • Rear suspension
  • Steering
  • Body
  • Repair and care
  • Electrical equipment
  • Equipment and devices
  • Electrical circuits
OpelBook.ru © 2017–2026 · Mobile version · · Sitemap: EN BG BY UA RS HR RO PL SK HU · Feedback · Site search
Astra F, petrol · Astra G, petrol · Astra G · Astra H · Astra J, petrol · Corsa B · Corsa C, petrol · Corsa C · Insignia A · Kadett D · Kadett E · Omega A · Omega B · Omega B2 · Vectra A, petrol · Vectra A · Vectra B, petrol · Vectra B · Vectra C · Zafira A, petrol · Frontera A, petrol · Frontera B · Ascona C · Vivaro A ·
We want your visit to be comfortable 🤝! We use cookies 🍪 to make that happen.