


Contents: Removal ⬇ Installation ⬇
Removal
Place a container under the oil drain plug to collect any leaking oil. Remove the plug and drain the engine oil from the engine.
Remove the guide tube for the engine oil level indicator.
Remove the front suspension beam from the chassis.
Disconnect the front propeller shaft from the front axle.
Disconnect the steering column from the steering gear.
Disconnect the multi-pin connector from the transmission.
Remove the starter (see the relevant chapter).
Support the front axle with a jack and remove the bolts that secure it.
Lower the front axle enough to allow the crankcase to be removed.
Remove the 18 bolts securing the crankcase to the cylinder block.
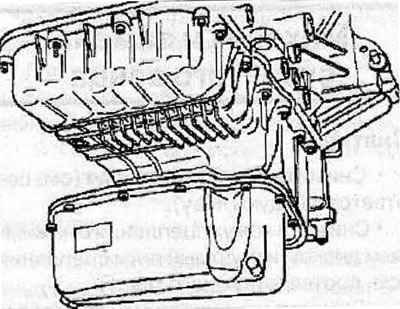
Insert special tool KM-J-37228 between the crankcase and the cylinder block. Be careful not to damage the mating surfaces. Do not use a screwdriver to separate the crankcase, as this will damage its flange. Hit the special tool with a nylon hammer. After the special tool has entered between the crankcase and the cylinder block, hit the special tool with a nylon hammer so that the tool moves along the perimeter of the crankcase.
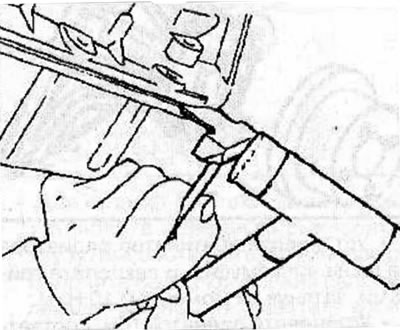
Clean the mating surfaces of the crankcase and cylinder block.
Installation
Apply a 3.5 mm diameter layer of sealant to the mating surface of the crankcase. Apply a layer of sealant from the inside of the holes for the crankcase mounting bolts.
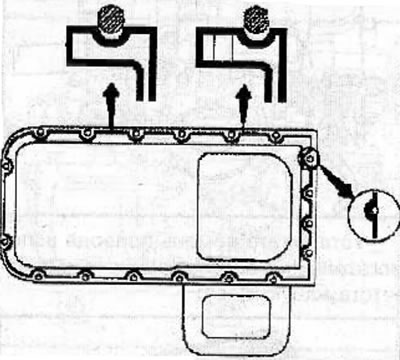
Warning! Install the crankcase no later than five minutes after applying the sealant.
Install the crankcase and secure with 18 bolts, tightening them to a torque of 10 Nm in the sequence shown in the figure.
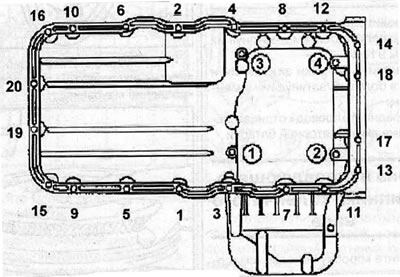
Replace the front axle and secure it with bolts.
Install the starter (see the relevant chapter).
Connect the multi-pin connector to the gearbox.
Connect the steering column to the steering gear.
Connect the front propeller shaft to the front axle.
Install the front suspension beam onto the chassis.
Install the guide tube for the engine oil level indicator.
Fill the engine with the required amount of the required motor oil.
Visitor comments