
OpelBook.ru
Cars AvtoVAZ Cars Mitsubishi Cars BMW Cars Mercedes Cars Nissan Cars Toyota Cars Chevrolet
English Русский
Български
Беларускі
Український
Српски
Hrvatski
Română
Polski
Slovenský
Magyar
 |  Sitemap  |  Contacts  |    


Main Astra Corsa Insignia Kadett Omega Vectra Zafira Others Articles
Frontera A (1991-1998, petrol) Frontera B (1998-2004) Ascona C (1981-1988) Vivaro A (2001-2014)
  • Main
  • Opel
  • Frontera B
  • Power unit
  • Petrol engines 3.2 l
  • Crankshaft

Crankshaft (Opel Frontera B)

            0

Contents: Removal ⬇ Examination ⬇ Installation ⬇

Removal


Remove the engine from the car (see the relevant chapter).

Install the engine on the KM-412 stand with the appropriate adapters.

Place a container under the oil drain plug to collect any leaking oil. Remove the plug and drain the engine oil from the engine.

By moving the tensioner pulley downward, release the tension and remove the accessory drive belt.

Remove the timing belt of the gas distribution mechanism drive (see the relevant chapter).

Remove the flywheel.

Remove the crankcase (see the relevant chapter).

Warning: Be careful not to damage the mating surfaces of the crankcase and cylinder block.


Remove the oil pump, oil pickup pipe with mesh filter, rear cover of the cylinder block with rear crankshaft oil seal (see the relevant chapters).

Remove 8 bolts and oil gallery.
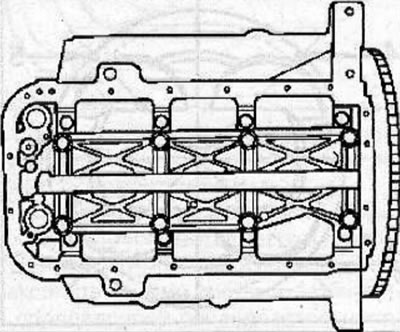
Remove 8 bolts and oil gallery.


Remove the bolts and the connecting rod caps (see the relevant chapter).

Remove the bolts and covers from the cylinder block.

Remove the crankshaft from the cylinder block.

Clean the removed parts thoroughly.

Examination


Check the crankshaft main and connecting rod bearing journals for wear and tear. Check the crankshaft oil holes for clogging.


Install the crankshaft on the V-shaped prisms.
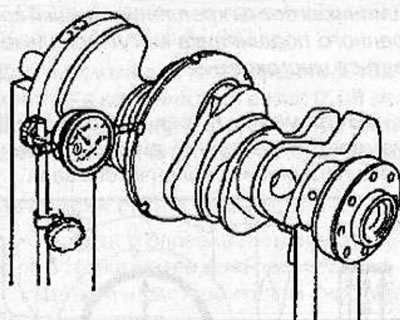
Install the crankshaft on the V-shaped prisms.


Install the dial indicator tip onto the crankshaft journal. Slowly rotate the crankshaft and measure its runout using a dial indicator.

If the crankshaft runout exceeds 0.04 mm, replace the crankshaft.

Installation


Lubricate the new main bearing shells with engine oil and install them into the cylinder block and main bearing caps.

Warning! Install the main bearing shells in the following sequence:
  • A - upper and lower bearing shells of main journals 1 and 4 of the crankshaft.
  • B - upper bearing shells of main journals 2 and 3 of the crankshaft.
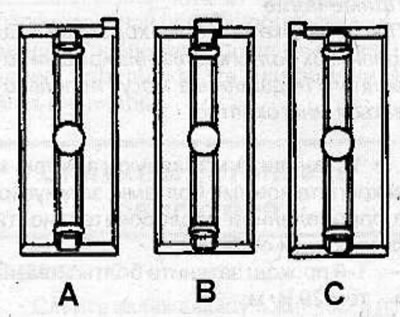
  • C - lower bearing shells of main journals 2 and 3 of the crankshaft.


C - lower bearing shells of main journals 2 and 3 of the crankshaft.


Before installing the crankshaft, apply a thin layer of clean engine oil to all sliding surfaces. Install the crankshaft onto the main bearing shells in the cylinder block.


Lubricate the new thrust half rings with engine oil and install them on both sides of the crankshaft main journal.

Warning! The oil grooves on the thrust washers must be located on the crankshaft side.


Install the crankshaft main bearing caps in accordance with the markings and secure with bolts, tightening them to a torque of 39 N·m.

Warnings:
  • Before screwing in the crankshaft main bearing cap bolts, lubricate the threads and bases of the bolt heads with engine oil.
  • Start tightening the main bearing cap bolts from the front side of the cylinder block.
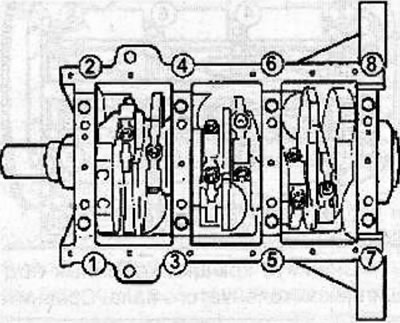

Start tightening the main bearing cap bolts from the front side of the cylinder block.


Turn the crankshaft and check that it rotates easily and smoothly.

Check the crankshaft axial clearance. Install the dial indicator tip onto the rear end of the crankshaft. Move the crankshaft along the axis until it stops and set the dial indicator scale to zero. Move the crankshaft along the axis in the other direction until it stops and read the axial play values on the indicator scale.
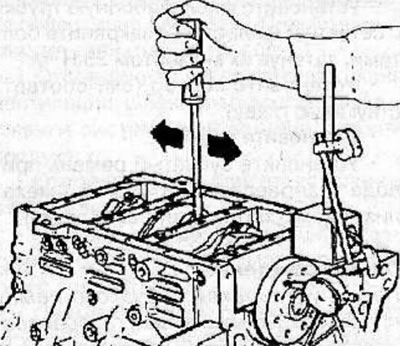
Check the crankshaft axial clearance. Install the dial indicator tip onto the rear end of the…


If the crankshaft axial clearance exceeds 0.30 mm, replace the thrust half rings.


Install the connecting rod caps onto the connecting rods and secure with new bolts, tightening them to a torque of 54 N·m.

Install the oil pump (see the relevant chapter).

Install the rear cylinder block cover with the rear crankshaft oil seal and secure with bolts, tightening them to a torque of 18 Nm.

[Source is on this resource: OPELBOOK.ru]

Install the oil gallery and secure with new bolts, tightening them in the specified sequence as follows:
  • 1st pass: tighten the bolts to 29 Nm;
  • 2nd pass: tighten the bolts to an angle of 55-65°;
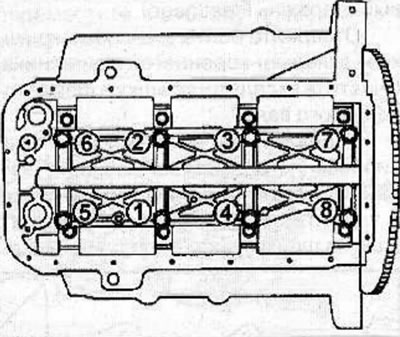
2nd pass: tighten the bolts to an angle of 55-65°;


Screw in the side bolts securing the crankshaft main bearing caps and tighten them in a specific sequence to a torque of 39 N·m.
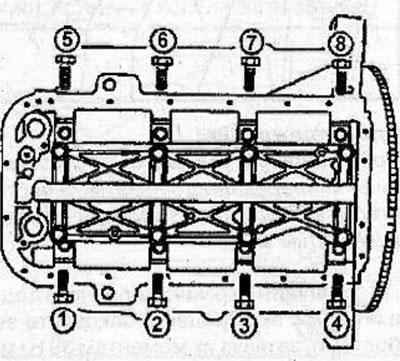
Screw in the side bolts securing the crankshaft main bearing caps and tighten them in a specific…


Install the oil pick-up pipe with the mesh filter and secure with bolts, tightening them to a torque of 25 N·m.


Install the crankcase (see the relevant chapter).

Install the flywheel.

Install the timing belt of the gas distribution mechanism drive (see the relevant chapter).

Warning: Before installing the timing belt, check the valve timing.


Install the crankshaft pulley and accessory drive belt.

Remove the engine from the KM-412 stand.

Install the engine into the car (see the relevant chapter).


This article is available at russian, bulgarian, belarusian, ukrainian, serbian, croatian, romanian, polish, slovak, hungarian
Checking the article: Chernov Alexander

Share information:

Previous articles
Opel Frontera B: Petrol engines 3.2 l
Next articles

Pulley and front crankshaft oil seal
Measuring clearances in crankshaft connecting rod bearings
Pistons and connecting rods
Carter — removal and installation
Replacing the rear crankshaft oil seal
Flywheel and ring gear replacement
Measuring clearances in crankshaft main bearings
Removal and installation the engine
Lubrication system
Replacing the oil filter
Oil pan
Oil pump


See similar ones from other Opel car manuals:
▶ Crankshaft pulley — removal and installation Opel Astra F (1991-1998, petrol)
▶ Removal and installation the crankshaft pulley Opel Corsa B (1993-2000)
▶ Replacing the crankshaft pulley Opel Insignia A (2008-2017)
▶ Installing the crankshaft Opel Kadett E (1984-1995)
▶ Crankshaft pulley — removal and installation Opel Omega B2 (1999-2003)
Link to this page in different formats

Visitor comments


No comments yet


How much will 27 + 25 =


Vivaro A (2001-2014) 
  • General information
  • User manual
  • Power unit
  • Petrol engine F4R
  • Diesel engine F9Q
  • Diesel engine G9U
  • Transmission
  • Clutch and drive shafts
  • Manual gearbox
  • Chassis
  • Front suspension
  • Rear suspension
  • Brake system
  • Body
  • Exterior
  • Interior
  • Electrical equipment
  • Heating and ventilation
  • Air conditioner
  • Equipment and devices
  • Electrical diagrams
Ascona C (1981-1988) 
  • General information
  • Maintenance
  • Power unit
  • Gasoline engines
  • Diesel engines
  • Cooling system
  • Fuel and exhaust system
  • Contact ignition system
  • Contactless ignition system
  • Transmission
  • Clutch
  • Mechanical gearbox
  • Automatic gearbox
  • Drive shafts
  • Chassis
  • Steering
  • Brake system
  • Car suspension
  • Body
  • Exterior
  • Interior
  • Doors and windows
  • Electrical equipment
  • Equipment and devices
  • Power devices
  • Electrical circuits
Frontera B (1998-2004) 
  • General information
  • User manual
  • Maintenance
  • Power unit
  • Petrol engines 2.2 l
  • Petrol engines 3.2 l
  • Diesel engines 2.2 l
  • Cooling system
  • Fuel system (petrol)
  • Fuel system (diesel)
  • Ignition system
  • Transmission
  • Clutch
  • Manual gearbox MUA5C
  • Automatic gearbox 4L30E
  • Chassis
  • Suspension and axles
  • Steering
  • Brake system
  • Body
  • Exterior
  • Interior
  • Doors, locks and windows
  • Heating and air conditioning
  • Electrical equipment
  • Power devices
  • Equipment and devices
  • Lighting and signaling
  • Electrical diagrams
Frontera A (1991-1998, petrol) 
  • General information
  • Introduction to guide
  • User manual
  • Maintenance
  • Power unit
  • Engine repair
  • Lubrication system
  • Cooling system
  • Power and exhaust system
  • Engine electrics
  • Transmission
  • Clutch
  • Mechanical gearbox
  • Cardan shafts
  • Chassis
  • Brake system
  • Front suspension
  • Rear suspension
  • Steering
  • Body
  • Repair and care
  • Electrical equipment
  • Equipment and devices
  • Electrical circuits
OpelBook.ru © 2017–2026 · Mobile version · · Sitemap: EN BG BY UA RS HR RO PL SK HU · Feedback · Site search
Astra F, petrol · Astra G, petrol · Astra G · Astra H · Astra J, petrol · Corsa B · Corsa C, petrol · Corsa C · Insignia A · Kadett D · Kadett E · Omega A · Omega B · Omega B2 · Vectra A, petrol · Vectra A · Vectra B, petrol · Vectra B · Vectra C · Zafira A, petrol · Frontera A, petrol · Frontera B · Ascona C · Vivaro A ·
We want your visit to be comfortable 🤝! We use cookies 🍪 to make that happen.