
OpelBook.ru
Cars AvtoVAZ Cars Mitsubishi Cars BMW Cars Mercedes Cars Nissan Cars Toyota Cars Chevrolet
English Русский
Български
Беларускі
Український
Српски
Hrvatski
Română
Polski
Slovenský
Magyar
 |  Sitemap  |  Contacts  |    


Main Astra Corsa Insignia Kadett Omega Vectra Zafira Others Articles
Frontera A (1991-1998, petrol) Frontera B (1998-2004) Ascona C (1981-1988) Vivaro A (2001-2014)
  • Main
  • Opel
  • Frontera B
  • Power unit
  • Petrol engines 3.2 l
  • Oil pan

Oil pan (Opel Frontera B)

            0

Contents: Removal ⬇ Installation ⬇

Removal


Disconnect the cable from the negative battery terminal.

Raise the vehicle and support it on supports.

Remove 2 bolts and 2 nuts and remove the lower protection (1) of the engine compartment.
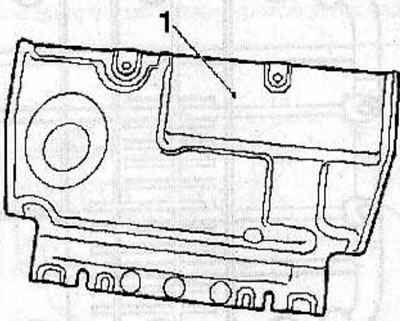
Remove 2 bolts and 2 nuts and remove the lower protection (1) of the engine compartment.


Remove 6 bolts and gearbox guard (1).
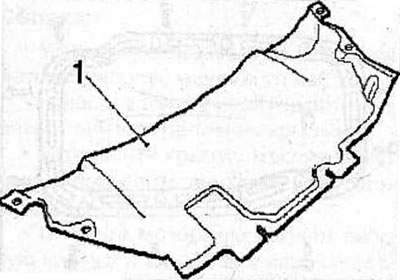
Remove 6 bolts and gearbox guard (1).


Disconnect the connector (2) of the engine oil level sensor (1).
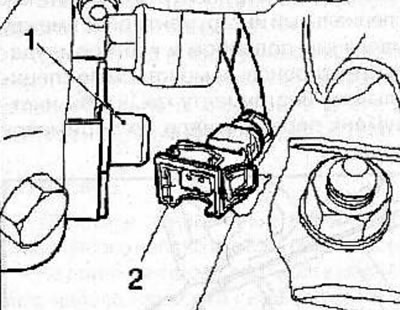
Disconnect the connector (2) of the engine oil level sensor (1).


Remove 4 nuts, 4 bolts and remove the rear beam (1) from the front of the frame.


Original source is on the website [www.OpelBook.ru]
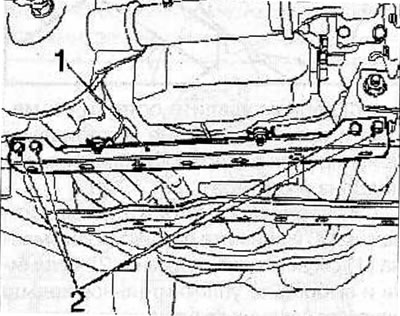
Remove 4 nuts, 4 bolts and remove the rear beam (1) from the front of the frame.


Warnings:
  • When working under the vehicle, be careful not to touch the exhaust pipes or other hot engine parts.
  • Raise the vehicle so that it remains in a horizontal position. If the vehicle is raised on a slope, make sure the engine oil drain plug on the oil pan is at its lowest point.


Place a container under the oil drain plug to collect any leaking oil. Remove the plug and drain the engine oil from the engine.

Remove 12 oil pan mounting bolts.
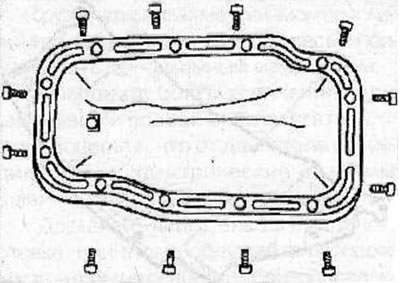
Remove 12 oil pan mounting bolts.


Insert special tool KM-J-37228 between the oil pan and the crankcase. Be careful not to damage the mating surfaces. Do not use a screwdriver to remove the oil pan as this will damage the oil pan flange. Hit the special tool with a nylon hammer. After the special tool has entered between the oil pan and the crankcase, hit the special tool with a nylon hammer so that the tool moves along the perimeter of the pan.
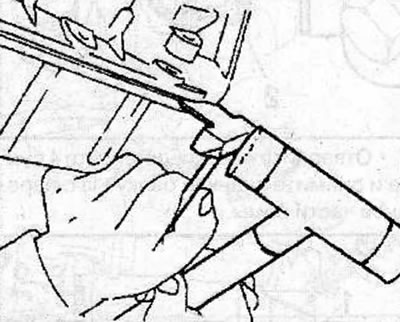


Insert special tool KM-J-37228 between the oil pan and the crankcase. Be careful not to damage the…


Use a scraper to remove any remaining sealant and any foreign material from the mating surfaces of the oil pan and crankcase.

Remove the 2 bolts (3), remove the clamp (4) and remove the oil level sensor (1) from the oil pan (2). Remove and discard the O-ring of the oil level sensor.
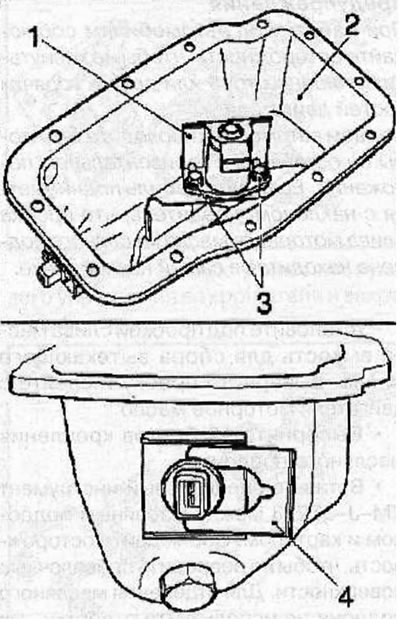
Remove the 2 bolts (3), remove the clamp (4) and remove the oil level sensor (1) from the oil pan…


Installation


Install the oil level sensor (1) with a new O-ring onto the oil pan, secure with 2 bolts (3) and a clamp (4).
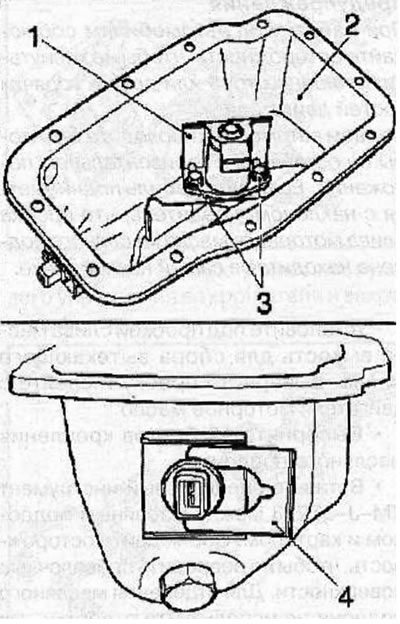
Install the oil level sensor (1) with a new O-ring onto the oil pan, secure with 2 bolts (3) and a…


Apply a 3.5 mm bead of sealant to the oil pan mating surface. Apply the bead of sealant to the inside of the oil pan mounting bolt holes. Install the oil pan no later than five minutes after applying the sealant.


Install the oil pan and secure with 12 bolts, tightening them to 25 N·m in the sequence shown in the figure.
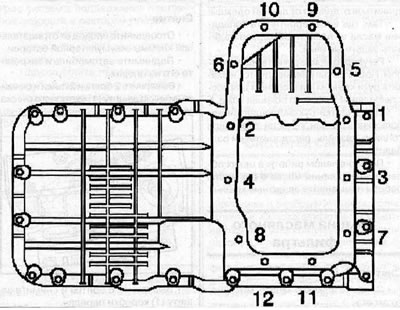
Install the oil pan and secure with 12 bolts, tightening them to 25 N·m in the sequence shown in…


Screw the plug with a new seal into the oil pan.

Connect the connector (2) to the engine oil level sensor (1).
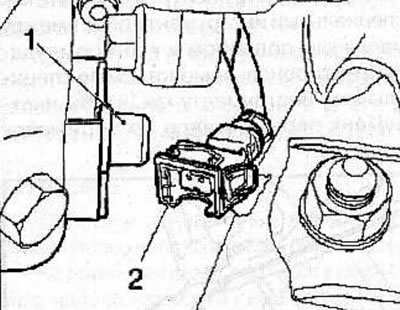
Connect the connector (2) to the engine oil level sensor (1).


Install the rear beam (1) onto the front part of the frame and secure with bolts and nuts (2), tightening them to a torque of 50 Nm.
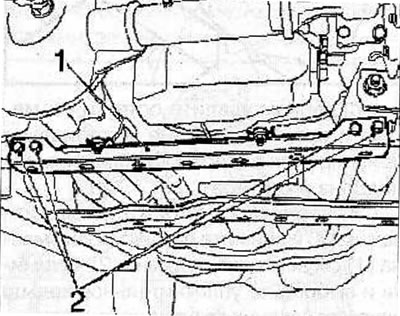
Install the rear beam (1) onto the front part of the frame and secure with bolts and nuts (2),…


Install the gearbox guard and secure it with 6 bolts.


Install the lower engine compartment protection and secure it with bolts and nuts.

Lower the car.

After installing the oil pan, wait at least 30 minutes before adding engine oil to the engine.

Fill the engine with the required amount of the required motor oil.


This article is available at russian, bulgarian, belarusian, ukrainian, serbian, croatian, romanian, polish, slovak, hungarian
Checking the article: Chernov Alexander

Share information:

Previous articles
Opel Frontera B: Petrol engines 3.2 l
Next articles

Replacing the oil filter
Lubrication system
Removal and installation the engine
Measuring clearances in crankshaft main bearings
Crankshaft
Pulley and front crankshaft oil seal
Oil pump


Link to this page in different formats

Visitor comments


No comments yet


How much will 46 + 29 =


Vivaro A (2001-2014) 
  • General information
  • User manual
  • Power unit
  • Petrol engine F4R
  • Diesel engine F9Q
  • Diesel engine G9U
  • Transmission
  • Clutch and drive shafts
  • Manual gearbox
  • Chassis
  • Front suspension
  • Rear suspension
  • Brake system
  • Body
  • Exterior
  • Interior
  • Electrical equipment
  • Heating and ventilation
  • Air conditioner
  • Equipment and devices
  • Electrical diagrams
Ascona C (1981-1988) 
  • General information
  • Maintenance
  • Power unit
  • Gasoline engines
  • Diesel engines
  • Cooling system
  • Fuel and exhaust system
  • Contact ignition system
  • Contactless ignition system
  • Transmission
  • Clutch
  • Mechanical gearbox
  • Automatic gearbox
  • Drive shafts
  • Chassis
  • Steering
  • Brake system
  • Car suspension
  • Body
  • Exterior
  • Interior
  • Doors and windows
  • Electrical equipment
  • Equipment and devices
  • Power devices
  • Electrical circuits
Frontera B (1998-2004) 
  • General information
  • User manual
  • Maintenance
  • Power unit
  • Petrol engines 2.2 l
  • Petrol engines 3.2 l
  • Diesel engines 2.2 l
  • Cooling system
  • Fuel system (petrol)
  • Fuel system (diesel)
  • Ignition system
  • Transmission
  • Clutch
  • Manual gearbox MUA5C
  • Automatic gearbox 4L30E
  • Chassis
  • Suspension and axles
  • Steering
  • Brake system
  • Body
  • Exterior
  • Interior
  • Doors, locks and windows
  • Heating and air conditioning
  • Electrical equipment
  • Power devices
  • Equipment and devices
  • Lighting and signaling
  • Electrical diagrams
Frontera A (1991-1998, petrol) 
  • General information
  • Introduction to guide
  • User manual
  • Maintenance
  • Power unit
  • Engine repair
  • Lubrication system
  • Cooling system
  • Power and exhaust system
  • Engine electrics
  • Transmission
  • Clutch
  • Mechanical gearbox
  • Cardan shafts
  • Chassis
  • Brake system
  • Front suspension
  • Rear suspension
  • Steering
  • Body
  • Repair and care
  • Electrical equipment
  • Equipment and devices
  • Electrical circuits
OpelBook.ru © 2017–2026 · Mobile version · · Sitemap: EN BG BY UA RS HR RO PL SK HU · Feedback · Site search
Astra F, petrol · Astra G, petrol · Astra G · Astra H · Astra J, petrol · Corsa B · Corsa C, petrol · Corsa C · Insignia A · Kadett D · Kadett E · Omega A · Omega B · Omega B2 · Vectra A, petrol · Vectra A · Vectra B, petrol · Vectra B · Vectra C · Zafira A, petrol · Frontera A, petrol · Frontera B · Ascona C · Vivaro A ·
We want your visit to be comfortable 🤝! We use cookies 🍪 to make that happen.