


Turbo diesel engine TC4EE1, 1.7 l
To compensate for thermal expansion, there must be a certain gap in the valve drive. Too small a gap leads to a violation of the valve timing and a decrease in compression. In extreme cases, the valves become deformed and burn.
Too much clearance leads to loud noise during operation. Valve timing is disrupted. Due to short valve opening time and poor cylinder filling, engine power decreases and its operation becomes unstable.
Correct operation of the valves is possible only when the valves have good sealing, the clearances in their drive do not exceed the permissible values, and the ends of the valve stems are not work-hardened.
Valve clearances must be checked and adjusted during routine maintenance, after repairs, and when noise occurs in the valve mechanism. Valve clearances are checked and adjusted on a cold engine.
Examination
Remove the cylinder head cover.
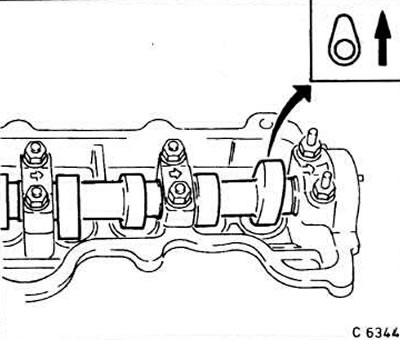
Turn the crankshaft so that the cam lobe of the adjustable valve faces upward. Turn the tappet cup so that the tappet groove faces forward.
To turn the crankshaft, engage 5th gear, jack up one of the front wheels and turn the wheel manually.
Check the clearance in the valve drive. It should be: for the inlet valves - 0.15 mm, for the outlet valves - 0.25 mm.
The feeler gauge should enter with slight friction. Otherwise, the gap needs to be adjusted.
Turn the crankshaft and repeat the above procedure with the other valves.
If gap adjustment is necessary, use a set of feeler gauges to determine the gap size and record it.
Install the cylinder head cover in place and tighten its mounting bolts to a torque of 10 Nm.
Adjustment
The valve clearance is adjusted by replacing the adjusting washers with washers of the required thickness. To do this, it is necessary to compress the valve spring. The Opel KM-650 valve spring compression device should be used.
Remove the adjusting washer.
Determine the required thickness of the adjusting washer.
Lubricate a new adjusting washer of the required thickness with oil and install it in place.
Caution! When installing the adjusting washer, make sure that its marking is facing downwards.
Adjust the clearances in all valves in the same way.
Determining the thickness of the adjusting washer
Measure the thickness of the previously installed adjusting washer with a micrometer. Write down the result. The washer thickness designation is on one of its sides.
To calculate the thickness of the washer, you can use the following formula:
N = T + (A - S) where
N - thickness of the new adjusting washer,
[The article was published on the website: Opelbook.ru]
T - thickness of the removed washer,
A - current valve clearance,
S - required valve clearance.
Visitor comments