
Signs of defects in the cylinder head gasket are:
- reduction in engine power;
- coolant loss (white smoke in exhaust gases);
- increased oil consumption;
- coolant getting into the engine oil. The oil level does not go down, but goes up. Gray engine oil, bubbles on the dipstick, thin oil;
- oil getting into the coolant;
- strong foaming of the coolant;
- low compression in two adjacent cylinders.
Removing
Disconnect wire "masses" from the battery.
Remove the air filter and (if there) suction hose and prechamber.
Remove the bent section of the hose after loosening the clamp.
Remove the V-belt, push the alternator aside.
Vehicles with V-ribbed belt: Remove belt and pulley.
On engines with fuel injection: remove the accelerator link at the throttle valve.
For carbureted engines: Disconnect the accelerator cable from the carburetor and support.
Disconnect all hoses and lines going to the cylinder head, carburetor and intake manifold.
Disconnect the fuel line at the fuel pump and plug its end with a suitable plug.
Disconnect the wires from the spark plugs and the wire from the coil at the ignition distributor.
Remove the front toothed belt cover.
Set the piston of the 1st cylinder to TDC. To do this, turn the crankshaft by the pulley mounting bolt clockwise with a curved spanner until the mark on the engine housing aligns with the mark on the pulley. At the same time, the mark on the camshaft pulley must match the mark on the camshaft housing.
Loosen the toothed belt and remove it from above.

Remove the camshaft housing cover.
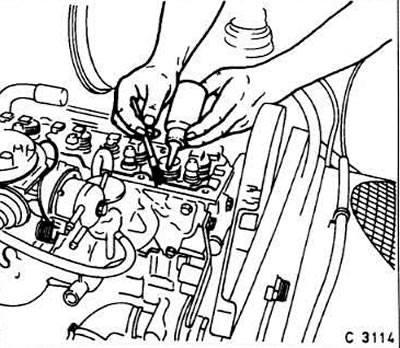
Remove the camshaft sprocket. At the same time, hold the camshaft against turning with a wrench.
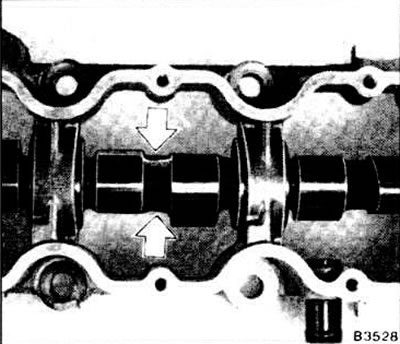
Between the valve cams of the 3rd cylinder there are flats for a wrench.
Remove the camshaft sprocket.
Remove the exhaust pipe from the exhaust manifold.

Loosen the upper bolts securing the rear toothed belt cover.
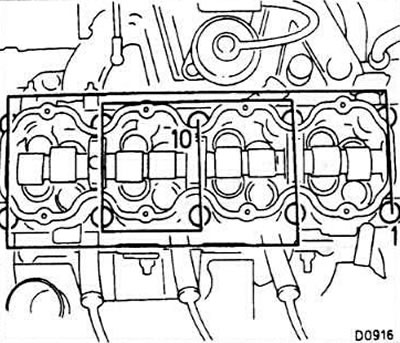
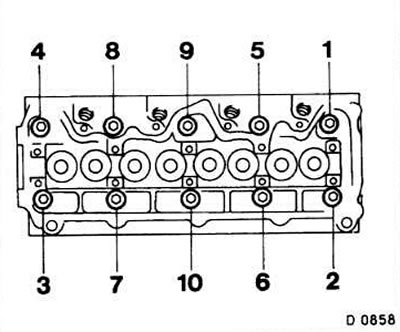
Loosen the cylinder head bolts (see fig.) first 1/4 turn, then another ½ turn. After that, unscrew the bolts completely.
Attention! The cylinder head bolts can only be loosened when the engine is cold.
Remove the camshaft housing.
Remove the rocker arms, stops and hydraulic gap compensators and arrange them in such a way that they are not confused during assembly and reinstalled in their places in the same order.
Remove intake and exhaust manifolds.
Installation
Clean the mating surface of the cylinder block from gasket residue. Cover the openings of the block with a rag to prevent dirt from getting into them.
Check the mating surface of the cylinder block for straightness.
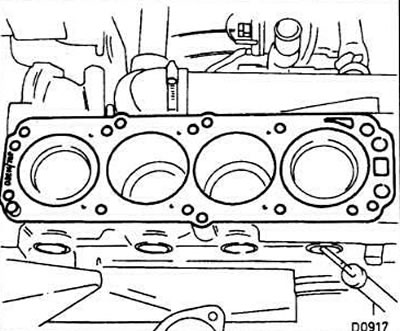
Install a new gasket without using sealant. The mating surface of the cylinder block must be free of grease.
Position the gasket so that it does not cover the holes in the block.
Clean the mating surface of the cylinder head.
Check the mating surface for straightness.
Clean the mating surface of the cylinder head adjacent to the camshaft housing.
Install the cylinder head.
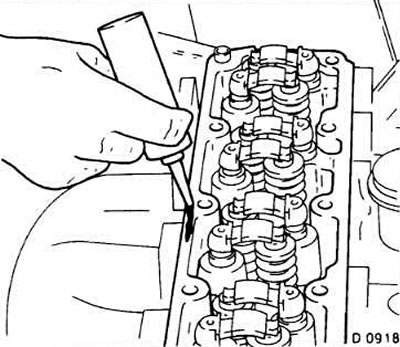
Install the valve clearance adjusters after lubricating them with engine oil. Lightly lubricate the rocker arms with MoS-based paste2 and install them.
Clean the mating surface of the camshaft housing.
Apply a coat of sealant ET N1503166 to this surface.
Install the camshaft housing, slightly tighten its bolts in a spiral from the inside to the outside (use new bolts).
Attention! Tighten the bolts in four stages. Use only a tested and serviceable torque wrench for this. Instead, you can use an angle washer to control the tightening of threaded connections.
The cylinder head bolts must be tightened with particular care, also using a tested and serviceable torque wrench.
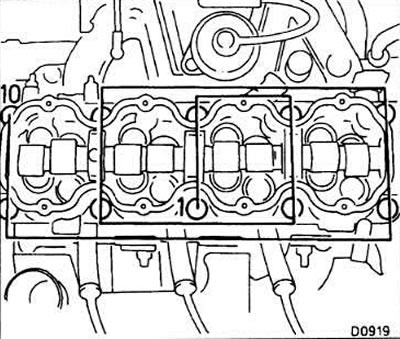
Tighten the cylinder head bolts in a spiral pattern from the inside to the outside to 25 Nm.
Tighten the bolts in the same order by 60°.
Tighten the bolts in the same sequence at an angle of 60°.
Tighten the bolts in the same sequence to the corner:
- for engines 1.4 and 1.6 l: 30°;
- for engines 1.8 and 2.0 l: 60°;
In order to accurately maintain the specified tightening angles, it is recommended that appropriate marks be placed on the camshaft housing cover. To do this, put the wrench on the nut and mark with chalk after 30° (or after 60°- depending on the engine). You can also cut out the corresponding template from cardboard. To maintain maximum accuracy, it is recommended to purchase a Hazet tool specially designed for this purpose.
Attention! On a warm engine, it is necessary to tighten the bolts again.
Install the camshaft sprocket and secure it with a bolt, holding the shaft from turning with a wrench by the flats. Bolt tightening torque - 45 Nm.
Attention! Use only a new bolt!
Install a new camshaft housing gasket and tighten the bolts to 8 Nm.
Put on the toothed belt and tension it.
Install the front toothed belt cover.
Put on the V-belt and tension it.
Vehicles with V-ribbed belt: Fit the pulley and fit the belt.
Fill with coolant.
Connect all hoses, lines and cables to the cylinder head, intake manifold, carburetor and fuel pump.
Connect the wires to the spark plugs in the sequence shown in the table "Main engine parameters" (see at the beginning of the book). Cylinder number 1 is on the right, looking in the direction of the car.
Attach downpipe to exhaust manifold.
Check engine oil level, top up if necessary. If the cylinder head was removed due to a defective gasket, it is recommended to change the oil and oil filter, as the oil may contain coolant.
Install the air filter.
Connect wire "masses" to the battery.
Start and warm up the engine.
Check ignition timing.
Check idle speed and CO content in exhaust gases.
Check coolant level.
Tighten the cylinder head bolts (on a warm engine) in the order indicated above, at an angle of 30°. Subsequent lift (e.g. after 1000 km run) need not.
Diesel engine 17YD 1.7L
Disconnect the fuel lines at the injectors and injection pump. Disconnect the pipelines completely, without bending them.
Remove the top and bottom timing belt covers.
Remove cover from clutch housing.
Set the piston of the 1st cylinder to the ignition advance position before TDC.
Remove vacuum pump.
Loosen and remove toothed belt.
Install a new cylinder head gasket.
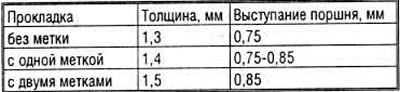
Attention! Depending on the size of the protrusion of the piston, a gasket of different thicknesses is installed. When replacing the gasket, pay attention to its designation. The designation is on the side of the gasket in the form of one, two marks, or their absence.
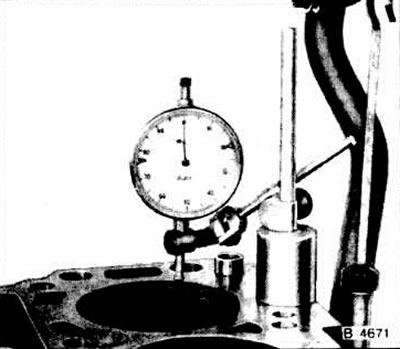
Check pistons and valves for wear. If the wear is negligible, then it is enough to install a thicker gasket. To do this, measure the piston protrusion with an indicator.
Attention! Tighten the bolts in four stages. Use only a tested and serviceable torque wrench for this. Instead of nege, you can use an angle washer to control the tightening of threaded connections.
Tighten the cylinder head bolts in a spiral pattern from the inside to the outside to 25 Nm.
Tighten the bolts in the same order by 90°.
Tighten the bolts in the same order by 90°.
Tighten the bolts in the same sequence at an angle of 45°
Attention! On a warm engine, it is necessary to tighten the bolts again.
Install the camshaft sprocket. Screw in the pulley mounting bolt without tightening it.
Put on and tension the toothed belt.
Tighten the toothed pulley bolt to 90 Nm.
Check injection advance.
Install vacuum pump.
Install a new seal under the camshaft housing cover and secure the cover with bolts.
Install the lower and upper toothed belt covers.
Connect fuel lines to injection pump and injectors.
Start and warm up the engine (oil temperature 60°C).
Check coolant level.
Tighten the cylinder head bolts in the order described above by 30°with a rigid wrench. Subsequent tightening of bolts (e.g. after 1000 km run) need not.
Check idle speed and maximum speed.
TC4EE1 1.7L turbocharged diesel engine
Remove intake manifold.
Disconnect fuel lines from injection pump and injectors. Remove the pipelines completely without bending them.
Disconnect the fuel return line from the injectors.
Remove the radiator fan.
Remove toothed belt cover.
Set the piston of the 1st cylinder to TDC.
Remove the camshaft sprocket.
Loosen and remove toothed belt.
Loosen the three bolts securing the rear toothed belt cover.
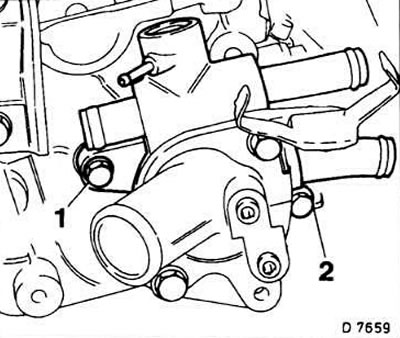
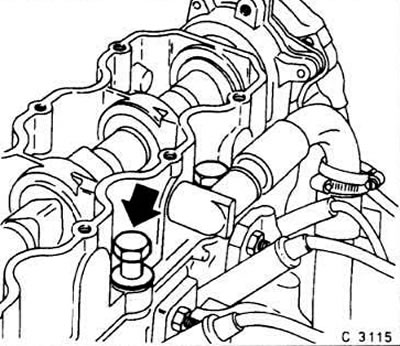
Remove bolts 1 and 2 securing the thermostat housing (see fig.).
Disconnect the coolant hose from the turbocharger after removing the clamp.
Disconnect the oil supply and drain pipes between the turbocharger and the cylinder block.
Loosen the turbocharger mounting bolts.
Remove the oil dipstick tube.
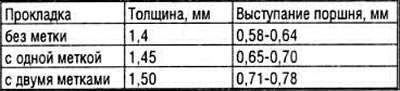
Loosen the cylinder head bolts in the sequence shown (see fig.).
Remove the cylinder head by pushing the rear toothed belt cover aside.
Install a new cylinder head gasket.
Attention! Depending on the size of the protrusion of the piston, a gasket of different thicknesses is installed. When replacing the gasket, pay attention to its designation. The designation is on the side of the gasket in the form of one, two marks, or their absence.
Check pistons and valves for wear and replace if necessary. If the wear is negligible, then it is enough to install a thicker gasket. To do this, measure the piston protrusion with an indicator.
Attention! Tighten the bolts in three steps. Use only a tested and serviceable torque wrench for this. Instead, you can use an angle washer to control the tightening of threaded connections.
Tighten the cylinder head bolts in the order shown (see fig.) torque 40 Nm.
Tighten the bolts in the same sequence at an angle of 60-75°.
Tighten the bolts in the same sequence at an angle of 60-75°.
Attention! Subsequent tightening of bolts (e.g. after 1000 km run) need not.
Install the oil dipstick tube.
Install and secure the turbocharger.
Secure the oil supply and drain pipes between the turbocharger and the cylinder block.
Clean the mating plane of the thermostat housing, install the thermostat assembly and tighten its fastening bolts to a torque of 30 Nm.
Screw in the three bolts securing the toothed belt rear cover and tighten them to 8 Nm.
Install the camshaft sprocket and tighten its bolt to 10 Nm.
Put on the toothed belt and tension it.
Install a new seal under the camshaft housing cover and secure the cover with bolts.
Install the radiator fan.
Install the toothed belt cover.
Secure the fuel lines at the injection pump and injectors with a torque of 25 Nm.
Attach the fuel drain pipe to the injectors.
Install intake manifold.
Check injection advance.
Start and warm up the engine to an oil temperature of 60°C.
Check coolant level.
Check idle speed and maximum speed, correct if necessary.
16 valve engines
Removing
Disconnect wire "masses" from the battery.
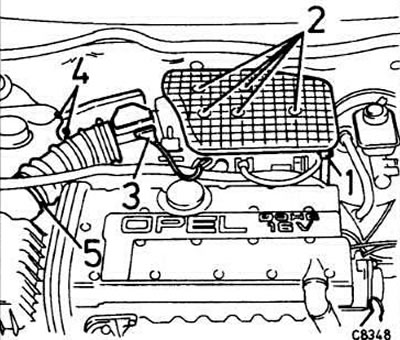
Detach hose 1 for crankcase breather.
Loosen screws 2.
Unplug connector 3 at air volume sensor.
Unscrew bolts 4 securing the air volume sensor.
Loosen hose clamps 5.
Remove the throttle body.
Remove the air filter mount.
Drain coolant.
Disconnect the accelerator cable at the carburetor throttle.
Tag and disconnect all hoses and lines leading to the cylinder head and intake manifold.
Remove exhaust manifold.
Remove air filter.
Remove the alternator V-belt and, if equipped, the power steering pump.
Remove the front toothed belt cover.
Set the piston of the 1st cylinder to the TDC position.
Remove the oil cooler pipe bracket. Position the gasket so that it does not block the holes in the block.
Loosen and remove toothed belt.
Remove the high voltage wire cover.
Remove spark plug caps.
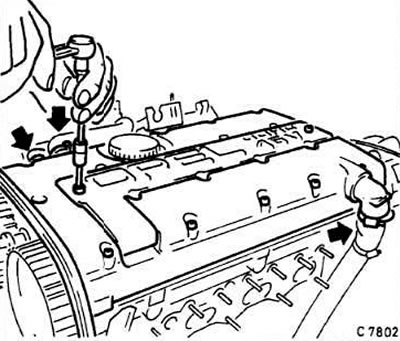
Loosen hose clamps (see arrows in fig. C7802).
Remove cylinder head cover.
Remove the camshaft pulleys by holding the camshafts by the hexagon wrench.
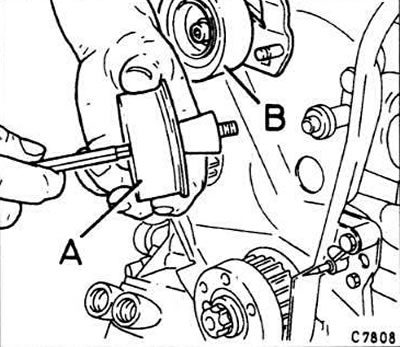
Remove guide pulley A and tension pulley B together with the base.
Attention! Pay attention to the position of the spacer (large diameter to the engine).
Remove rear toothed belt cover.
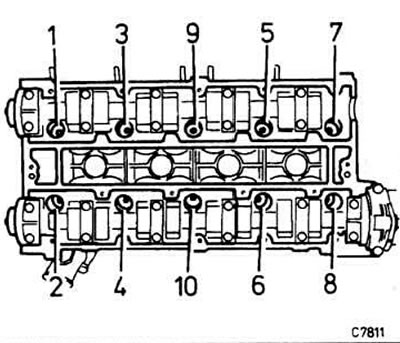
Loosen the cylinder head bolts in the sequence shown in the figure, first ¼ turn, then ½ turn. After that, completely unscrew the bolts and remove them together with the washers. To loosen, you need a wrench for 12 mm Togh type bolts, for example, Hazet 880 Mlg E-12 with a 958-2 head.
Attention! This operation should only be carried out on a cold engine!
Remove cylinder head.
Installation
Clean mating surfaces of gasket residue. To prevent dirt from getting into the cylinder block bores, cover them with rags.
Check the straightness of the surface of the cylinder block.
Lay a new gasket on the surface of the block without using sealant. The gasket must not cover the holes in the block.
Clean the mating plane of the cylinder head.
Install the cylinder head.
Install all washers under the head bolts.
Insert new cylinder head bolts and screw them in with a wrench until tight.
Attention! Tighten the bolts in four stages. Use only a tested and serviceable torque wrench for this. Instead, you can use an angle washer to control the tightening of threaded connections.
Tighten the cylinder head bolts in the order shown (see fig.) torque 25 Nm.
Tighten the bolts in the same order at an angle of 65°.
Tighten the bolts in the same order at an angle of 65°.
Tighten the bolts in the same order at an angle of 65°.
Attention! On a warm engine, it is necessary to tighten the bolts again.
Tighten the bolts securing the rear cover of the toothed belt to a torque of 6 Nm, having previously lubricated with sealant, for example, Opel 1510177.
Install idler and idler rollers.
Attention! The spacer bushings should face the smaller diameter towards the rollers.
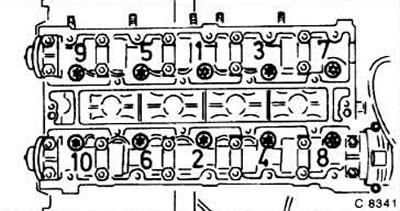
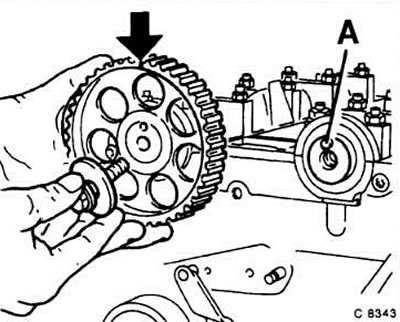
Install the camshaft pulleys. At the same time, the label (see arrow in fig.C8343) should be directed outward. The pin A of the camshaft must point upwards and enter the hole in the toothed pulley.
While holding the camshaft from turning with a wrench, tighten the pulley mounting bolt in two steps (use new bolt):
- the first stage - 50 Nm;
- the second stage - at an angle of 60-75°.
Place a new gasket under the cylinder head cover and tighten the bolts to 8 Nm.
Connect both hoses to the cylinder head cover and secure with clamps.
Put the tips on the spark plugs in accordance with the firing order of the cylinders. The order of operation of the cylinders is shown in the table "Main engine parameters" (see at the beginning of the book). Cylinder number 1 is on the right, looking in the direction of the car.
Fasten the cover of high voltage wires.
Install the exhaust manifold.
Install a new toothed belt and tension it.
Install the front toothed belt cover.
Put on the V-belt and tension it.
Install the front pipes of the air filter, mixing chamber, air volume sensor.
Connect the connector to the air volume sensor.
Connect all pipes, hoses and cables to the cylinder head.
Fill with coolant.
Check engine oil level, top up if necessary. If the cylinder head was removed due to a defective gasket, it is recommended to change the oil and filter, as the oil may contain coolant.
Connect wire "masses" to the battery.
Start and warm up the engine.
Check ignition timing.
Check idle speed and CO content in exhaust gases.
Check coolant level.
Tighten the cylinder head bolts on a warm engine in the above order by an angle of 30-45°. Subsequent lift (e.g. after 1000 km run) need not.
Visitor comments