


Contents: Petrol engines and diesel engines…⬇ 16-valve engines ⬇ Diesel engines ⬇ 1.7L turbocharged diesel engine ⬇
Petrol engines and diesel engines with a capacity of 1.7 liters
Caution! Special instructions for 16-valve and diesel engines are given at the end of the section.
Removal
Disconnect the ground wire from the battery.
Remove the air filter and (if present) the suction hose.
Remove the alternator, power steering pump and air conditioning compressor drive belt.
For vehicles with a poly V-belt: remove the belt, pulley and power steering pump.
Remove the front timing belt cover by opening the clips.
Set the piston of the 1st cylinder to TDC. To do this, shift the gearbox to neutral and apply the parking brake. Put a ring spanner or a head with a ratchet on the central bolt of the crankshaft pulley and turn the crankshaft clockwise until the mark on the pulley coincides with the pointer on the engine block (see bottom of figure C4459).
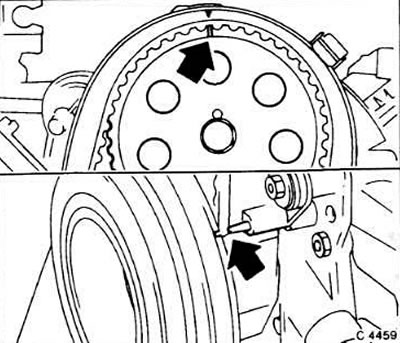
At the same time, the marks on the camshaft pulley and the engine block must match (see top of picture). If this is not the case, turn the crankshaft one more revolution.
Caution! Do not turn the crankshaft using the camshaft pulley mounting bolt, as this may overload the timing belt.
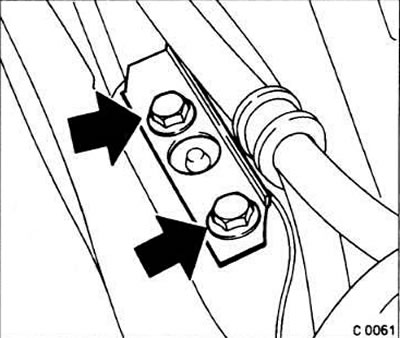
Loosen the cooling system pump mounting bolts (see arrows in Fig. P0510).
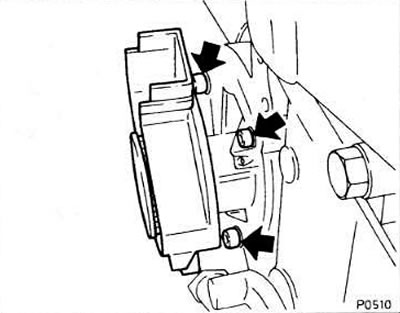
For all engines except 1.4 and 1.6 litre engines produced since June 1990: turn the coolant pump until the toothed belt is released.
Attention! Due to the lack of sufficient space to perform the specified operation with a regular key, it is recommended to use a special key from Opel: for 1.4 and 1.6 liter engines - KM-421 A; for engines with a capacity of 1.8 and 2.0 l - KM-637. If you do not have such a key, you can use a regular wrench, but you must first remove the generator.
Remove the timing belt from the camshaft drive gear.
For engines with a volume of 1.4 and 1.6 liters produced since June 1990. (with automatic timing belt tensioner): press on the tension roller and remove the toothed belt.
Caution! Do not change the position of the pulleys when the toothed belt is removed!
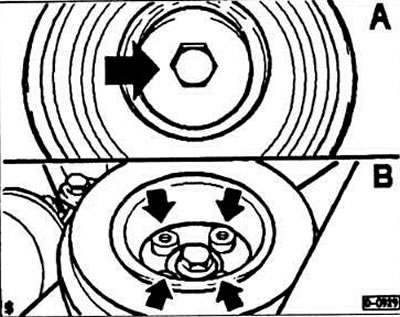
Remove the belt pulley from the crankshaft, having first engaged 1st gear and the parking brake. This will lock the crankshaft and the pulley mounting bolt(s) can be unscrewed (Fig. A - pulley mounting bolt for 1.4 and 1.6 liter engines; fig. B — pulley mounting bolt for 1.8 and 2.0 l engines).
Installation
Attention! Before installing the belt, check whether the mark on the camshaft drive gear matches the mark on the engine housing. In addition, the mark on the crankshaft pulley should match the pointer on the engine housing. To check, install and remove the pulley.
Install the timing belt.
Attention! For engines with a volume of 1.4 and 1.6 liters produced since June 1990. (with automatic belt tensioner) after installing the timing belt and before installing the crankshaft pulley, install the tension roller.
Install the crankshaft pulley and secure it with bolts. For 1.8 and 2.0 liter engines, the four bolts are tightened to a torque of 25 Nm; for 1.4 and 1.6 liter engines, the central bolt with a thread length of 23 mm is tightened to a torque of 55 Nm, the bolt with a thread length of 30 mm is tightened to a torque of 55 Nm, and then both bolts are tightened to an angle of 45-60°.
Caution: Use only new bolts.
For engines without automatic tensioner: tighten the belt.
Attention! After tensioning the belt, it is necessary to check the coincidence of the marks again. If necessary, loosen the belt and align the marks.
Screw in the cooling system pump mounting bolts.
Turn the crankshaft one full revolution and check the belt tension again.
Tighten the coolant pump mounting bolts:
- for engines with a volume of 1.4 and 1.6 l - a torque of 8 Nm;
- for 1.8 and 2.0 l engines - 25 Nm.
Install the front timing belt cover and secure it.
Install and tension the V-belt.
For vehicles with a poly V-belt: install the belt, pulley and pump.
Install the air filter and (if equipped) the suction hose.
Connect the ground wire to the battery.
16-valve engines
The instructions below are specific to 16-valve engines. The installation procedure is basically the same as for 8-valve engines.
Caution! The removed timing belt must be replaced.
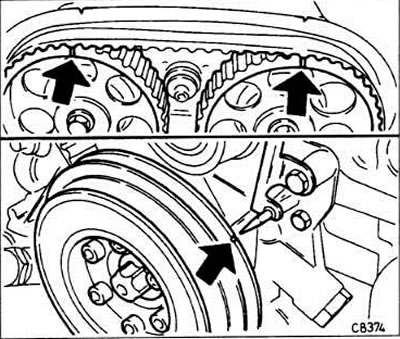
Set the piston of the 1st cylinder to the ignition position before TDC. To do this, first set the gearbox to neutral and apply the parking brake. Then slowly turn the crankshaft by the pulley clockwise, using the Opel MKM-6-4-21 or Hazet 900M-E20 key, until the mark on the pulley coincides with the pointer on the engine housing (see bottom of fig.C8374).
At the same time, the marks on the drive gears of the camshafts must match the marks on the cylinder head cover (see top of fig.C8374). If this is not the case, then it is necessary to turn the crankshaft one more full revolution.
Caution! Do not turn the crankshaft using the camshaft pulley mounting bolt, as this may overload the timing belt.
Remove the oil cooler line holders.
Remove the crankshaft pulley using an 8mm Allen key.
Material was taken from a resource: www.OPELBOOK.ru
Attention! Before removing the pulley, check the alignment of the ignition marks again.
Loosen the tension roller and remove the timing belt.
Caution! Do not turn the crankshaft and camshafts with a loose tension roller, as the toothed belt may jump to the next tooth.
Tighten the crankshaft pulley mounting bolts to 20 Nm.
Install and tension the timing belt.
Install the oil cooler line holders.
Diesel engines
The following instructions apply only to diesel engines. The procedure for installing a diesel engine is basically the same as for a gasoline engine.
Removal
Remove the upper and lower timing belt covers.
Remove the clutch housing cover.
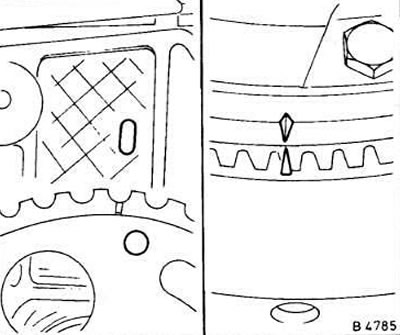
Set the piston of the 1st cylinder to TDC. To do this, turn the crankshaft in the direction of rotation until the marks on the flywheel match (see the right picture in Fig.B4785) and on the fuel injection pump (see left picture fig.B4785).
Remove the camshaft housing cover.
Remove the vacuum pump (it is mounted on the flange of the camshaft housing).
Loosen the camshaft mounting bolts.
Loosen the cooling system pump mounting bolts, move the pump using the Opel KM-509 tool (47.7 mm) and thus loosen the toothed belt.
Disconnect the engine mount at the front right.
Press the engine away from the support. Remove the toothed belt from the pulleys.
Installation
Check the pulleys for damage and replace if necessary.
Check the alignment of the TDC marks as shown in Figure B4785.
Install a new timing belt.
Secure the engine support to the longitudinal beam with a torque of 40 Nm.
Tighten the timing belt.
Tighten the coolant pump mounting bolts to 25 Nm.
Screw in the camshaft pulley mounting bolt without tightening it.
Check the ignition setting (tag matching).
Tighten the camshaft pulley mounting bolt to a torque of 75 Nm, and then tighten to an angle of 60-65°.
Install a new gasket under the camshaft taper cover and tighten the cover mounting bolts crosswise.
Secure the lower and upper timing belt covers.
Tighten the clutch housing mounting bolts.
1.7L turbocharged diesel engine
Removal
Disconnect the ground wire from the battery.
Remove the air filter.
Remove the V-belts from the power steering pump and alternator.
Remove the upper timing belt cover.
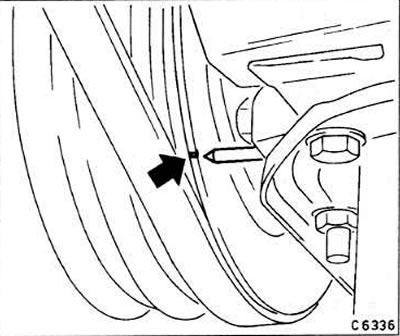
Set the piston of the 1st cylinder to TDC. To do this, shift the gearbox to neutral and apply the parking brake. Apply a spanner to the central bolt of the crankshaft pulley. Turn the crankshaft clockwise until the mark on the pulley coincides with the pointer on the engine housing.
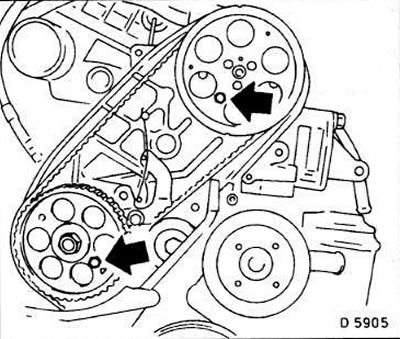
At the same time, it is necessary to insert the fixing bolts into the camshaft and fuel injection pump pulleys. If this cannot be done, turn the crankshaft one full revolution. Regular M6x1 bolts can be used as fixing bolts (camshaft) and M8x1.25 (high pressure fuel pump).
Attention! Do not change the position of the camshaft when the timing belt is removed.
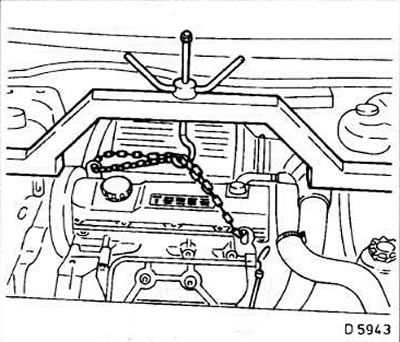
Install the lifting device KM-263-V and tighten the chain.
If the specified device is not available, place a suitable pipe over the engine compartment, supporting it on the fenders through wooden blocks. Do not place the pipe directly on the fenders!
Remove the right engine mount fastener.
Remove the tension roller mount, remove the tension spring (see arrows in fig.D5906).
Loosen the crankshaft pulley mounting bolts and remove the pulley.
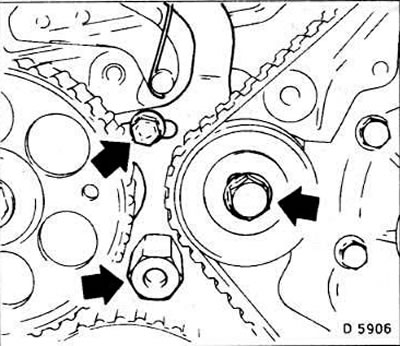
Loosen the camshaft pulley mounting bolts and remove the pulley. Loosen the camshaft drive gear mounting bolt.
Remove the timing belt together with the camshaft pulley.
Installation
Caution! Before installing the timing belt, check whether the mark on the camshaft drive gear matches the mark on the engine housing.
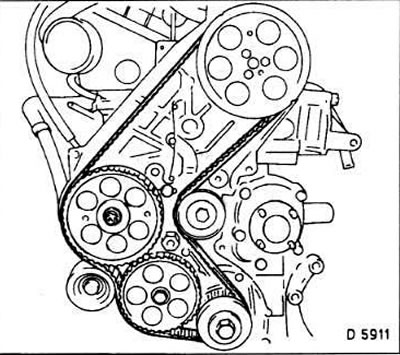
Install the timing belt together with the camshaft pulley.
Install the locking bolt and camshaft pulley mounting bolts. Tighten the bolts to 10 Nm.
Install the tensioner spring and tighten its mounting bolts to a torque of 20 Nm.
Secure the lower timing belt cover.
Install the camshaft pulley and tighten its mounting bolts to a torque of 20 Nm.
Install the right engine mount and remove the engine lifting device from the wings.
Loosen the fixing bolt.
Attention! Check the location of the marks again with the timing belt tensioned. If necessary, loosen the belt and achieve the correct mutual location of the marks.
Check the injection start advance of the high-pressure fuel pump.
Install the upper timing belt cover.
Install the V-belt.
Connect the ground wire to the battery.
Visitor comments