
OpelBook.ru
Cars AvtoVAZ Cars Mitsubishi Cars BMW Cars Mercedes Cars Nissan Cars Toyota Cars Chevrolet
English Русский
Български
Беларускі
Український
Српски
Hrvatski
Română
Polski
Slovenský
Magyar
 |  Sitemap  |  Contacts  |    


Main Astra Corsa Insignia Kadett Omega Vectra Zafira Others Articles
Vectra A (1988-1995, petrol) Vectra A (1988-1995) Vectra B (1995-2002, petrol) Vectra B (1995-2002) Vectra C (2002-2008)
  • Main
  • Vectra
  • Vectra A
  • Power unit
  • Engine repair
  • Checking and adjusting the timing belt tension

Checking and adjusting the timing belt tension (Opel Vectra A)

            0

Contents: Petrol engines and diesel engines…⬇ Adjusting the timing belt tension on…⬇

Petrol engines and diesel engines with a capacity of 1.7 liters


For 1.8 and 2.0 litre engines, the timing belt tension should be checked every 60,000 km or every 4th maintenance.

Attention! For 16-valve engines, the belt may not need to be adjusted. If the toothed belt has been removed, it must be replaced with a new one.


Please note! Since June 1990, all 1.4 and 1.6 litre engines have been equipped with an automatic timing belt tensioner. These engines can be identified by the flat timing belt cover above the camshaft pulley and the additional tension roller mounting bolt above the crankshaft. The automatic tensioner is maintenance-free and adjustment-free. Adjustment is only required when removing the timing belt and installing it again.


Examination


To check the tension of the toothed belt, a special device Opel KM-510-A is required. To turn the cooling system pump when tensioning the toothed belt, the following Opel keys are required:
  • for engines with a capacity of 1.4 and 1.6 l - KM-412A;
  • for engines with a capacity of 1.8 and 2.0 l - KM-637;
  • for diesel engines - KM-509.

You can also use regular standard keys, but you will have to remove the generator first.

Correct tension significantly affects the service life of the belt. The tension should be checked with a warm engine (the engine is considered warm if the coolant temperature is about 80°C). It is recommended to install and tension a new belt on a cold engine (at an engine temperature below +25°C).


Attention! The toothed belt must not be broken or twisted by hand. Incorrect tension is the cause of noise during its operation.


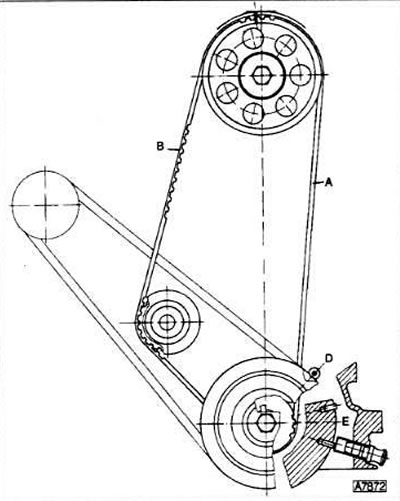
The belt tension is checked on branch B (Fig. A7872). The tension checking device is installed at the top of the belt.

Release the tension bar on the generator and remove the V-belt. Tilt the generator down.

Remove the front timing belt cover.
Remove the front timing belt cover.


Check the toothed belt for cracks and fraying. If necessary, replace the belt with a new one.

Turn the engine crankshaft in the direction of rotation at an angle of at least 90° to tighten the toothed belt. The first cylinder should be at TDC.
Turn the engine crankshaft in the direction of rotation at an angle of at least 90° to tighten the…


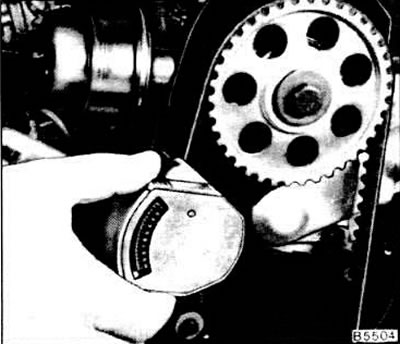
Install the tension tester KM-510A at point B of the toothed belt (see fig.A7872). Slowly remove the stopper from the device. Lightly pressing your fingers on the device releases the lock.


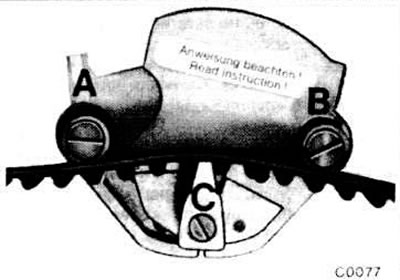
Pass the toothed belt between points A, B and C (see fig.C0077). In this case, the retainer C must be located in the belt recess.
Pass the toothed belt between points A, B and C (see fig.C0077). In this case, the retainer C must…


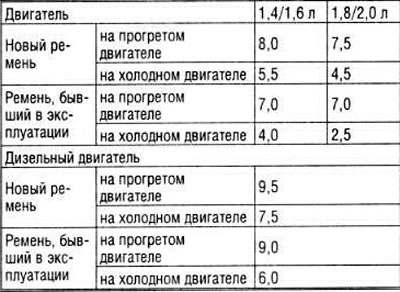
Values characterizing the degree of tension of the toothed belt
Values characterizing the degree of tension of the toothed belt

Adjustment


Loosen the cooling system pump mounting bolts.
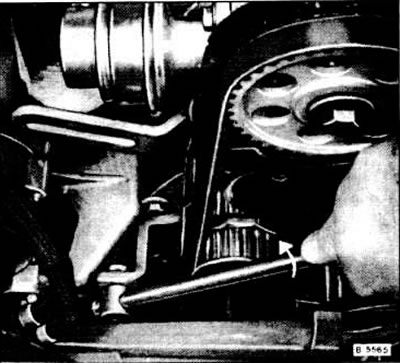
Loosen the cooling system pump mounting bolts.


Turn the coolant pump on the engine with a special Opel key or a regular 42.4 mm key (in the latter case, you must first remove the generator). When the pump is turned upward, the belt tension increases; when it is turned downward, it decreases.


Screw in the coolant pump mounting bolts, but do not tighten them.

Remove the belt tension tester. Rotate the crankshaft one full revolution in the direction of rotation, then check the tension again.

Attention! The belt tension must be adjusted until the device shows a stable value.

Tighten the coolant pump mounting bolts to the following torque: for 1.4 and 1.6 l engines - 8 Nm; for 1.8 and 2.0 l engines – 25 Nm.

Install the front timing belt cover.

Install the generator. Put on the V-belt.

Attention! If there is no appropriate device for checking and adjusting the toothed belt tension, this operation can be performed as follows. The belt is tensioned so that at point B (Fig. A7872) it can be pressed by a finger by 10 mm. Later, the belt tension must be checked with a special device. Until this is done, high engine speeds should not be allowed.


Adjusting the timing belt tension on 16-valve engines


For adjustment you will need a special device Opel KM-666. The engine must be cold.

Put on a new timing belt.
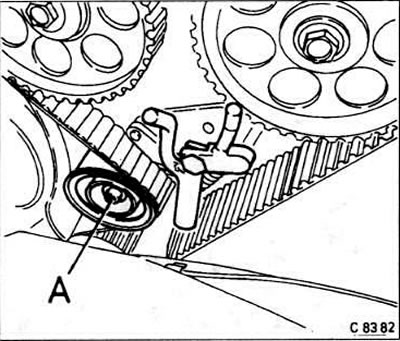
Put on a new timing belt.


Install the adjusting device.

Using a waterproof marker, make a mark on the seventh tooth of the camshaft gear, counting counterclockwise (120° to the crankshaft).


Turn the crankshaft clockwise until the mark on the camshaft pulley aligns with the mark on the cylinder head cover.

Attention! Turn the crankshaft evenly, without jerking, to prevent the belt teeth from jumping.


Tighten the tension roller mounting bolt in two stages:
  • Stage 1: torque 25 Nm;
  • Stage 2: Pull to an angle of 45-60°.

Remove the adjusting device.

Turn the crankshaft to the TDC position of the 1st cylinder. The mark on the crankshaft pulley should coincide with the pin on the rear cover of the toothed belt. At the same time, the marks on the camshaft pulleys should coincide with the marks on the cylinder head cover.

(Material published on the website: www.opelbook.ru)


This article is available at russian, bulgarian, belarusian, ukrainian, serbian, croatian, romanian, polish, slovak, hungarian
Checking the article: Zinoviev Kirill

Share information:

Previous articles
Opel Vectra A: Engine repair
Next articles

Removal and installation the timing belt
Removal and installation the engine
Engine specifications
Installing the timing belt tensioner
Removal and installation a vacuum pump
Removal and installation the cylinder head
Checking the cylinder head and cylinder block for straightness
Replacing the camshaft housing. Removing and installing the camshaft
Checking and adjusting valve timing


See similar ones from other Opel car manuals:
▶ Checking and adjusting the timing belt tension Opel Kadett D (1979-1984)
▶ Timing Belt — Checking Condition, Adjusting Tension and… Opel Zafira A (1999-2005, petrol)
▶ Checking the condition of the timing belt, guide and… Opel Astra H (2004-2009)
▶ Checking the condition, adjusting the tension and replacing… Opel Frontera A (1991-1998, petrol)
▶ Checking and adjusting fuel injection timing settings Opel Corsa B (1993-2000)
Link to this page in different formats

Visitor comments


No comments yet


How much will 38 + 46 =


Vectra C (2002-2008) 
  • General information
  • User manual
  • Vehicle device
  • Maintenance
  • Troubleshooting
  • Power unit
  • Engine repair
  • Cooling system
  • Power and control system
  • Engine electrics
  • Transmission
  • Clutch
  • Car gearbox
  • Drive shafts
  • Chassis
  • Car suspension
  • Steering
  • Brake system
  • Body
  • Exterior
  • Interior
  • Doors, locks and windows
  • Heating and ventilation
  • Electrical equipment
  • Equipment and devices
  • Headlights and lighting
  • Electrical circuits
Vectra B (1995-2002) 
  • General information
  • User manual
  • Weekly checks
  • Maintenance (gasoline)
  • Maintenance (diesel)
  • Troubleshooting
  • Power unit
  • SOHC gasoline engine
  • DOHC petrol engine
  • Diesel engine 1.7 liter
  • Diesel engine 2.0 liters
  • Engine repair
  • Cooling system
  • Fuel system (gasoline)
  • Fuel system (diesel)
  • Charging system
  • Launch system
  • Ignition and preheat
  • Transmission
  • Clutch
  • Mechanical gearbox
  • Automatic gearbox
  • Drive shafts
  • Chassis
  • Brake system
  • Wheel suspension
  • Steering
  • Body
  • Exterior
  • Interior
  • Doors and windows
  • Heating and ventilation
  • Electrical equipment
  • Equipment and devices
  • Electrical circuits
Vectra B (1995-2002, petrol) 
  • General information
  • Maintenance
  • Help with malfunctions
  • Power unit
  • Engine repair
  • Exhaust system
  • Cooling system
  • Fuel system
  • Multec injection system
  • Four point injection
  • Transmission
  • Clutch
  • Gearbox and drive
  • Chassis
  • Wheel suspension
  • Steering
  • Brake system
  • Wheels and tires
  • Body
  • Exterior
  • Interior
  • Electrical equipment
  • Fuses and electronics
  • Power devices
  • Ignition system
  • Lighting and signaling
  • Equipment and devices
  • Heating and ventilation
  • Electrical circuits
Vectra A (1988-1995) 
  • Power unit
  • Engine repair
  • Ignition system
  • Lubrication system
  • Cooling system
  • Injection system
  • Fuel system (carburetor)
  • Fuel system (diesel)
  • Exhaust system
  • Transmission
  • Clutch
  • Car gearbox
  • Chassis
  • Front suspension
  • Rear suspension
  • Steering
  • Brake system
  • Wheels and tires
  • Body
  • Exterior
  • Interior
  • Electrical equipment
  • Electrical circuits
Vectra A (1988-1995, petrol) 
  • General information
  • User manual
  • Maintenance
  • Power unit
  • SOHC engine
  • DOHC engine
  • Cooling and ventilation
  • Fuel system (carburetor)
  • Fuel system (injector)
  • Exhaust converter
  • Transmission
  • Clutch
  • Mechanical gearbox
  • Automatic gearbox
  • Drive shafts
  • Chassis
  • Brake system
  • Car suspension
  • Steering
  • Body
  • Body elements
  • Electrical equipment
  • Power devices
  • Equipment and devices
  • Electrical circuits
OpelBook.ru © 2017–2026 · Mobile version · · Sitemap: EN BG BY UA RS HR RO PL SK HU · Feedback · Site search
Astra F, petrol · Astra G, petrol · Astra G · Astra H · Astra J, petrol · Corsa B · Corsa C, petrol · Corsa C · Insignia A · Kadett D · Kadett E · Omega A · Omega B · Omega B2 · Vectra A, petrol · Vectra A · Vectra B, petrol · Vectra B · Vectra C · Zafira A, petrol · Frontera A, petrol · Frontera B · Ascona C · Vivaro A ·
We want your visit to be comfortable 🤝! We use cookies 🍪 to make that happen.