
OpelBook.ru
Cars AvtoVAZ Cars Mitsubishi Cars BMW Cars Mercedes Cars Nissan Cars Toyota Cars Chevrolet
English Русский
Български
Беларускі
Український
Српски
Hrvatski
Română
Polski
Slovenský
Magyar
 |  Sitemap  |  Contacts  |    


Main Astra Corsa Insignia Kadett Omega Vectra Zafira Others Articles
Corsa B (1993-2000) Corsa C (2000-2006, petrol) Corsa C (2000-2006)
  • Main
  • Corsa
  • Corsa B
  • Power unit
  • Injection system (diesel)
  • Checking and adjusting fuel injection timing settings

Checking and adjusting fuel injection timing settings (Opel Corsa B)

            0

Contents: Examination ⬇ Adjustment ⬇
The injection timing can be adjusted with the engine removed and installed. The adjustment on the installed engine is described below. For checking, an indicator with a corresponding adapter for screwing into the injection pump is required. Adjustment and checking must be done on a cooled engine.

Examination


1. Disconnect the negative cable from the battery.

2. Remove the air filter with the air intake sleeve.

3. Remove the PCV hose from the cylinder head and release the wiring harness from the retainer on the intake manifold.

4. Unscrew the mounting bolts and remove the intake manifold.

Intake manifold mounting bolts
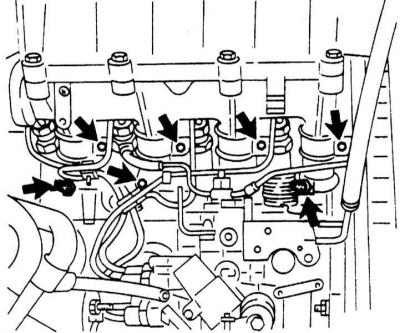
Intake manifold mounting bolts


5. Remove the upper timing belt cover.

6. Set the piston of the first cylinder to the TDC position (see Chapter Engines).

7. Remove the fuel lines from the injectors and the high-pressure fuel pump, for which remove the union nuts.

Do not change the shape of the pipelines.


8. Unscrew the plug from the fuel injection pump distributor housing.

Plug in the fuel injection pump distributor housing
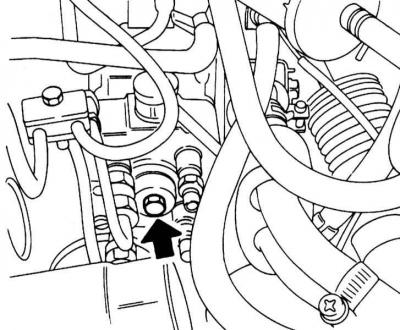
Plug in the fuel injection pump distributor housing


9. Screw in an adapter instead of the plug, for example, KM-226-a and an indicator with a measuring range of 0÷3 mm).


10. Use a screwdriver to remove the cold start speed increase device from its working position.

Disabling the cold start boost device
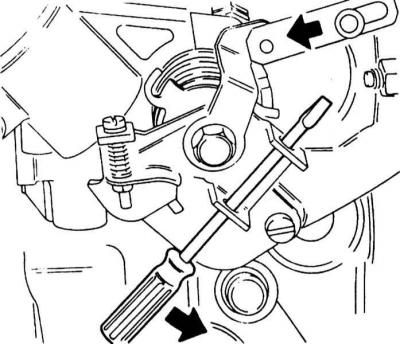
Disabling the cold start boost device


11. Set the indicator to a position approximately 2 mm when the measuring rod touches the pump piston.

12. Turn the crankshaft counterclockwise by about 60 degrees so that the pump piston is at the bottom. At this point, the indicator shows the lowest value and does not move anymore. In this position, set the indicator to "0". Check the adjustment by slightly rotating the crankshaft in different directions. The indicator should not show a value less than 0 mm.

13. Turn the crankshaft clockwise until the TDC marks are aligned and read the indicator. Compare the indicator readings with the Specifications in Chapter Fuel, exhaust and emission control systems.

14. If the requirements of the Specifications in Chapter Fuel, exhaust and emission control systems not achieved, adjust the fuel injection pump.

Adjustment


1. Unscrew the fuel injection pump mounting nuts and the adjusting bolts on its holder.

Fastening nuts (top) and adjusting bolts (bottom) of the fuel injection pump
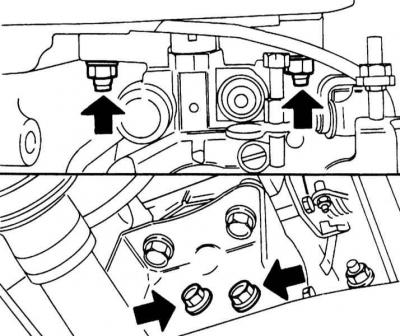


Fastening nuts (top) and adjusting bolts (bottom) of the fuel injection pump


2. Turn the injection pump to achieve the required Specifications in Chapter Fuel, exhaust and emission control systems adjustment value (the average value from that specified in the Specifications Chapter Fuel, exhaust and emission control systems range). If the value is too high, turn the pump towards the engine; if it is underestimated, in the opposite direction.

3. After completing the adjustment, tighten the fuel injection pump mounting bolts to the cylinder head with force 25 Nm, and the fastening of the fuel injection pump holder - with force 45 Nm.

4. Remove the indicator.

5. Tighten the center plug with a new copper sealing ring with force 20 Nm.

6. Remove the screwdriver from the cold start device.

7. Connect the fuel lines to the injectors and the high-pressure fuel pump and tighten their union nuts with force 25 Nm.

8. Use a scraper to clean the surfaces of the intake manifold and cylinder head from any remaining sealant. Install a new gasket.

9. Further installation is carried out in the reverse order of dismantling the components. Tighten the fasteners with the required force.


This article is available at russian, bulgarian, belarusian, ukrainian, serbian, croatian, romanian, polish, slovak, hungarian
Checking the article: Trifonova Emilia

Share information:

Previous articles
Opel Corsa B: Injection system (diesel)
Next articles

Checking and adjusting maximum engine speed
General information about the fuel injection system of a diesel engine
Checking the temperature sensitive element
Removal and installation injectors
Fuel filter heating element


See similar ones from other Opel car manuals:
▶ Checking and adjusting fuel injection timing settings Opel Astra G (1998-2004)
▶ Checking and adjusting the GM «Multec SPI» fuel injection… Opel Kadett E (1984-1995)
▶ Fuel injection system throttle switch — checking and… Opel Omega A (1986-1993)
▶ Checking the fuel injection timing Opel Vectra B (1995-2002)
▶ Timing Belt — Checking Condition, Adjusting Tension and… Opel Zafira A (1999-2005, petrol)
Link to this page in different formats

Visitor comments


No comments yet


How much will 16 + 13 =


Corsa C (2000-2006) 
  • General information
  • Introduction to guide
  • Troubleshooting
  • Vehicle device
  • User manual
  • Maintenance
  • Power unit
  • Engine repair
  • Cooling system
  • Power and exhaust system
  • Control system
  • Engine electrical equipment
  • Transmission
  • Clutch
  • Mechanical gearbox
  • Automatic gearbox
  • Drive shafts
  • Chassis
  • Brake system
  • Wheel suspension
  • Steering
  • Body
  • Exterior
  • Interior
  • Doors and windows
  • Heating and air conditioning
  • Electrical equipment
  • Equipment and devices
  • Lamps and lighting
  • Electrical circuits
Corsa C (2000-2006, petrol) 
  • User manual
  • Car access
  • Governing bodies
  • Seat control
  • Heating and air conditioning
  • Driving and maintenance
  • Engines 1.0 and 1.2 l
  • Engine repair
  • Cooling and lubrication system
  • Injection system
  • Engines 1.4, 1.6 and 1.8 l
  • Engine repair
  • Cooling and lubrication system
  • Injection system
  • Transmission
  • Clutch
  • Mechanical gearbox
  • Automatic gearbox
  • Drive shafts
  • Chassis
  • Wheels and tires
  • Wheel suspension
  • Steering
  • Brake system
  • Body
  • Exterior
  • Doors and windows
  • Electrical equipment
  • Equipment and devices
  • Lighting system
  • Electrical circuits
Corsa B (1993-2000) 
  • General information
  • Introduction to guide
  • User manual
  • Maintenance
  • Power unit
  • SOHC gasoline engines
  • DOHC gasoline engines
  • Diesel engines
  • Engine repair
  • Cooling system
  • Supply system
  • Injection system (gasoline)
  • Injection system (diesel)
  • Exhaust systems
  • Control system (gasoline)
  • Preheat system (diesel)
  • Charge and launch system
  • Transmission
  • Mechanical gearbox
  • Automatic gearbox
  • Clutch and drive shafts
  • Chassis
  • Brake system
  • Front suspension
  • Rear suspension
  • Steering
  • Body
  • Ventilation and heating
  • Exterior
  • Interior
  • Doors and windows
  • Electrical equipment
  • Equipment and devices
  • Lamps and lighting
  • Electrical circuits
OpelBook.ru © 2017–2026 · Mobile version · · Sitemap: EN BG BY UA RS HR RO PL SK HU · Feedback · Site search
Astra F, petrol · Astra G, petrol · Astra G · Astra H · Astra J, petrol · Corsa B · Corsa C, petrol · Corsa C · Insignia A · Kadett D · Kadett E · Omega A · Omega B · Omega B2 · Vectra A, petrol · Vectra A · Vectra B, petrol · Vectra B · Vectra C · Zafira A, petrol · Frontera A, petrol · Frontera B · Ascona C · Vivaro A ·
We want your visit to be comfortable 🤝! We use cookies 🍪 to make that happen.