
Engine idle check
The idle speed of the engine crankshaft is maintained automatically within 720-880 rpm by the idle speed controller at the commands of the electronic control unit (ECU). Carbon monoxide content (SO) in the exhaust gases, which should be less than 0.4%, is automatically regulated by the ECU based on information from the oxygen concentration sensor in the exhaust gases. Thus, neither the adjustment of the idling mode, nor the CO content during operation is required.
Checking the idle speed of the engine is carried out with the engine warmed up to normal operating temperature, with the gap between the electrodes of the spark plugs and the ignition timing correctly set, with the air filter installed with a clean filter element, with a fully charged battery in good condition, with the power consumers turned off.
If the idle speed is not correct, check the operation of the idle speed control.
If the CO content does not correspond to the required value, check the tightness of the engine air supply system, the serviceability of the system elements and electrical circuits.
Throttle opening test
The throttle valve opening is set at the factory and cannot be adjusted during operation.
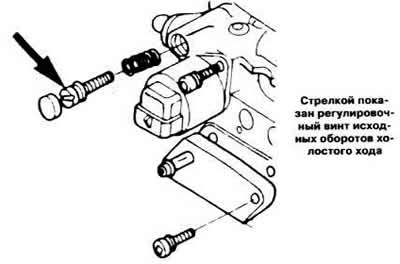
Note. During operation, it is forbidden to change the position of the adjusting screw of the initial idle speed, located in the upper part of the throttle body near the idle speed control (see picture).
Fuel pressure test
Make sure the ignition is off. Disconnect the fuel pump enable relay connector. Crank the engine with the starter for less than 5 seconds to relieve pressure in the injection system.
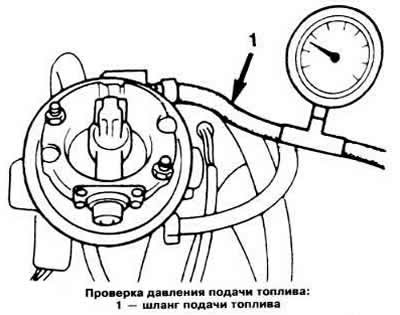
Connect pressure gauge to hose 1 (see picture) fuel supply through the tee.
Connect the fuel pump enable relay connector.
Start the engine at idle and check the fuel supply pressure on the pressure gauge, which should be in the range of 0.7-0.8 kg / cm2.
If the fuel supply pressure is lower than 0.6 kg/cm2, check the operation of the fuel pump, fuel filter, fuel pressure regulator and fuel outlet hose.
Checking the Fuel Pressure Regulator
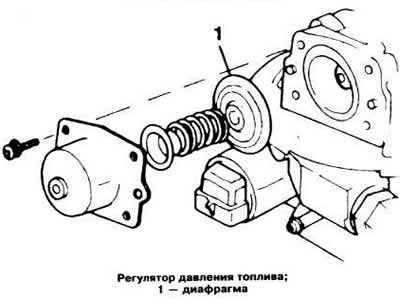
The fuel pressure regulator is installed in the injector body and cannot be adjusted. Depressurize the injection system before removing the pressure regulator. Whenever the cover fastening screws are loosened or removed, replace diaphragm 1 (see picture). Tighten the screws securing the regulator cover to 0.25 Nm.
Throttle position sensor test
Make sure the ignition is off. Disconnect the throttle position sensor connector.
Connect an ohmmeter to the leads «A» (black and white wire) And «IN» (brown wire) sensor pads and measure the resistance, which should be in the range of 4-9 kOhm.
Connect an ohmmeter to the leads «IN» And «WITH» (blue wire), close the throttle and measure the resistance, which should be 1-3 kOhm.
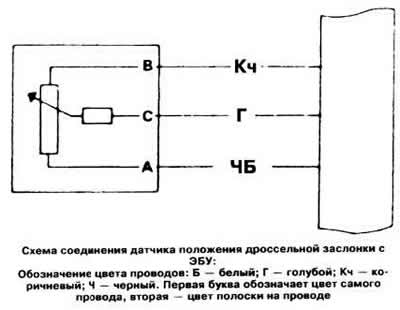
Gradually opening the throttle, monitor the resistance, which should gradually increase to 5-10 kOhm at full throttle.
Connect a voltmeter to the leads «A» And «WITH» sensor pads.
Turn on the ignition and check the sensor supply voltage with a voltmeter, which should be between 4.7-5.1 V. If the voltage is not correct, check the circuit between the sensor connector and the ECU terminals.
Vacuum sensor test
Check the vacuum hose connecting the intake manifold to the vacuum sensor for sharp kinks, cracks, or blockages. If necessary, repair or replace the hose.
Make sure the ignition is off. Without disconnecting the sensor connector, connect a voltmeter to the terminals «WITH» (black and white wire) And «A» (brown wire).
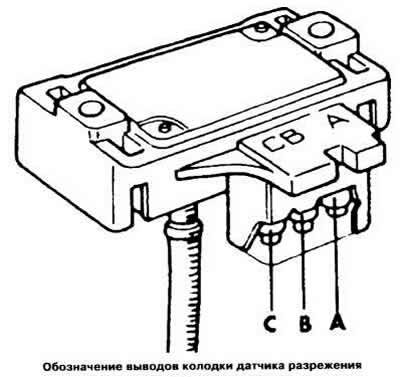
Disconnect the sensor block vacuum hose from the sensor.
Turn on the ignition and check the voltage with a voltmeter, which should be in the range of 4.7-5.1 V, then turn off the ignition.
Connect a voltmeter to the leads «IN» (green wire) And «A» (brown wire) sensor pads. Attach a vacuum hose to the sensor. Disconnect the vacuum hose from the inlet pipe, connect a vacuum pump to the hose and pipe fitting.
Switch on the ignition and, creating in the sensor with the help of a vacuum pump 0.2, 0.6 and 0.8 kg / cm2, check the voltage with a voltmeter, which should be within 3.5-3.9, 1.3-1.7 and 0.3-0.7 V, respectively.
If the voltage values do not match the data, check the wires and their connections between the sensor and the ECU. After checking, connect the vacuum hose to the intake manifold.
Checking the coolant temperature sensor
Make sure the ignition is off. Disconnect the coolant temperature sensor connector. Relieve residual pressure in the engine cooling system. Unscrew the sensor.
Place the sensor in a tank of water or coolant that can be heated. Turning on the water heating, measure the resistance of the sensor at different temperatures in the tank, which must correspond to the values \u200b\u200bspecified in subsection «Design and specifications»
After checking, replace the sensor and attach the block to it.
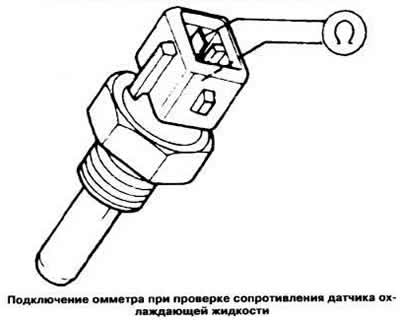
Note. Checking the coolant temperature sensor can be done on the engine at the appropriate coolant temperature.
Checking the idle speed controller
To test the regulator on a vehicle, do the following:
- make sure the ignition is off;
- disconnect the regulator connector;
- connect an ohmmeter to the leads «A» And «IN» pads and measure the resistance, which should be 50-65 ohms;
- connect an ohmmeter to the leads «WITH» And «D» and measure the resistance, which should be within the same limits.
Connect an ohmmeter between the body of the regulator and each of its outputs in turn. In both cases, the ohmmeter should show R=∞.
The removed regulator is checked as follows:
- connect the regulator connector;
- turn on the ignition;
- lightly pressing on the end of the valve head 1 (see picture), check the smoothness of its movement.
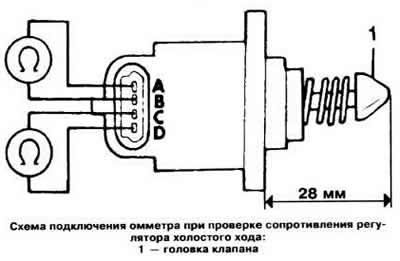
If the regulator does not meet any of the listed requirements, it must be replaced. Before installing the regulator, measure the distance between the end face of the valve head and the mating plane of the regulator, which must be at least 28 mm.
Checking the injection nozzle
Remove air filter. Make sure the ignition is off.
Disconnect the injector connector, connect an ohmmeter to its terminals and check the resistance of the winding, which on a cold engine should be in the range of 1.4-1.8 ohms. When measuring on a hot engine, 5 minutes after stopping, the resistance of the injector winding should be 1.6-2.0 ohms. After checking, connect the nozzle connector and replace the air filter.
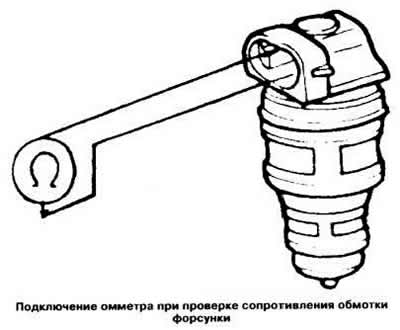
Checking the fuel spray cone and the tightness of the nozzle is carried out as indicated in subsection «fuel injection system «LE-Jetronic».
Exhaust oxygen concentration sensor test
Make sure the ignition is off. Disconnect connector 1 (see picture) sensor and connect a voltmeter to its terminals.
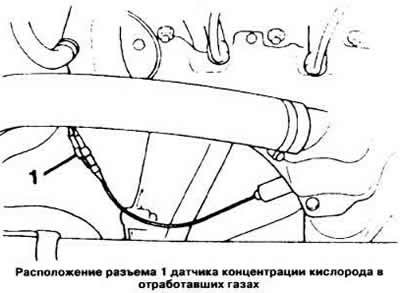
Turn on the ignition. In this case, the voltage on the voltmeter should be in the range of 0.30-0.55 V.
If the voltage does not match this one, check the continuity of the circuit between the computer and the sensor.
Connect a voltmeter to the sensor block and to «mass».
Start the engine and let it run at a crankshaft speed of 1300 rpm to warm up the sensor, then return the engine to idle speed. In this case, the voltage on the voltmeter should vary within 0.05-0.95 V.
Briefly increase the engine speed: the voltage on the voltmeter should be 0.7 V.
If the sensor does not meet the specified requirements, it must be replaced.
Visitor comments