
OpelBook.ru
Cars AvtoVAZ Cars Mitsubishi Cars BMW Cars Mercedes Cars Nissan Cars Toyota Cars Chevrolet
English Русский
Български
Беларускі
Український
Српски
Hrvatski
Română
Polski
Slovenský
Magyar
 |  Sitemap  |  Contacts  |    


Main Astra Corsa Insignia Kadett Omega Vectra Zafira Others Articles
Omega A (1986-1993) Omega B (1993-1999) Omega B2 (1999-2003)
  • Main
  • Omega
  • Omega A
  • Power unit
  • Diesel engines
  • Engine — complete disassembly

Engine — complete disassembly (Opel Omega A)

            0

1. Remove the auxiliary components listed in Chapter 8.

2. Unscrew and remove the oil pressure sensor. Remove the oil level dipstick.

3. Disconnect the crankcase ventilation hose from the camshaft cover.

4. Remove the bolts, noting the locations of the hangers, then lift the cylinder head cover and remove the gasket. Remove the mounting bolts, remove the camshaft sprocket access plate and the gasket at the front end of the cylinder head.

5. Rotate the crankshaft until the pointer in the hole on the right side of the cylinder block aligns with the mark on the flywheel/drive plate. In this position, piston No.1 (front) is at TDC. The injection timing mark on the camshaft sprocket should align with the notch in the camshaft sprocket support plate and the recess in the camshaft should be correctly positioned to allow full access to the cylinder head bolts (see illustrations). If this does not work, rotate the crankshaft several full revolutions. Do not rotate the crankshaft/camshaft forward from this position.
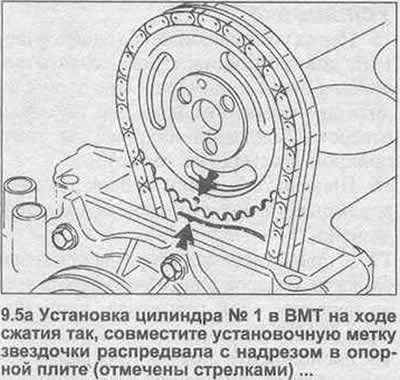
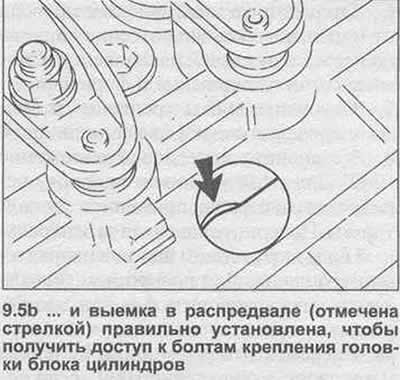
5. Rotate the crankshaft until the pointer in the hole on the right side of the cylinder block…


5. Rotate the crankshaft until the pointer in the hole on the right side of the cylinder block…


6. Loosen the plastic side play bolt at the end of the camshaft, then loosen and remove the camshaft sprocket mounting bolts. Remove the sprocket from the camshaft. Check that the camshaft sprocket and drive chain remain properly engaged, secure them together with wire. Make alignment marks between the sprocket and chain.


7. Remove the two small bolts securing the drive chain cover to the front of the head.

8. Working in the reverse order of Illustration 12.19, loosen the cylinder head bolts uniformly one half turn at a time until all the bolts can be loosened and removed by hand. Discard the bolts; new ones must be used during installation.

9. Lift the cylinder head. Remove the gasket and remove the O-ring from the top of the timing chain cover. Also remove the head location pins.

10. Remove the mounting bolt and washer and remove the pulley assembly from the crankshaft. To prevent rotation while loosening the bolt, lock the flywheel/drive plate with a homemade tool similar to the one shown in the illustration.
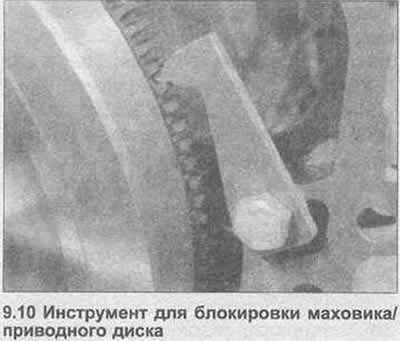
10. Remove the mounting bolt and washer and remove the pulley assembly from the crankshaft. To…


11. Carefully inspect the flywheel/drive plate mounting bolts; locate the bolt that is marked "P" and mark its position on the flywheel/drive plate (see illustration). Remove the mounting bolts and flywheel/drive plate. On automatic transmission models, remove the washer and spacer behind the drive plate. Discard the bolts; new ones must be used during installation.
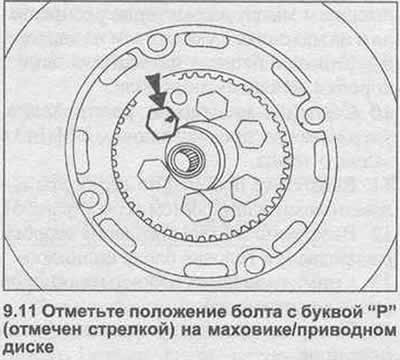
11. Carefully inspect the flywheel/drive plate mounting bolts; locate the bolt that is marked «P»…


12. Remove the bolts, water pump and gasket from the drive chain cover.


13. Unscrew the drive chain tensioner mechanism and remove the sealing gasket.

14. Turn the engine over on the workbench.

15. Loosen and remove the mounting bolts, remove the pan and gasket. Note that the bolts are different lengths. Unscrew the inlet pipe from the base of the oil pump, remove the gasket.

16. Unscrew the drive chain cover mounting bolts, bolts of different lengths. Remove the cover with both gaskets. Remove the location pins.

17. Make alignment marks between the crankshaft sprocket and the drive chain, then disconnect the drive chain and remove it together with the camshaft sprocket.

18. Remove the mounting bracket and take out the drive chain tensioner blades.

19. Unscrew the mounting bolt, remove the drive chain guide from the front side of the block. If necessary, unscrew the camshaft sprocket support plate.

20. Mark the position of the caps and connecting rods relative to each other.

21. Lay the cylinder block on its side, then remove the connecting rod lower head bolts of cylinder No.1 and remove the cover. Using a hammer handle, tap the connecting rod and piston through the top of the block. Install the cover on the connecting rod, keeping the bearing shells in their main positions.

22. Repeat the procedure with the remaining pistons and connecting rods.

Material copied from this resource (OpelBook.ru)

23. The main bearing caps also need to be noted.

24. Turn the block over again, then remove the main bearing bolts and caps. Be careful to keep the bearing shells in their respective caps.


25. Lift the crankshaft out of the crankcase, remove the oil seal. If necessary, remove the oil pump/distributor drive sprockets and the drive chain, noting the installation orientation. Remove the woodruff key from the crankshaft groove.

26. Remove the upper halves of the main bearing shells from the crankcase and place them with their corresponding caps.


This article is available at russian, bulgarian, belarusian, ukrainian, serbian, croatian, romanian, polish, slovak, hungarian
Checking the article: Zinoviev Kirill

Share information:

Previous articles
Opel Omega A: Diesel engines
Next articles

Engine Auxiliaries — Removal
Engine disassembly — general description
Engine — removal
Engine Removal Method
Basic actions requiring engine removal
Basic actions possible with the engine in a car
Pallet — removal and installation with engine in car
Engine Mounting Brackets — Replacement
Cylinder head — removal and installation (engine in a car)
Valve clearances — checking and adjustment
Engine Components — Inspection and Refurbishment
Cylinder head — overhaul


See similar ones from other Opel car manuals:
▶ Engine — complete disassembly Opel Ascona C (1981-1988)
▶ Engine bay — 1.4L C 14 NZ engine Opel Astra F (1991-1998, petrol)
▶ Starting the engine from an auxiliary power source Opel Corsa B (1993-2000)
▶ Engine compartment fuse box Opel Insignia A (2008-2017)
▶ Engine hood Opel Kadett E (1984-1995)
Link to this page in different formats

Visitor comments


No comments yet


How much will 24 + 28 =


Omega B2 (1999-2003) 
  • General information
  • User manual
  • Maintenance
  • Troubleshooting
  • Power unit
  • Petrol 4-cylinder
  • Petrol 6-cylinder
  • Engine overhaul
  • Diesel engines 2.0 l
  • Diesel engines 2.5 l
  • Cooling and heating
  • Injection system (gasoline)
  • Fuel system (diesel)
  • Fuel system
  • Exhaust system
  • Ignition system
  • Transmission
  • Clutch
  • Mechanical gearbox
  • Automatic gearbox
  • Main gear and shafts
  • Chassis
  • Brake system
  • Car suspension
  • Steering
  • Body
  • Body elements
  • Electrical equipment
  • Equipment and devices
  • Electrical circuits
Omega B (1993-1999) 
  • General information
  • User manual
  • Tips for the car owner
  • Maintenance (gasoline)
  • Maintenance (diesel)
  • Power unit
  • Petrol engine SOHC 2.0 l
  • Petrol engine DOHC 2.0 l
  • Petrol engines 2.5 and 3.0 l
  • Repair of gasoline engines
  • Diesel engine 2.0 l
  • Diesel engine repair 2.0 l
  • Diesel engine 2.5 l
  • Cooling and heating
  • Power system (petrol)
  • Emission reduction
  • Fuel system (diesel 2.0 l)
  • Fuel system (diesel 2.5 l)
  • Launch system
  • Ignition system
  • Transmission
  • Clutch
  • Mechanical gearbox
  • Automatic gearbox
  • Drive shafts
  • Chassis
  • Brake system
  • Wheel suspension
  • Steering
  • Body
  • Exterior
  • Interior
  • Doors and windows
  • Electrical equipment
  • Equipment and devices
  • Wiring diagrams (early)
  • Wiring diagrams (late)
Omega A (1986-1993) 
  • General information
  • User manual
  • Maintenance
  • Changes and additions
  • Troubleshooting
  • Power unit
  • Gasoline engines
  • Diesel engines
  • Cooling system
  • Fuel system (gasoline)
  • Fuel system (diesel)
  • Ignition system
  • Transmission
  • Clutch
  • Mechanical gearbox
  • Automatic gearbox
  • Cardan shaft
  • Drive shafts
  • Chassis
  • Brake system
  • Car suspension
  • Steering
  • Body
  • Exterior
  • Interior
  • Electrical equipment
  • Power devices
  • Lighting and appliances
  • Electrical circuits
OpelBook.ru © 2017–2026 · Mobile version · · Sitemap: EN BG BY UA RS HR RO PL SK HU · Feedback · Site search
Astra F, petrol · Astra G, petrol · Astra G · Astra H · Astra J, petrol · Corsa B · Corsa C, petrol · Corsa C · Insignia A · Kadett D · Kadett E · Omega A · Omega B · Omega B2 · Vectra A, petrol · Vectra A · Vectra B, petrol · Vectra B · Vectra C · Zafira A, petrol · Frontera A, petrol · Frontera B · Ascona C · Vivaro A ·
We want your visit to be comfortable 🤝! We use cookies 🍪 to make that happen.