
Functional check
Note: On diesel models, too much depressing the brake pedal at low engine speeds (for example, at stops, traffic jams, etc.) leads to a decrease in the depth of discharge and a deterioration in brake control. This is not a malfunction - be careful.
2. Without starting the engine, depress the foot brake pedal several times. Check that there is no change in pedal back travel (distance between pedal and floor).
3. Keeping the pedal depressed, start the engine. If immediately after starting the pedal is noticeably «fails», therefore, the vacuum brake booster is working properly. Otherwise, on petrol models, disconnect the vacuum hose from the brake booster and, with the engine running, put your finger on the hose opening - check if a vacuum is created in the hose. On diesel models, disconnect the hose from the vacuum pump and check the vacuum at the pump connection.
4. If there is no vacuum, check the tightness of the hose and the quality of the tightening of all clamps, if necessary, replace the hose. At a service station, you can check the amount of vacuum created using a special device. If all indicators are normal and the hose is tight, replace the amplifier.
Removal and installation
5. Remove the fairing grille (see chapter 11) and brake master cylinder (see Section 12).
6. Disconnect the indicated on the resist. illustrations of brake lines and vacuum hose.
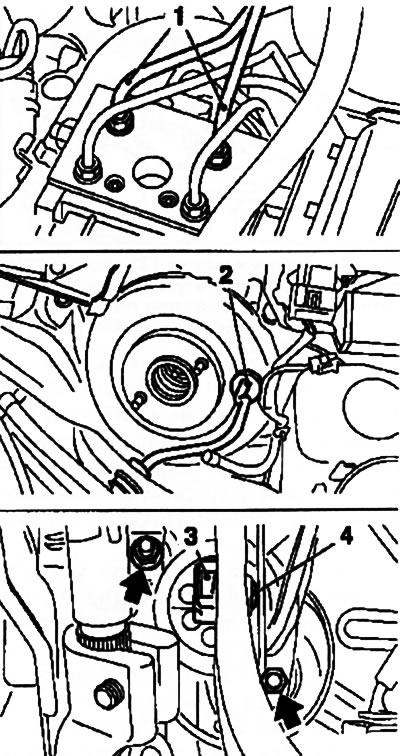
13.6. nuts (indicated by arrows) vacuum booster mounts: 1. Brake lines; 2. Vacuum hose; 3. Fixing plate; 4. GTZ rod axis
7. In the passenger compartment, remove the fixing plate and remove the axis of fastening of the GTZ rod to the brake pedal (see illustration 13.6).
8. Loosen 2 fixing nuts (see illustration 13.6) and remove the amplifier assembly from the cabin bulkhead. The amplifier cannot be repaired and must be replaced in case of failure.
9. Installation is carried out in the reverse order.
Visitor comments