
Attention: Bleed the brake system while wearing goggles. If brake fluid accidentally gets into your eyes, rinse immediately with plenty of water and seek medical attention!
1. Bleeding the hydraulic system is carried out in order to remove air from it that enters the path when servicing the brake mechanisms, replacing hydraulic lines or GTZ, as well as when lowering below the minimum allowable value of the liquid level in the master cylinder reservoir.
2. If air has entered the system due to a drop in the liquid level in the GTZ tank, or when the brake lines are disconnected from the GTZ, the brake mechanisms of all four wheels must be pumped. When disconnecting the lines from any of the calipers / wheel cylinders, it will be sufficient to pump only the brake circuit of the corresponding brake mechanism. If the brake line was disconnected from the fitting located between the GTZ and one of the brake mechanisms, only this part of the brake circuit is pumped.
Bleeding using a special kit
3. Models covered in this manual may be equipped with ABS. For high-quality and guaranteed pumping of the hydraulic drive, as well as for the clutch drive (see Chapter 6, Section 4), a special bleed kit must be used - carefully read the instructions for its use before starting work.
4. Depress the foot brake pedal several times with the engine off to release the residual vacuum in the vacuum brake booster.
5. Remove the brake fluid reservoir cap and replace it with an appropriate bleed adapter. Connect the second hose of the device to the bleed valve of the corresponding brake mechanism. Turn on the device and open the valve. Bleeding should be continued until the release of air bubbles from the brake path stops, then first close the valve, and then turn off the device. If necessary, repeat the procedure for the remaining brake mechanisms.
6. Upon completion of pumping, add fresh brake fluid to the GTZ reservoir, bringing its level back to normal. Never add used brake fluid to the reservoir - it is highly hygroscopic and absorbs a lot of moisture over time, which leads to a drop in its boiling point and, as a result, to a decrease in braking efficiency. In addition, the presence of moisture in the hydraulic system contributes to the accelerated aging of the material of flexible brake hoses.
7. Check up efficiency of functioning of brakes. Press the brake pedal with a force of approximately 20-30 kgf / cm2 and hold it down for about 10 seconds. The pedal should provide firm resistance - a feeling of softness of its stroke, as well as a gradual lowering of the pedal during the specified time indicates the presence of air in the hydraulic circuits and the need to repeat the pumping procedure.
8. Take a test drive on a low traffic road, make sure the brakes are working properly. To check the functioning of the ABS, accelerate the car to a speed of 40-50 km / h, fully depress the brake pedal and hold it in this position until the car comes to a complete stop - the car must maintain directional stability, the wheels must not block and go skidding. When the ABS is operating, pulsations of the brake pedal will be felt, and a characteristic noise will be heard in the engine compartment.
Attention: Before braking, make sure that there is no possibility of creating an emergency and interfering with other road users!
9. Check the brake system for leaks, if necessary, eliminate the cause, pump again and check the system.
Attention: Never start using the car without being absolutely sure that the brake system is working properly!
Pumping without using a special kit - assistance of an assistant is required
10. In cases where a bleeding kit is not available, if air enters the hydraulic path of the service brake drive, you can use the method below.
Attention: On models equipped with ABS, this method does not give a 100% guarantee of complete removal of air from the system - be especially careful when continuing to drive! If air enters the ABS pump unit, the system must only be bled using a special kit!
11. Before starting the procedure, check the level of brake fluid in the reservoir and, if necessary, bring it to the mark «MAX».
Note: Don't forget to regularly check the liquid level in the pumping inlet reservoir. An excessive drop in the level is fraught with air entering the GTZ, which will nullify all the efforts made and entail the need to pump the entire brake system.
12. Enlist the help of an assistant, prepare a supply of fresh brake fluid, a transparent container partially filled with brake fluid, a piece of plastic hose that fits tightly over the bleed valve, and a suitable open-end / ring wrench to release / tighten the valve.
13. Remove the dust cap and slightly loosen the bleed valve (see resist. illustration) brake mechanism of the left front wheel, then re-tighten it so that it is easily and quickly released during the procedure.
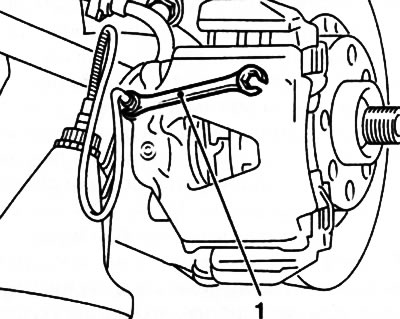
3.13. With a wrench (1) loosen the bleed valve on the brake caliper
Note: It is recommended to apply a rust remover to the valves an hour before the start of the bleeding procedure!
14. Pull a suitable plastic or rubber hose over the valve. To prevent air from entering the brake path, the second (free) the end of the hose must be immersed in a container of brake fluid (see resist. illustration). The end of the hose must be completely immersed in the liquid, and the liquid container must be higher than the bleed valve.
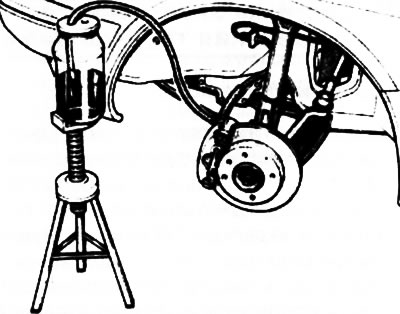
3.14. Make sure that the other end of the hose connected to the bleeder valve is completely immersed in the brake fluid poured into a transparent receiving vessel
15. Ask an assistant to slowly squeeze the foot brake pedal several times, thereby raising the pressure in the system.
16. With the brake pedal fixed in the lower position, slightly open the bleed valve so that brake fluid begins to be forced out of it. Watch for fluid exiting the hose. After a couple of seconds, when the pressure weakens, close the valve and allow the assistant to release the pedal.
17. Repeat the procedures of the last two paragraphs until fluid free of air bubbles begins to flow from the valve, then go to the brake mechanism of the right front wheel. Proceeding in a similar manner, pump this mechanism, then the mechanisms of the left rear and, finally, the right rear wheels.
Attention: Always make sure that the liquid level in the GTZ reservoir does not fall too low, if necessary, make the appropriate adjustment!
18. Upon completion of work, check the performance of the brake system (see paragraphs 6-9).
Visitor comments