
Note: See your dealer for advice before grinding valves or lapping valve seats. This is necessary in order to strengthen the valve seats for the use of unleaded gasoline.
Warning: Exhaust valves fitted to models with 20 XEJ and C20XE engines (with two overhead cams), contain sodium to improve their heat transfer. Sodium is a highly reactive metal that can ignite or explode on contact with water (or with water vapor in the air).
Inspection
1. Remember that the cylinder head is cast from a soft alloy and can be easily damaged by a scraper or wire brush when cleaning carbon deposits. The stems and valve guides must also be cleaned of carbon deposits. Flush the combustion chambers and channels with kerosene and clean the surface of the cylinder head.
2. If the engine is installed in a vehicle, clean the top of the pistons and cylinder walls. If the pistons have not been removed from the block, care must be taken to ensure that carbon particles do not get on the cylinder walls. They can scratch them or cause damage to pistons and rings. To ensure this doesn't happen, first crank the crankshaft so that two of the pistons are at the top, they are bored. Cover the two cylinder bores with cloth or paper and adhesive tape. The cooling channels must also be closed with small pieces of adhesive tape, otherwise carbon particles that have entered the cooling system can damage the water pump.
3. Apply grease to the gap between the cylinder walls and the pistons. Using a blunt scraper, carefully scrape off carbon deposits from the piston head, do not scratch the aluminum walls. Also clean the carbon deposits from the protrusion of the cylinder wall. Once all carbon has been removed, carefully clean off any grease that will be contaminated with carbon particles. To prevent the formation of deposits, the piston head can be polished. Remove the cloth or adhesive tape from the other two cylinders, turn the crankshaft so that these two pistons are now at the top. Place a cloth or duct tape over the exposed cylinders, which are already free of carbon, and continue as previously described.
4. Check the condition of the valve heads, especially the exhaust valves. Also inspect the valve seating surfaces. If there is slight pitting on the valve and seat, it can be removed by lapping the seat and valve with a special paste.
5. If there is severe pitting on the valve seats, grind them down and install new valves. It is best to contact your local dealer or machine builder for this work. In practice, it is very rare for saddles to wear out much. The most common wear is on valves, so it's easier to buy a new set of valves and lap them into the seats.
Recovery
6. Grinding of valves is performed as follows. Apply a coarse paste to the contact surface of the valve seat, place a grinding tool with a suction cup on the valve head. Sand the valve head in a semi-rotary motion, rubbing it against the seat, lifting the valve from time to time to redistribute the grinding paste. When a matte smooth surface appears on the seat and on the valve itself, wipe off the paste and repeat the same process with fine paste. If a weak spring is placed under the valve head, this will greatly facilitate the work. When the surfaces become an even light gray color, grinding can be completed. Carefully clean the seats and valves of the grinding paste, do not leave the paste in the channels or in the guide bushings. Wipe the valves and seats with a cloth soaked in kerosene, then with a clean cloth and finally blow them out with compressed air.
7. Check that the valve springs are not damaged. If any of them are broken, all springs should be replaced. Check the height of the springs in a free, uncompressed state compared to new ones. If some springs are shorter than new ones, replace all springs. The metal of the springs wears out over time and it is recommended to replace them even if they look serviceable.
8. The cylinder head must be checked for deformation by placing it on a piece of glass or using a straight edge and feeler gauge. If you are in doubt about the condition, or if the surface of the block shows signs of corrosion, it must be re-sanded.
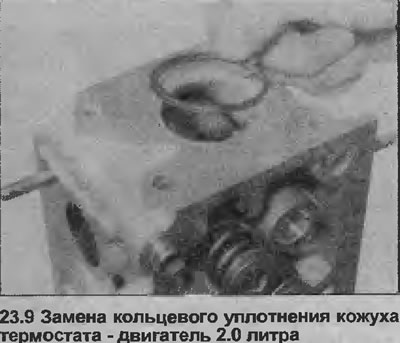
9. On models with 1.8 and 2.0 liter engines, always replace the O-ring between the cylinder head and thermostat housing (see illustration). From Chapter 21 it can be seen that a significant amount of work must be done to replace the O-ring with the head installed.
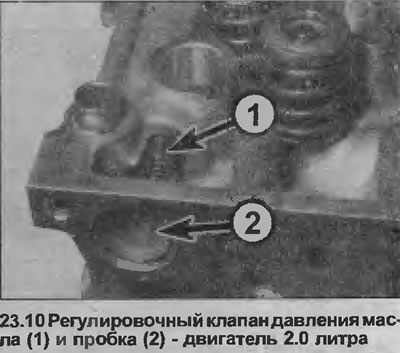
10. If the cylinder head oil pressure control valve needs to be replaced, it can be accessed through a round plug covering the end of the valve (see illustration). After removing the old valve, install a new one and tighten the plug. Due to the complexity of this step, it is probably best to have the valve replaced by an Opel dealer.
Visitor comments