
OpelBook.ru
Cars AvtoVAZ Cars Mitsubishi Cars BMW Cars Mercedes Cars Nissan Cars Toyota Cars Chevrolet
English Русский
Български
Беларускі
Український
Српски
Hrvatski
Română
Polski
Slovenský
Magyar
 |  Sitemap  |  Contacts  |    


Main Astra Corsa Insignia Kadett Omega Vectra Zafira Others Articles
Vectra A (1988-1995, petrol) Vectra A (1988-1995) Vectra B (1995-2002, petrol) Vectra B (1995-2002) Vectra C (2002-2008)
  • Main
  • Vectra
  • Vectra A
  • Power unit
  • SOHC engine
  • Hydraulic valve lifters — inspection

Hydraulic valve lifters — inspection (Opel Vectra A)

            0

Inspection


1. On engines with high mileage or on which maintenance has not been performed regularly (especially oil change), there is a possibility that the valve lifters are dirty inside. In the best case, this can result in increased noise and wear. To reduce the possibility of problems during engine operation, it is recommended to disassemble and clean the hydraulic lifters every time the cylinder head is overhauled. Please note that replacement parts for the lifters are not available, and if any of the components are unserviceable, the entire assembly must be replaced (see illustration).
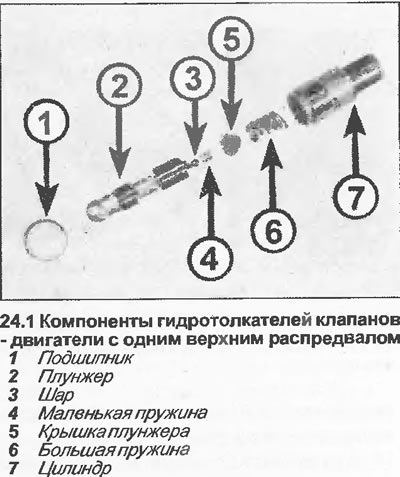
1. On engines with high mileage or on which maintenance has not been performed regularly…


2. After removing and disassembling the cylinder head as described in Chapters 21 and 23, first inspect the tappet seats in the head. If there is excessive wear, the head must be replaced. Also check that the tappet oil holes in the head are not clogged.

3. Starting with valve tappet #1, carefully remove the bearing from the top of the tappet cylinder. It may be possible to remove it by hand, but be careful not to distort the bearing.

4. Remove the plunger from the cylinder and remove the spring.

5. Using a small screwdriver, carefully remove the cap from the plunger base. Remove the spring and ball from under the cap, making sure not to lose them.


(Text copied from this portal OPELBOOK)

6. Carefully clean all components with kerosene or solvent, paying special attention to the treated surfaces of the cylinder (inside) and the piston (outside). Dry all components thoroughly with a thick (lint-free) cloth. Carefully inspect the springs for damage or deformation. If the springs are in poor condition, the pushrod must be replaced.

7. Lubricate the components with clean engine oil, then assemble the lifters as follows.

8. Turn the plunger over and insert the ball into the hole in the base of the plunger (see illustration).
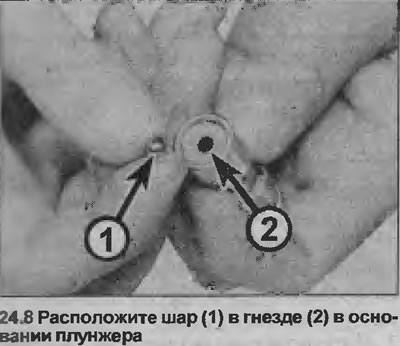
8. Turn the plunger over and insert the ball into the hole in the base of the plunger (see…


9. Install the smaller spring into the seat in the plunger cap, then carefully install the cap with the spring, making sure that the spring rests against the ball. Gently crimp the flange of the cap around the perimeter, using a small screwdriver if necessary, until the flange is securely seated in the groove in the base of the plunger (see illustrations).
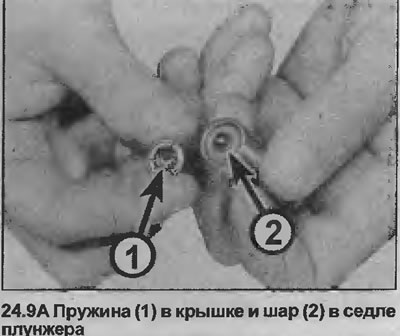
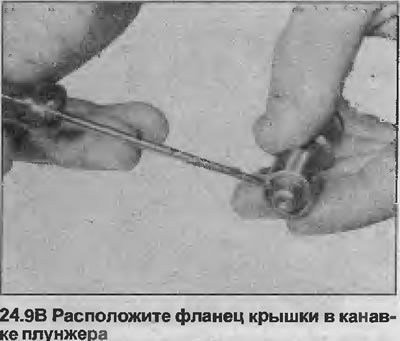
9. Install the smaller spring into the seat in the plunger cap, then carefully install the cap with…


9. Install the smaller spring into the seat in the plunger cap, then carefully install the cap with…


10. Install the large spring (correctly oriented) in the plunger cap, insert the plunger assembly with spring into the cylinder (see illustrations).
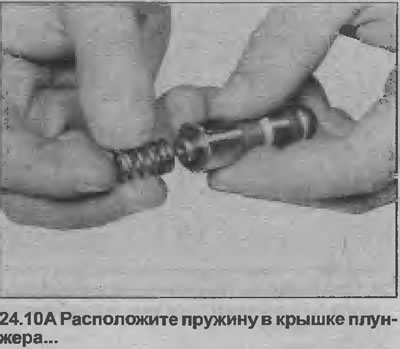
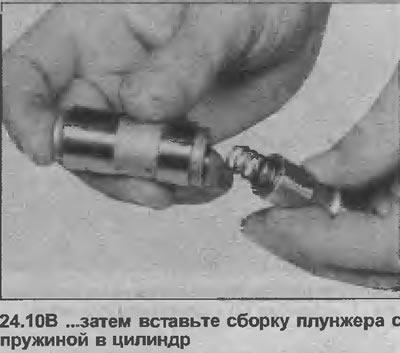

10. Install the large spring (correctly oriented) in the plunger cap, insert the plunger assembly…


10. Install the large spring (correctly oriented) in the plunger cap, insert the plunger assembly…


11. Place the bearing on the top of the plunger, gently squeeze the plunger with your hands until the bearing is securely locked into the groove of the cylinder (see illustration).
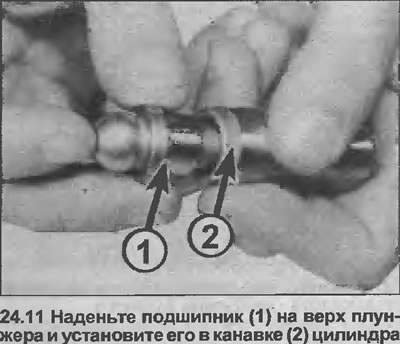
11. Place the bearing on the top of the plunger, gently squeeze the plunger with your hands until…


12. Repeat the above procedure with the remaining valve lifters.


This article is available at russian, bulgarian, belarusian, ukrainian, serbian, croatian, romanian, polish, slovak, hungarian
Checking the article: Chernov Alexander

Share information:

Previous articles
Opel Vectra A: SOHC engine
Next articles

Cylinder head — inspection and restoration
Cylinder head — disassembly and assembly
Cylinder head — removal and installation (engine removed)
Cylinder head — removal and installation (engine in a car)
Camshafts, repair dimensions for models C16NZ2, 1.8 and 2.0 liters — general description
Camshaft housing and camshaft — disassembly, inspection and assembly
Flywheel — removal, inspection and installation
Drive Disc (Automatic Transmission) — Removal and Installation
Front Crankshaft Oil Seal — Replacement
Rear Crankshaft Oil Seal — Replacement
Pallet — removal and installation
Oil pump — removal and installation


See similar ones from other Opel car manuals:
▶ Hydraulic valve lifters — replacement Opel Zafira A (1999-2005, petrol)
▶ Removal and installation of camshafts and valve lifters,… Opel Astra H (2004-2009)
▶ Pressure regulator valve in the hydraulic circuits of the… Opel Corsa B (1993-2000)
▶ Pushers and hydraulic lifters Opel Omega B (1993-1999)
▶ Hydraulic valve clearance compensators Opel Frontera B (1998-2004)
Link to this page in different formats

Visitor comments


No comments yet


How much will 25 + 31 =


Vectra C (2002-2008) 
  • General information
  • User manual
  • Vehicle device
  • Maintenance
  • Troubleshooting
  • Power unit
  • Engine repair
  • Cooling system
  • Power and control system
  • Engine electrics
  • Transmission
  • Clutch
  • Car gearbox
  • Drive shafts
  • Chassis
  • Car suspension
  • Steering
  • Brake system
  • Body
  • Exterior
  • Interior
  • Doors, locks and windows
  • Heating and ventilation
  • Electrical equipment
  • Equipment and devices
  • Headlights and lighting
  • Electrical circuits
Vectra B (1995-2002) 
  • General information
  • User manual
  • Weekly checks
  • Maintenance (gasoline)
  • Maintenance (diesel)
  • Troubleshooting
  • Power unit
  • SOHC gasoline engine
  • DOHC petrol engine
  • Diesel engine 1.7 liter
  • Diesel engine 2.0 liters
  • Engine repair
  • Cooling system
  • Fuel system (gasoline)
  • Fuel system (diesel)
  • Charging system
  • Launch system
  • Ignition and preheat
  • Transmission
  • Clutch
  • Mechanical gearbox
  • Automatic gearbox
  • Drive shafts
  • Chassis
  • Brake system
  • Wheel suspension
  • Steering
  • Body
  • Exterior
  • Interior
  • Doors and windows
  • Heating and ventilation
  • Electrical equipment
  • Equipment and devices
  • Electrical circuits
Vectra B (1995-2002, petrol) 
  • General information
  • Maintenance
  • Help with malfunctions
  • Power unit
  • Engine repair
  • Exhaust system
  • Cooling system
  • Fuel system
  • Multec injection system
  • Four point injection
  • Transmission
  • Clutch
  • Gearbox and drive
  • Chassis
  • Wheel suspension
  • Steering
  • Brake system
  • Wheels and tires
  • Body
  • Exterior
  • Interior
  • Electrical equipment
  • Fuses and electronics
  • Power devices
  • Ignition system
  • Lighting and signaling
  • Equipment and devices
  • Heating and ventilation
  • Electrical circuits
Vectra A (1988-1995) 
  • Power unit
  • Engine repair
  • Ignition system
  • Lubrication system
  • Cooling system
  • Injection system
  • Fuel system (carburetor)
  • Fuel system (diesel)
  • Exhaust system
  • Transmission
  • Clutch
  • Car gearbox
  • Chassis
  • Front suspension
  • Rear suspension
  • Steering
  • Brake system
  • Wheels and tires
  • Body
  • Exterior
  • Interior
  • Electrical equipment
  • Electrical circuits
Vectra A (1988-1995, petrol) 
  • General information
  • User manual
  • Maintenance
  • Power unit
  • SOHC engine
  • DOHC engine
  • Cooling and ventilation
  • Fuel system (carburetor)
  • Fuel system (injector)
  • Exhaust converter
  • Transmission
  • Clutch
  • Mechanical gearbox
  • Automatic gearbox
  • Drive shafts
  • Chassis
  • Brake system
  • Car suspension
  • Steering
  • Body
  • Body elements
  • Electrical equipment
  • Power devices
  • Equipment and devices
  • Electrical circuits
OpelBook.ru © 2017–2026 · Mobile version · · Sitemap: EN BG BY UA RS HR RO PL SK HU · Feedback · Site search
Astra F, petrol · Astra G, petrol · Astra G · Astra H · Astra J, petrol · Corsa B · Corsa C, petrol · Corsa C · Insignia A · Kadett D · Kadett E · Omega A · Omega B · Omega B2 · Vectra A, petrol · Vectra A · Vectra B, petrol · Vectra B · Vectra C · Zafira A, petrol · Frontera A, petrol · Frontera B · Ascona C · Vivaro A ·
We want your visit to be comfortable 🤝! We use cookies 🍪 to make that happen.