
Inspection.
1. It is recommended, if necessary, to inspect the brake shoes by removing the drums. This will allow for a proper inspection of the chocks and also the wheel cylinders can be inspected for leaks. However, if desired, you can inspect the condition of the rear shoe pads by removing the plug from the inspection hole in the rear brake plate (Pic. 9.21).
2. Use a flashlight and mirror to check that the friction material has not worn below the specified minimum. If this is the case, then the shoes need to be replaced.
Replacement.
3. Raise the rear of the car and remove the rear wheels (see Section 3). Block the front wheels by placing something under them. Release the handbrake completely.
4. Remove the drum mounting screw and remove the drum. If the drum sits tightly on the hub, then tap it with a plastic hammer. If the drum is scratched due to wear, the cam adjusters may have to be retracted before the drum can be removed and the shoes removed from the grooves. Before starting disassembly, sketch out the location of the shoes and how the pads are installed in relation to the driving and driven ends.
5. Disconnect the upper shoe return spring using pliers.
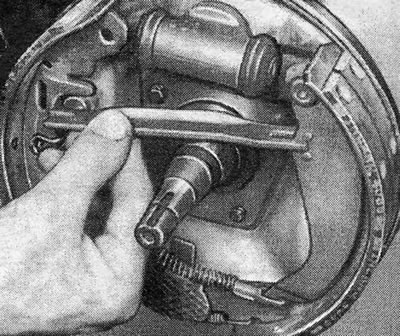
6. Remove the shoe circlips. These rings are a type of ring where the ends must be squeezed to release the ring from the rear brake plate.
7. Separate the shoes until they can be removed from their mounting location below.
8. Unhook the lower return spring of the shoe and remove the strut located between the shoes (Pic. 9.24).
9. Disconnect the end of the handbrake cable from the lever on the brake shoe and remove the shoes. Do not press the brake pedal while the shoes are removed.
10. GM still supplies friction pads to install on the original shoes. This involves drilling out the old rivets to remove worn pads and using the new rivets supplied with the shoe pads. Riveting should be done from the center outwards. Pads are supplied in 5.0mm thickness (0.197 inches) for normal use and 5.6mm thick (0.220 inch) for cases where the drums have been processed (see also Section 14).
11. With all that being said, it is still recommended to use new or factory refinished shoes as replacement parts rather than attempting to fix them yourself.
12. Before installing new shoes, clean off all dirt and powder without inhaling it.
13. Any signs of oil contamination on the rear brake shoes indicate a leak in the hydraulic cylinder (Section 12) or that the hub seal is faulty (Section 10). Fix leaks immediately and replace shoes.
14. Lightly lubricate the adjusting cams and the top shoe contact points on the rear brake plate with a high melting point grease.
15. Lay out the shoes on the workbench, making sure they are positioned correctly in relation to the handbrake lever and the driving and driven ends of the shoe pad (photo).
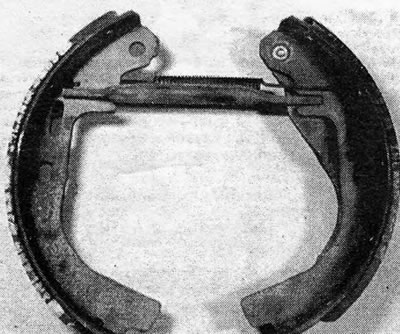
Photo 9.15 Rear brake shoes, ready for installation.
16. Install the lower return spring.
17. Pull your shoes (outward) and install their lower ends in place, and then attach the handbrake cable.
18. Install the strut and upper return spring.
19. Install new spring rings.
20. Install the brake drum.
21. Adjust the shoes as indicated in Section 8.
22. Install the road wheel.
23. Repeat these operations on the opposite brake, as the shoes must be replaced as a set (four shoes). Upon completion, adjust the handbrake if necessary (Section 26).
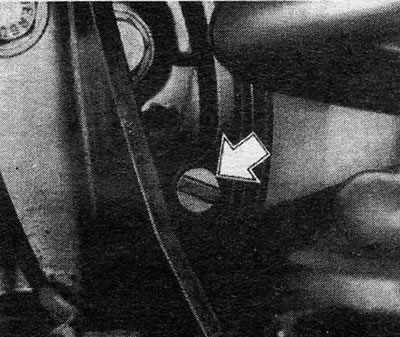
Pic. 9.21. Inspection hole plug in the rear plate - indicated by arrow
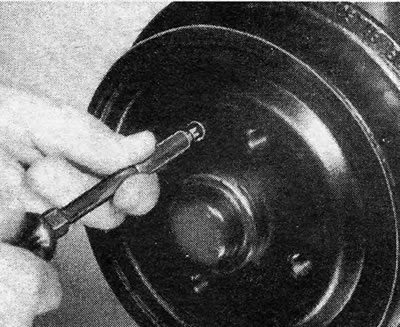
Pic. 9.22. Removing the brake drum mounting screw
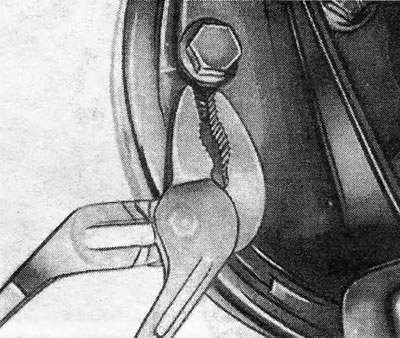
Pic. 9.23. Shoe spring compression
Pic. 9.24. Removing the brake shoe strut
Visitor comments