
OpelBook.ru
Cars AvtoVAZ Cars Mitsubishi Cars BMW Cars Mercedes Cars Nissan Cars Toyota Cars Chevrolet
English Русский
Български
Беларускі
Український
Српски
Hrvatski
Română
Polski
Slovenský
Magyar
 |  Sitemap  |  Contacts  |    


Main Astra Corsa Insignia Kadett Omega Vectra Zafira Others Articles
Frontera A (1991-1998, petrol) Frontera B (1998-2004) Ascona C (1981-1988) Vivaro A (2001-2014)
  • Main
  • Opel
  • Ascona C
  • Chassis
  • Brake system
  • Master Brake Cylinder — Removal and Installation

Master Brake Cylinder — Removal and Installation (Opel Ascona C)

            0

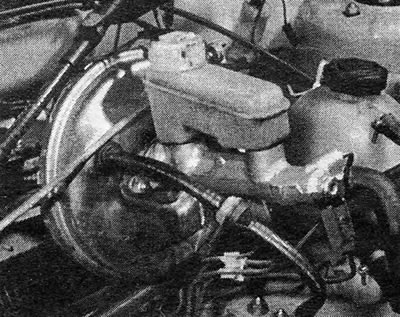
1. Unscrew the cap from the fluid reservoir and set it aside along with the float and level warning switch (photo).

Photo 15.1 Master cylinder and vacuum servo unit (models before 1985)

Photo 15.1 Master cylinder and vacuum servo unit (models before 1985)


2. Pump out as much liquid as possible from the tank using an old (clean) hydrometer or something similar.

3. Remove the cable holder from the master cylinder body (where is it).

4. Disconnect the fluid pipes from the master cylinder by unscrewing the couplings.

5. Two pressure regulating valves are screwed into the master cylinder and now need to be unscrewed.

Article posted on an online resource: opelbook.ru

6. Unscrew the master cylinder from the brake vacuum servo unit (booster) (photo).
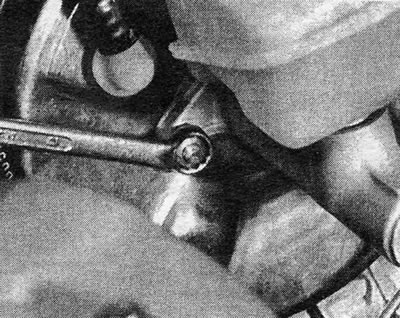
Photo 15.6 Unscrewing the master cylinder from the servo unit (models after 1985)

Photo 15.6 Unscrewing the master cylinder from the servo unit (models after 1985)


7. If disassembly was performed for the purpose of replacing the master cylinder, save the fluid reservoir for installation on the new cylinder. To remove the reservoir from ATE type master cylinders, simply pull it off the rubber seals. For GMF type master cylinders, the retaining spring rings must first be pushed back using a screwdriver.

8. Assembly is carried out in reverse order; use new rubber seals and tighten all bolts to the specified torque value.

9. Bleed the hydraulic system as described in Section 20.


This article is available at russian, bulgarian, belarusian, ukrainian, serbian, croatian, romanian, polish, slovak, hungarian
Checking the article: Kornev Georgy

Share information:

Previous articles
Opel Ascona C: Brake system
Next articles

Brake Drum — Inspection and Renewal
Rear Brake Plate — Removal and Installation
Rear Brake Cylinder — Removal, Inspection and Installation
Self-adjusting rear brakes — inspection and replacement
Self-adjusting rear brakes — description
Rear Brake Shoes (Pre-1984 Models) — Inspect and Replace
Master Cylinder (ATE Type) — Inspection and Repair
Master Cylinder (GNF Type) — Inspection
Pressure Regulating Valves
Flexible Hoses and Rigid Tubes — Inspection and Replacement
Hydraulic system — blowing
Vacuum Servo Hose — Replacement


See similar ones from other Opel car manuals:
▶ Master Brake Cylinder — Removal, Repair and Installation Opel Astra F (1991-1998, petrol)
▶ Master brake cylinder Opel Corsa C (2000-2006, petrol)
▶ Replacing the master brake cylinder Opel Insignia A (2008-2017)
▶ Removal and installation the brake master cylinder Opel Kadett E (1984-1995)
▶ Master Brake Cylinder — Removal and Installation Opel Omega B (1993-1999)
Link to this page in different formats

Visitor comments


No comments yet


How much will 16 + 13 =


Vivaro A (2001-2014) 
  • General information
  • User manual
  • Power unit
  • Petrol engine F4R
  • Diesel engine F9Q
  • Diesel engine G9U
  • Transmission
  • Clutch and drive shafts
  • Manual gearbox
  • Chassis
  • Front suspension
  • Rear suspension
  • Brake system
  • Body
  • Exterior
  • Interior
  • Electrical equipment
  • Heating and ventilation
  • Air conditioner
  • Equipment and devices
  • Electrical diagrams
Ascona C (1981-1988) 
  • General information
  • Maintenance
  • Power unit
  • Gasoline engines
  • Diesel engines
  • Cooling system
  • Fuel and exhaust system
  • Contact ignition system
  • Contactless ignition system
  • Transmission
  • Clutch
  • Mechanical gearbox
  • Automatic gearbox
  • Drive shafts
  • Chassis
  • Steering
  • Brake system
  • Car suspension
  • Body
  • Exterior
  • Interior
  • Doors and windows
  • Electrical equipment
  • Equipment and devices
  • Power devices
  • Electrical circuits
Frontera B (1998-2004) 
  • General information
  • User manual
  • Maintenance
  • Power unit
  • Petrol engines 2.2 l
  • Petrol engines 3.2 l
  • Diesel engines 2.2 l
  • Cooling system
  • Fuel system (petrol)
  • Fuel system (diesel)
  • Ignition system
  • Transmission
  • Clutch
  • Manual gearbox MUA5C
  • Automatic gearbox 4L30E
  • Chassis
  • Suspension and axles
  • Steering
  • Brake system
  • Body
  • Exterior
  • Interior
  • Doors, locks and windows
  • Heating and air conditioning
  • Electrical equipment
  • Power devices
  • Equipment and devices
  • Lighting and signaling
  • Electrical diagrams
Frontera A (1991-1998, petrol) 
  • General information
  • Introduction to guide
  • User manual
  • Maintenance
  • Power unit
  • Engine repair
  • Lubrication system
  • Cooling system
  • Power and exhaust system
  • Engine electrics
  • Transmission
  • Clutch
  • Mechanical gearbox
  • Cardan shafts
  • Chassis
  • Brake system
  • Front suspension
  • Rear suspension
  • Steering
  • Body
  • Repair and care
  • Electrical equipment
  • Equipment and devices
  • Electrical circuits
OpelBook.ru © 2017–2026 · Mobile version · · Sitemap: EN BG BY UA RS HR RO PL SK HU · Feedback · Site search
Astra F, petrol · Astra G, petrol · Astra G · Astra H · Astra J, petrol · Corsa B · Corsa C, petrol · Corsa C · Insignia A · Kadett D · Kadett E · Omega A · Omega B · Omega B2 · Vectra A, petrol · Vectra A · Vectra B, petrol · Vectra B · Vectra C · Zafira A, petrol · Frontera A, petrol · Frontera B · Ascona C · Vivaro A ·
We want your visit to be comfortable 🤝! We use cookies 🍪 to make that happen.