
Removing
1. Where applicable, remove the caps, then loosen the rear wheel bolts. Block the front wheels, jack up and support the rear of the vehicle on axle stands. Remove the wheel.
2. Remove the brake pads as described in chapter 5.
3. Working in the engine compartment, remove the brake fluid reservoir cap and cover the filler neck with a piece of polyethylene, securing it with a rubber band or reinstalling the cap. This will reduce fluid loss during the next procedure.
4. Turn off a nut of a coupling of a brake tube from a back part of a support and disconnect a tube. Be careful not to deform the tube. Be prepared for fluid to come out and plug open holes to prevent dirt from entering and further loss of fluid.
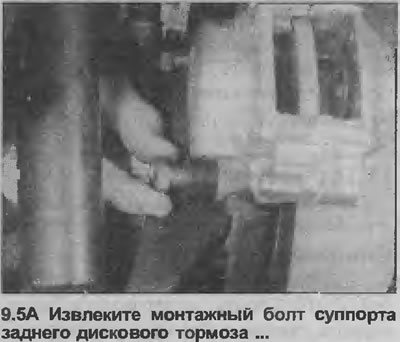
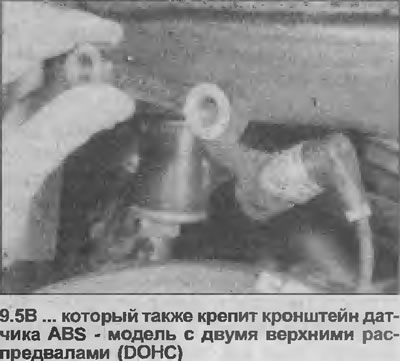
5. Unscrew the two mounting bolts and remove the caliper, remembering that on models with two overhead camshafts (DOHC) the caliper mounting bolts also attach the ABS sensor bracket (see illustrations).
Bulkhead
6. If it is not necessary to disassemble the caliper, go to step 20.
7. Clean off the dirt and dust from the caliper, being careful not to inhale particles that have risen into the air.
8. Never try to separate the two halves of the caliper.
9. Use a screwdriver to pry off the mounting brackets from the piston dust seals, then carefully remove the dust seals themselves in the same way.
10. Secure one of the pistons with a clamp. By forcing air into the brake hose port at the rear of the caliper housing, e.g. with a foot pump (air pressure should be low), drive the piston out of the hole. Be careful not to drop the piston - this may damage it.
11. Cover the caliper hole using a flat die or something similar. Then remove the clamp from the remaining piston and sometimes expel the piston in the same way
12. Carefully remove the seals from the grooves in the caliper channels using a plastic or wooden tool.
13. Inspect the pistons and caliper bore walls for scratches or other damage. If damage is found, replace the caliper assembly.
14. If the pistons and passages are in good condition, discard the seals and purchase a repair kit containing all necessary parts. Buy also a tube of special paste for brake cylinders.
15. Clean the piston and cylinder bore with brake fluid or methyl alcohol.
16. Apply a small amount of brake cylinder paste to the pistons, cylinder walls and piston seals.
17. Begin assembly by installing the seals in the caliper channels.
18. Install dust seals in the piston bores. Carefully insert the pistons into the channels and push them partially inward. The pistons may need to be rotated appropriately to allow them to move in the bore.
19. Insert dust seals into the edges of the caliper channels and install the mounting brackets.
Installation
20. Install the caliper and tighten the fastening bolts with the tightening force specified specifications (be sure to install the ABS sensor bracket where applicable).
21. Connect a brake tube to a support and tighten a connecting nut.
22. Install the brake pads as described in chapter 5.
23. Remove the polyethylene from the filler neck of the replenishment tank and bleed the corresponding hydraulic line as described in Chapter 3.
24. Install the wheel and lower the vehicle to the ground. Do not fully tighten the wheel bolts until the vehicle is lowered onto the wheels.
Visitor comments